Dreamy Room Level 69
Level 69 guide walkthrough, helping players solve puzzles and explore the wonderful world of Dreamy Room.
Dreamy Room Level 69 Walkthrough Guide
Dreamy Room Level 69 Room Story
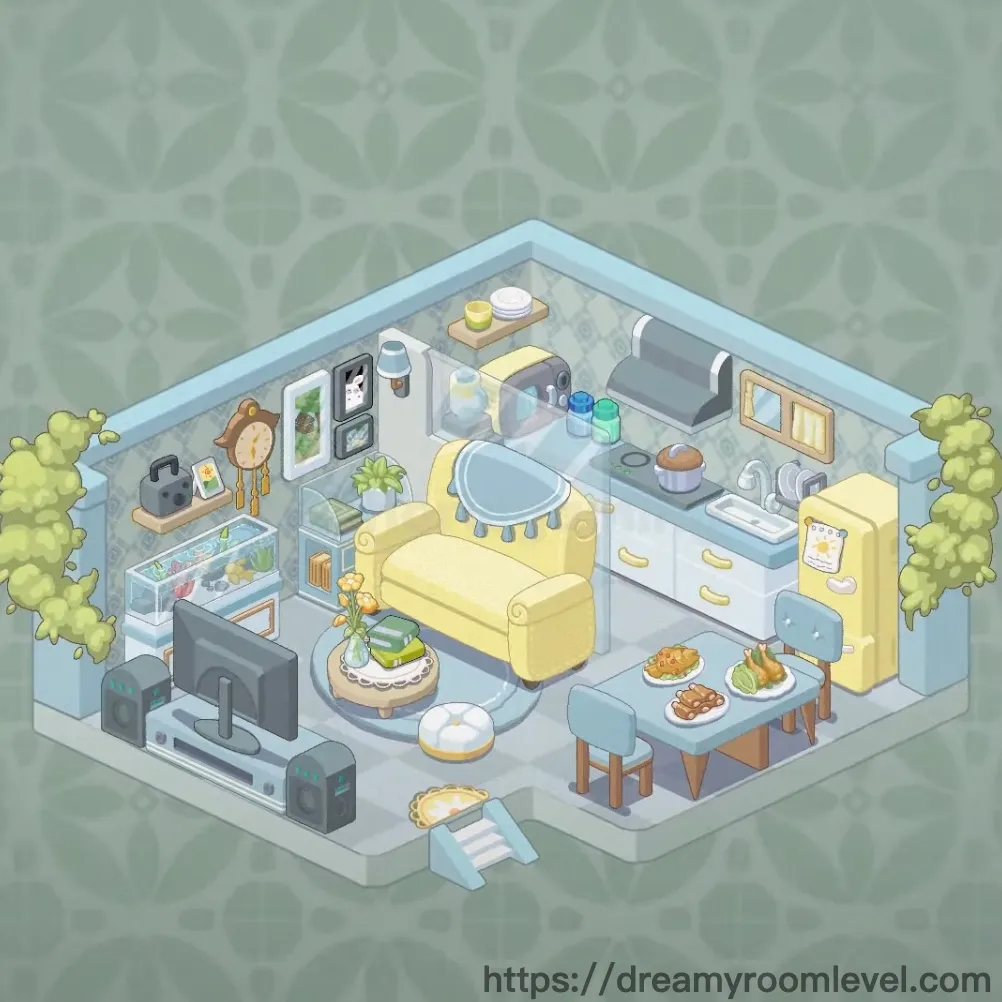
Emma's cozy studio apartment reflects her love for simple living and mindful design. The soft yellow sofa catches afternoon sunlight streaming through the window, while potted plants breathe life into every corner. Her kitchen counter displays fresh fruits and homemade waffles, ready for weekend brunch. The thoughtful layout of Dreamy Room Level 69 creates a harmonious flow between cooking, dining, and relaxing spaces, making this compact home feel surprisingly spacious and welcoming.
Dreamy Room Level 69: Step-by-Step Placement Guide
Step 1. Position the Yellow Sofa
Place the yellow sofa in the center-left area of the room, facing toward the entertainment area. This creates the main seating zone in Dreamy Room Level 69. Align it parallel to the bottom wall, leaving enough space for the coffee table in front.
Step 2. Add Blue Cushion to Sofa
Position the blue cushion on the right armrest of the yellow sofa. This decorative element adds a pop of color and completes the cozy seating arrangement.
Step 3. Place Round Coffee Table
Set the round coffee table directly in front of the yellow sofa, centered between the sofa and TV area. This creates a functional surface for drinks and snacks in the living zone.
Step 4. Position White Ottoman
Place the white ottoman on the floor near the coffee table, slightly to the right. This versatile piece serves as extra seating or a footrest, completing the living room setup.
Step 5. Install Television and TV Stand
Position the TV stand against the left wall, then place the television centered on top of it. Following Dreamy Room Level 69 layout principles, ensure it faces the sofa for optimal viewing.
Step 6. Set Up Left and Right Speakers
Place the speaker left on the floor to the left of the TV stand, and position the speaker right on the right side. These create a balanced audio setup for the entertainment area.
Step 7. Position Dining Table
Place the dining table in the lower right area of the room, near the kitchen counter. This light blue table creates a dedicated dining space essential for Dreamy Room Level 69 completion.
Step 8. Arrange Blue Dining Chairs
Position blue dining chair on the left side of the dining table, and place the blue dining chair 2 on the right side. Both should face inward toward the table, creating a welcoming dining arrangement.
Step 9. Install Kitchen Counter and Cabinets
Position the kitchen counter along the right wall, extending from the back corner forward. This L-shaped counter includes lower cabinets with yellow drawer handles, forming the main kitchen workspace.
Step 10. Place Yellow Refrigerator
Set the yellow refrigerator at the end of the kitchen counter, near the dining area. This bright appliance adds both functionality and visual appeal to the kitchen zone.
Step 11. Install Sink and Range Hood
Position the sink in the kitchen counter near the back wall, then install the range hood directly above it on the wall. This creates the primary food preparation area in Dreamy Room Level 69.
Step 12. Add Pot on Stove
Place the pot on stove on the cooktop area next to the sink. This gray pot with lid adds realistic detail to the cooking zone.
Step 13. Position Coffee Machine
Set the coffee machine on the kitchen counter near the back wall, to the left of the sink area. This essential appliance completes the beverage station.
Step 14. Hang Wall Shelf
Mount the wall shelf on the left wall above the TV stand area. This wooden shelf provides display space for decorative items and storage.
Step 15. Place Decorative Items on Shelf
Arrange the decorative items on shelf including small containers and ornaments on the mounted wall shelf. These items add personality to the entertainment area.
Step 16. Hang Wall Clock
Mount the wall clock on the left wall above the shelf, positioned centrally. This functional timepiece adds both utility and visual interest to Dreamy Room Level 69.
Step 17. Install Mirror
Hang the mirror on the back wall near the kitchen area, above the counter workspace. This round mirror helps brighten the space and adds depth.
Step 18. Hang Wall Frames
Position wall frame 1 on the left wall near the shelf, wall frame 2 below it, and wall frame 3 on the back wall. These framed pictures personalize the living space according to Dreamy Room Level 69 design.
Step 19. Add Floor Plants
Place floor plant left in the back left corner near the window, and position floor plant right in the front right corner near the entrance. These large potted plants frame the room beautifully.
Step 20. Position Potted Plants
Set potted plant 1 on the wall shelf, potted plant 2 on the kitchen counter, and potted plant 3 on the dining table. These smaller plants add greenery throughout the space.
Step 21. Place Round Rug
Position the round rug beneath the coffee table in the living area, centered between the sofa and TV. This circular rug with yellow trim defines the seating zone in Dreamy Room Level 69.
Step 22. Add Vase with Flowers
Place the vase with flowers on the round coffee table. This fresh floral arrangement adds natural beauty and color to the living area.
Step 23. Install Window
Position the window on the back wall near the kitchen area. This wooden-framed window allows natural light to illuminate the cooking space.
Step 24. Arrange Kitchen Utensils
Place the kitchen utensils on the counter near the sink area. These cooking tools should be easily accessible for food preparation.
Step 25. Add Cutting Board
Position the cutting board on the kitchen counter workspace near the sink. This wooden board is essential for meal preparation tasks.
Step 26. Place Wooden Tray
Set the wooden tray on the kitchen counter near the back wall, holding small cups and containers. This tray organizes beverage items neatly.
Step 27. Arrange Yellow and White Cups
Position the cup yellow and cup white on the wooden tray on the kitchen counter. These cups complete the beverage station setup in Dreamy Room Level 69.
Step 28. Place Blue and Green Jars
Set the jar blue and jar green on the kitchen counter near the cooking area. These colorful storage containers add functional decoration.
Step 29. Position Storage Jars
Place storage jar 1 and storage jar 2 on the kitchen counter near the wall. These containers provide organized storage for dry goods.
Step 30. Hang Towel
Hang the towel on the front of the kitchen counter or nearby cabinet. This white towel should be easily accessible for kitchen tasks.
Step 31. Display Fruit Bowl
Place the fruit bowl on the dining table. This bowl serves as both decoration and functional fruit storage, essential for completing Dreamy Room Level 69.
Step 32. Add Watermelon and Oranges
Position the watermelon on the dining table next to the fruit bowl, and arrange the orange fruits nearby. This fresh produce creates an inviting dining display.
Step 33. Arrange Plates with Food
Place plate 1 and plate 2 on the dining table, with the waffle displayed on one plate. This brunch setup completes the dining area.
Step 34. Position Bread Basket
Set the bread basket on the dining table near the plates. This woven basket holds bread and adds rustic charm to the meal presentation.
Step 35. Place Entrance Steps
Position the entrance steps at the front center of the room, creating the entry point. These light blue steps complete the studio apartment layout in Dreamy Room Level 69.
Tips and Tricks
Common Mistakes to Avoid
- Don't overlook the small decorative items on the wall shelf, as they're essential for completing Dreamy Room Level 69
- Avoid placing the floor plants too close to the walls, they need slight spacing to appear natural
- The kitchen utensils and cutting board can be hidden behind larger counter items, check carefully
- Don't confuse the two blue dining chairs, they must be positioned on opposite sides of the table
- The storage jars near the back wall are easily missed, ensure all counter items are placed
Placement Strategies
- Start with large furniture first (sofa, dining table, kitchen counter) to establish the room layout
- The round rug has a specific snap point beneath the coffee table, drag slowly to find it
- When placing counter items, work from back to front to avoid overlapping issues
- Small plants have precise positions, use the zoom feature if placement feels difficult
- The entrance steps must be placed last, as they're positioned at the room's front edge
- Kitchen items cluster tightly, place larger items first then fill in smaller jars and cups around them