Dreamy Room Level 72
Level 72 guide walkthrough, helping players solve puzzles and explore the wonderful world of Dreamy Room.
Dreamy Room Level 72 Walkthrough Guide
Dreamy Room Level 72 Room Story
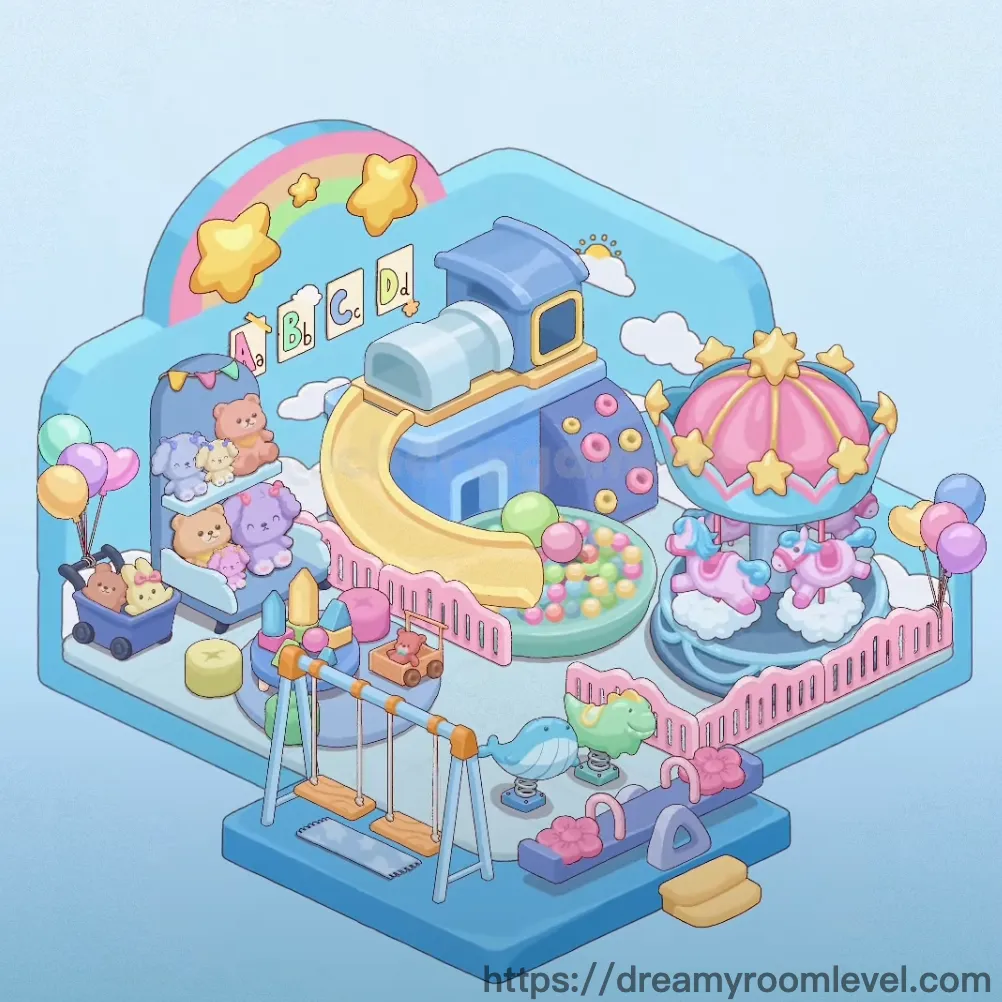
Welcome to this enchanting nursery playground where childhood dreams come alive. Little Emma's parents created this magical space filled with carousel rides, rainbow arches, and cuddly companions. Every corner sparkles with joy, from the cheerful toy train to the soft teddy bears waiting for playtime adventures in Dreamy Room Level 72.
Dreamy Room Level 72: Step-by-Step Placement Guide
Step 1. Place Rainbow and Sky Decorations
Position the rainbow at the upper left corner of the room, creating a beautiful arc across the sky backdrop. Add the sun near the rainbow's peak with radiating golden rays. Scatter multiple cloud elements throughout the upper background area. Place star decorations around the rainbow arc and near the clouds. These celestial elements establish the dreamy atmosphere for Dreamy Room Level 72.
Step 2. Set Up Base Platform in Dreamy Room Level 72
Drag the base platform to the center of the room floor, creating the foundation for all playground equipment. This hexagonal blue platform serves as the main play area. Ensure it's centered and level, as all other elements will be arranged on or around this base in Dreamy Room Level 72.
Step 3. Install Toy Train with Components
Place the toy train at the back-center of the platform, featuring blue and yellow colors. Attach the train chimney on top of the engine. Add the train window to the front cabin. Position the train track beneath the train. This cheerful locomotive becomes a focal point in Dreamy Room Level 72.
Step 4. Attach Yellow Slide to Train
Connect the yellow slide to the right side of the toy train, creating a fun exit path. The slide should curve downward smoothly from the train platform to the base floor. Ensure proper alignment so children can safely slide down in this Dreamy Room Level 72 playground design.
Step 5. Position Carousel in Dreamy Room Level 72
Place the carousel on the right side of the platform. Install the carousel pole as the central support structure. Attach the carousel top featuring pink and yellow decorations with star ornaments. Add the carousel horse seats around the pole. This rotating attraction adds magical charm to Dreamy Room Level 72.
Step 6. Create Ball Pit Area
Set up the ball pit in the lower center area, using a mint-green circular container. Fill it with colorful balls in pink, yellow, blue, and green. This soft play zone provides safe entertainment and sensory stimulation for Dreamy Room Level 72 visitors.
Step 7. Install Swing Set Structure
Position the swing set frame on the left side of the platform with silver metal poles. Hang the swing seat from the crossbar using sturdy chains. The swing should have enough clearance for safe movement in Dreamy Room Level 72.
Step 8. Arrange Baby Carriage with Teddy Bears in Dreamy Room Level 72
Place the baby carriage on the left front area with purple fabric. Inside and around the carriage, arrange the teddy bear brown, teddy bear purple, teddy bear pink, and teddy bear beige. These cuddly companions create a cozy corner in Dreamy Room Level 72.
Step 9. Display Alphabet Blocks
Stack the educational blocks prominently: alphabet block A, alphabet block B, alphabet block C, and alphabet block D behind the toy train. These colorful learning tools add educational value to Dreamy Room Level 72.
Step 10. Add Balloon Decorations in Dreamy Room Level 72
Attach the balloon bunch left to the left rear corner with strings in pastel colors. Place the balloon bunch right on the right side near the carousel. Connect each bunch with balloon string. These floating decorations enhance the festive atmosphere of Dreamy Room Level 72.
Step 11. Position Baby High Chair
Place the baby high chair on the left side near the swing area, featuring a mint-green seat and table tray. This practical furniture piece adds functionality for feeding time in Dreamy Room Level 72.
Step 12. Arrange Building Blocks Set in Dreamy Room Level 72
Scatter the building blocks near the ball pit area. Specifically place the pink building block, yellow building block, and blue building block in an accessible arrangement. These construction toys encourage creative play in Dreamy Room Level 72.
Step 13. Position Green Rocking Horse
Place the green rocking horse in the lower right corner with spring-mounted base. This classic toy adds nostalgic charm and provides gentle rocking motion entertainment for Dreamy Room Level 72.
Step 14. Arrange Baby Care Items in Dreamy Room Level 72
Position the baby bottle near the high chair with blue and yellow colors. Place the pink pacifier and blue pacifier nearby. These essential care items ensure practical functionality in Dreamy Room Level 72.
Step 15. Install Baby Mobile
Hang the baby mobile above the play area with dangling colorful elements. This rotating decoration provides visual stimulation and soothing movement throughout Dreamy Room Level 72.
Step 16. Add Toy Drum and Rattle in Dreamy Room Level 72
Place the toy drum on the floor near the front area with red and blue colors. Position the rattle nearby with orange and blue segments. These musical toys add auditory play elements to Dreamy Room Level 72.
Step 17. Position Stuffed Lamb
Place the stuffed lamb near the rocking horse in the lower section with soft white fur. This cuddly friend adds warmth and comfort to the Dreamy Room Level 72 environment.
Step 18. Arrange Toy Blocks Set in Dreamy Room Level 72
Position the toy blocks set near the building blocks area with various shapes and colors. These additional construction pieces expand creative possibilities in Dreamy Room Level 72.
Step 19. Place Triangle Toy
Position the triangle toy near the lower left area with geometric design. This educational shape toy supports early learning concepts in Dreamy Room Level 72.
Step 20. Install Pink Safety Fence in Dreamy Room Level 72
Attach the pink safety fence around the perimeter of the platform with horizontal rails. This protective barrier ensures child safety while maintaining the cheerful aesthetic of Dreamy Room Level 72.
Step 21. Add Fence Railing Details
Install the fence railing sections connecting the pink safety fence segments. These rails create a complete protective boundary around the play area in Dreamy Room Level 72.
Step 22. Place Yellow Floor Mat in Dreamy Room Level 72
Spread the yellow floor mat on the base platform surface, providing a soft cushioned play area. This safety mat adds comfort and prevents slips throughout Dreamy Room Level 72.
Step 23. Add Final Star Decorations
Place additional star decoration elements around the carousel top and rainbow arc. These twinkling accents complete the magical celestial theme of Dreamy Room Level 72, creating a perfectly enchanting nursery playground.
Tips and Tricks
Common Mistakes
- The carousel components must be assembled in correct order: pole first, then horses, finally the decorative top, or they won't align properly in Dreamy Room Level 72
- Ball pit placement requires centering before adding colorful balls, otherwise balls may scatter incorrectly across the platform
- Alphabet blocks need specific stacking sequence (A-B-C-D from bottom to top) for proper display behind the train
- Rainbow and sky elements must be placed before ground items to avoid layering conflicts in the background
- Safety fence sections require precise alignment with platform edges to create seamless protective boundary
Pro Tips
- Start with the base platform and toy train, as these anchor points guide placement of all surrounding elements in Dreamy Room Level 72
- Use the rainbow arc as a visual guide for positioning upper decorative elements like clouds and stars
- Carousel installation works best when placing the central pole first, then attaching horses radially before adding the decorative top
- Group similar small items together (teddy bears, building blocks, baby care items) for efficient placement in Dreamy Room Level 72
- The yellow slide connects more easily when positioned at a 45-degree angle from the train platform to the base floor
- Balloon bunches attach better when placed in corners, using the wall edges as natural anchor points for string alignment