Dreamy Room Level 6
Level 6 guide walkthrough, helping players solve puzzles and explore the wonderful world of Dreamy Room.
Dreamy Room Level 6 Walkthrough Guide
Dreamy Room Level 6 Room Story
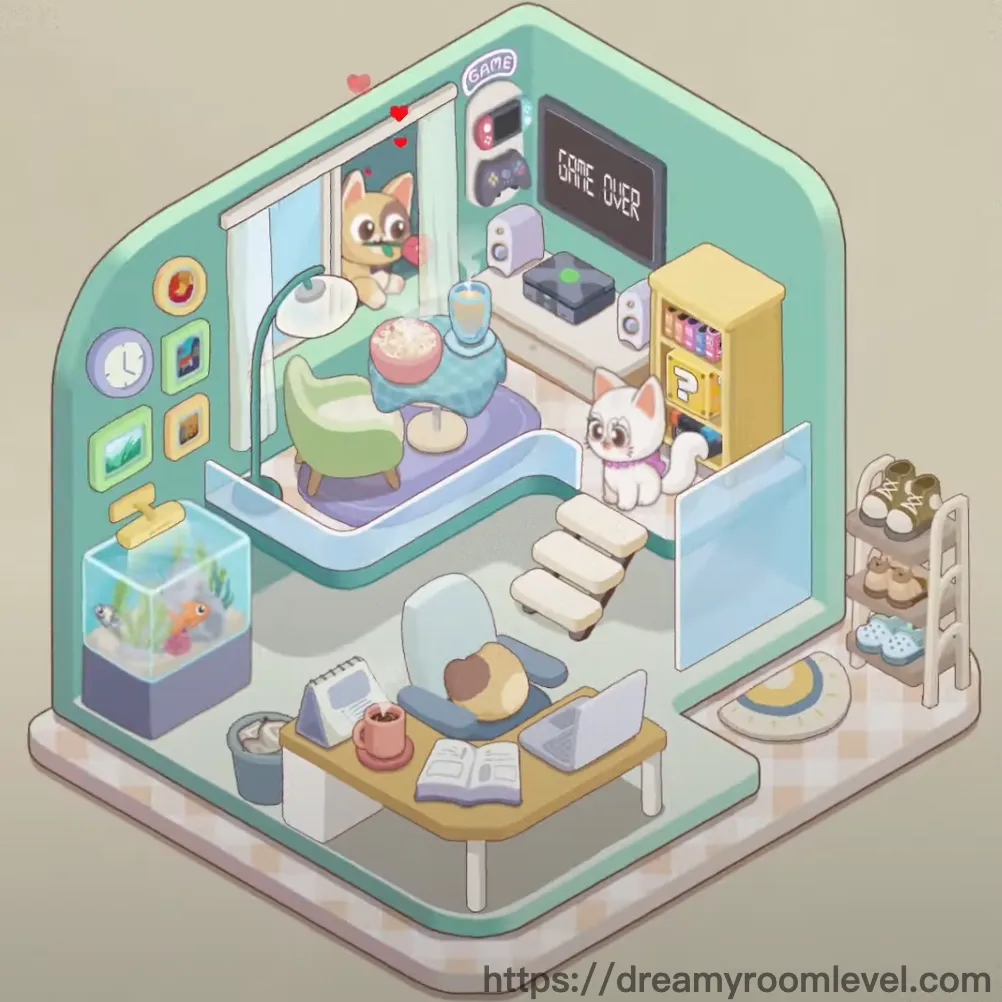
In this cozy multi-level gaming sanctuary, a creative soul has crafted their perfect retreat where work meets play. The soft green walls embrace a space where two adorable cats - one white, one brown - have claimed their territories among the carefully arranged gaming setup and comfortable seating areas. Sunlight filters through the glass partitions, illuminating a world where technology harmoniously blends with homey touches like potted plants and warm lighting. This Dreamy Room Level 6 represents the ultimate modern creative space, where inspiration flows as freely as the multi-tiered layout suggests endless possibilities for both productivity and relaxation.
Dreamy Room Level 6 Step-by-Step Placement Guide
Step 1. Install Green Walls as Foundation
Position the green walls to form the main structural boundaries of your multi-level space. These soft mint-colored walls should create the L-shaped layout visible in Dreamy Room Level 6, with the main wall forming the back boundary and the side wall creating the separation for the upper level. The walls need to be placed first as they define all subsequent furniture placement areas and provide the essential backdrop for this cozy gaming studio.
Step 2. Lay Down Checkered Floor Pattern
Install the checkered floor throughout both levels of your space, ensuring the cream and beige pattern aligns properly across all areas. This flooring should extend from the lower workspace area up to the upper relaxation zone, creating visual continuity in Dreamy Room Level 6. Position the tiles so that the pattern flows naturally around the stair placement area and maintains consistent alignment with the wall edges.
Step 3. Build Stairs for Level Connection
Construct the stairs in the central area between the two levels, positioning them to create easy access from the lower work zone to the upper lounge area. The white steps should be angled to face toward the right side of the room, allowing smooth traffic flow in Dreamy Room Level 6. Ensure the stairway placement leaves adequate space for furniture arrangement on both levels while maintaining the room's open feel.
Step 4. Install Blue Glass Partition for Space Division
Mount the blue glass partition vertically to create elegant separation between different functional zones. Position this translucent divider to the right side of the stairs, where it can provide privacy for the lower workspace while maintaining visual connection to the upper level. The glass should be oriented to catch natural light and create the airy atmosphere essential to Dreamy Room Level 6's design philosophy.
Step 5. Position Yellow Bookshelf in Dreamy Room Level 6
Place the yellow bookshelf against the right wall in the upper level area, ensuring it sits flush against the green wall surface. This bright storage unit should be positioned to display books and decorative items while remaining easily accessible from the seating area. The bookshelf's sunny color provides a cheerful contrast to the green walls and serves as a focal point for the upper relaxation zone.
Step 6. Arrange Purple Sofa for Upper Level Comfort
Install the purple sofa in the upper level lounge area, positioning it to face toward the stairs for optimal social interaction. Place this comfortable seating perpendicular to the yellow bookshelf, creating an inviting conversation nook in Dreamy Room Level 6. The sofa should sit far enough from the stairs to allow easy passage while close enough to the bookshelf for convenient access to reading materials.
Step 7. Add Green Chair to Upper Seating Area
Position the green chair adjacent to the purple sofa in the upper level, creating additional seating that complements the room's color scheme. This accent chair should face slightly toward the center of the room, encouraging conversation while providing a perfect reading spot near the bookshelf. The green upholstery echoes the wall color, creating visual harmony throughout Dreamy Room Level 6.
Step 8. Install Purple Bathtub in Lower Level Area in Dreamy Room Level 6
Place the purple bathtub in the lower level near the glass partition, creating a unique spa-like element within the workspace. Position the tub so its curved edge faces away from the main traffic areas while remaining visually accessible through the glass divider. This unexpected luxury feature adds personality and relaxation potential to the creative studio environment.
Step 9. Position Pink Chair Near Workspace
Set the pink chair in the lower level area, placing it near the workspace zone to provide additional seating for collaborative projects. The chair should be angled to face both the main work area and the stairs, following Dreamy Room Level 6's emphasis on flexible, multi-functional furniture placement. Its soft pink color adds warmth and femininity to balance the technological elements.
Step 10. Install Blue Office Chair at Primary Workstation
Position the blue office chair at the main desk area in the lower level, ensuring proper ergonomic placement for extended work sessions. The chair should face toward the back wall where the main computer setup will be located, providing comfortable access to all work tools in Dreamy Room Level 6. Roll the chair to the optimal distance from the desk edge for keyboard and mouse usage.
Step 11. Place Wooden Table as Central Work Surface in Dreamy Room Level 6
Install the wooden table in the lower level as the primary work surface, positioning it perpendicular to the blue glass partition. The natural wood finish should face toward the blue office chair, creating the main productivity zone for this creative studio. Ensure adequate legroom underneath while leaving space on the table surface for laptop, books, and other work materials that define this workspace.
Step 12. Set Up Laptop on Work Surface
Place the laptop on the wooden table at an angle that allows comfortable viewing from the blue office chair. Position the device toward the back edge of the table, leaving front space for mouse movement and note-taking in Dreamy Room Level 6. The laptop screen should face slightly toward the center of the room for easy viewing while maintaining privacy from other seating areas.
Step 13. Install Game Console in Entertainment Area
Mount the game console on the yellow bookshelf in the upper level, placing it at a height that allows easy access to controls and proper ventilation. The console should sit securely on one of the middle shelves, positioned for optimal cable management to the display screen in Dreamy Room Level 6. Ensure adequate clearance above and around the unit for heat dissipation during extended gaming sessions.
Step 14. Mount Projector for Entertainment Display in Dreamy Room Level 6
Install the projector in the upper level area, positioning it to project toward the main viewing area near the purple sofa. Mount the device at the appropriate height and angle to create clear, large-scale displays for gaming or movie watching. The projector placement should minimize shadows from people moving in the seating area while providing optimal image quality for entertainment in this creative studio.
Step 15. Position Purple Speakers for Audio System
Place the purple speakers strategically in the upper level to create immersive sound throughout both floors of Dreamy Room Level 6. Position one speaker near the gaming area and another to provide balanced audio coverage for both work and relaxation zones. The purple color should complement the sofa while the placement ensures optimal acoustics for music, gaming, and video content.
Step 16. Connect Game Controller to Gaming Setup
Position the game controller within easy reach of the upper level seating area, placing it on the bookshelf or nearby surface for convenient access. The controller should be stored where it won't be damaged but remains immediately available for gaming sessions in Dreamy Room Level 6. Consider cable length and wireless range when determining the optimal placement for comfortable gaming from the sofa.
Step 17. Install Display Screen for Visual Output in Dreamy Room Level 6
Mount the display screen at the optimal viewing height in the upper level, positioned to be easily seen from both the purple sofa and green chair. The screen should be angled slightly downward to reduce glare while providing clear visibility for gaming, movies, or presentations. Ensure the mounting height accommodates viewers of different heights while maintaining the room's aesthetic balance.
Step 18. Welcome White Cat to Upper Level
Allow the white cat to claim its favorite spot in the upper level near the comfortable seating area. Cats naturally gravitate toward cozy, elevated spaces, so this adorable feline friend will likely choose a spot on or near the purple sofa in Dreamy Room Level 6. Ensure the cat's presence adds to the homey atmosphere while keeping it away from delicate electronics and fragile decorative items.
Step 19. Position Brown Cat in Lower Workspace
Let the brown cat establish its territory in the lower level workspace, where it can supervise daily activities while staying close to its human companion. This friendly feline typically prefers spots near the work area where it can observe and interact without disrupting productivity in Dreamy Room Level 6. The cat's presence brings warmth and companionship to the creative studio environment.
Step 20. Install Fish Tank for Aquatic Ambiance in Dreamy Room Level 6
Place the fish tank in a stable location within the lower level, positioning it where it can be enjoyed from the work area while remaining safe from accidental bumps. The aquarium should sit on a sturdy surface away from electronics, providing calming aquatic views that enhance the peaceful atmosphere. The gentle movement of fish adds natural tranquility to the high-tech workspace environment.
Step 21. Mount Clock for Time Management
Install the clock on the green wall in a location visible from both levels, ensuring easy time checking during work and relaxation periods. Position the timepiece at eye level when seated, following Dreamy Room Level 6's emphasis on functional yet decorative elements. The clock's placement should complement other wall decorations while serving its practical purpose for productivity and time management.
Step 22. Add Potted Plant for Natural Elements
Place the potted plant in a location that receives adequate light while adding greenery to the space. Position this living decoration near the glass partition or window area where it can thrive while softening the room's technological elements in Dreamy Room Level 6. The plant's natural beauty provides a refreshing contrast to the electronic devices while improving air quality in the creative studio.
Step 23. Position Flower Pot for Additional Greenery in Dreamy Room Level 6
Set the flower pot in a complementary location to the potted plant, creating a natural garden feel within the indoor space. Choose a spot that balances the plant life throughout both levels while ensuring adequate care access. The flowering plant adds color and fragrance to enhance the sensory experience of working and relaxing in this thoughtfully designed environment.
Step 24. Place Coffee Cup on Work Surface
Position the coffee cup on the wooden table within easy reach of the blue office chair, creating a realistic workspace setup for productivity sessions. The cup should sit on the table surface away from electronic devices to prevent spills in Dreamy Room Level 6. This personal touch adds authenticity to the workspace while suggesting the comfort and convenience of having refreshments nearby during long work sessions.
Step 25. Add Drink Glass for Hydration Station
Place the drink glass in the upper level near the comfortable seating area, ensuring easy access during relaxation and entertainment time. Position the glass on a stable surface where it won't be easily knocked over but remains convenient for the leisure activities in Dreamy Room Level 6. The presence of beverages in both work and relaxation areas emphasizes the room's live-in comfort and practical design.
Step 26. Arrange Books for Reference Library in Dreamy Room Level 6
Organize the books on the yellow bookshelf in an aesthetically pleasing yet functional arrangement, mixing vertical and horizontal stacking for visual interest. Group related topics together while ensuring frequently used references remain easily accessible from the seating area. The book collection should reflect the creative and intellectual nature of activities in this studio space.
Step 27. Position Storage Box for Organization
Place the storage box in a convenient location that maximizes organization while maintaining the room's clean aesthetic. The container should be positioned where it can hold frequently used items without cluttering the visible workspace in Dreamy Room Level 6. Consider placing it near the desk area or under the stairs to utilize space efficiently while keeping necessary supplies within reach.
Step 28. Add Small Decorative Box for Personal Items
Set the small decorative box on the bookshelf or desk area to hold small personal treasures and keepsakes. This charming container should be positioned where it contributes to the room's personality while serving its storage function in Dreamy Room Level 6. The decorative aspect adds visual interest while the practical function helps maintain organization in the creative studio space.
Step 29. Place Trash Can for Cleanliness in Dreamy Room Level 6
Position the trash can in the lower level near the workspace, placing it within easy reach but not prominently visible to maintain the room's aesthetic appeal. The waste container should be accessible from the main work area while remaining discreet enough not to detract from the carefully curated environment. Proper waste management ensures the studio maintains its inspiring and clean atmosphere.
Step 30. Install Desk Lamp for Task Lighting
Mount or position the desk lamp on or near the wooden table to provide focused illumination for detailed work tasks. The lamp should be adjustable to direct light exactly where needed while complementing the room's overall lighting scheme in Dreamy Room Level 6. Quality task lighting reduces eye strain during extended work sessions while adding functional elegance to the workspace design.
Step 31. Arrange Decorative Items for Personal Touch
Distribute the decorative items throughout both levels to add personality and visual interest to the space. These personal accessories should be placed on shelves, tables, and other surfaces where they enhance the room's character without interfering with daily activities in Dreamy Room Level 6. The decorative elements should reflect the owner's interests while contributing to the overall cohesive design aesthetic.
Step 32. Install Controller Stand for Gaming Organization in Dreamy Room Level 6
Position the controller stand near the gaming setup in the upper level, creating an organized storage solution for gaming accessories. The stand should be placed within easy reach of the seating area while maintaining a tidy appearance when controllers are not in use. This organizational tool demonstrates attention to detail and helps maintain the studio's clean, professional appearance.
Step 33. Add Small Rug for Comfort and Style
Place the small rug in a strategic location that adds warmth and comfort to the floor space while defining specific activity areas. Consider positioning it near the seating area in the upper level or under the workspace in the lower level to create visual boundaries in Dreamy Room Level 6. The rug should complement the room's color scheme while providing additional comfort and acoustic benefits to complete this cozy creative studio.
Tips and Considerations
Important Considerations
- Watch for the narrow spaces between levels where small decorative items can easily be missed or placed incorrectly, particularly around the stair area where items might fall through gaps
- Be careful with the purple bathtub placement as it can obstruct access to other items if positioned too close to the glass partition or workspace furniture
- Pay attention to the multi-level layout complexity which can make it difficult to see items that need to be placed on the lower level when focusing on upper level arrangements
- Notice that the glass partition can create visual confusion when trying to place items behind it, requiring careful depth perception during the dragging process
- Remember that both cats are mobile elements that might need to be repositioned if they block access to other placement areas during room completion
Practical Tips
- Use the stairs as a visual reference point when placing items on either level, as they serve as the central landmark for navigation in this complex layout
- Approach the glass partition from the correct angle to avoid items snapping to the wrong side, particularly when placing items that need to go behind the translucent barrier
- Start with larger furniture pieces on each level before adding smaller decorative items to establish clear placement zones and avoid overcrowding
- Take advantage of the bookshelf's multiple levels by placing items from bottom to top to maintain stability and visual balance throughout the arrangement process
- Utilize the natural "zones" created by the room's layout - upper relaxation area, lower workspace, and transitional stair area - to guide logical item placement sequences
- Master the precise positioning required for small items near electronic equipment by zooming in closely and using slow, controlled dragging motions for accuracy in Dreamy Room Level 6