Dreamy Room Level 89
Level 89 guide walkthrough, helping players solve puzzles and explore the wonderful world of Dreamy Room.
Dreamy Room Level 89 Walkthrough Guide
Dreamy Room Level 89 Room Story
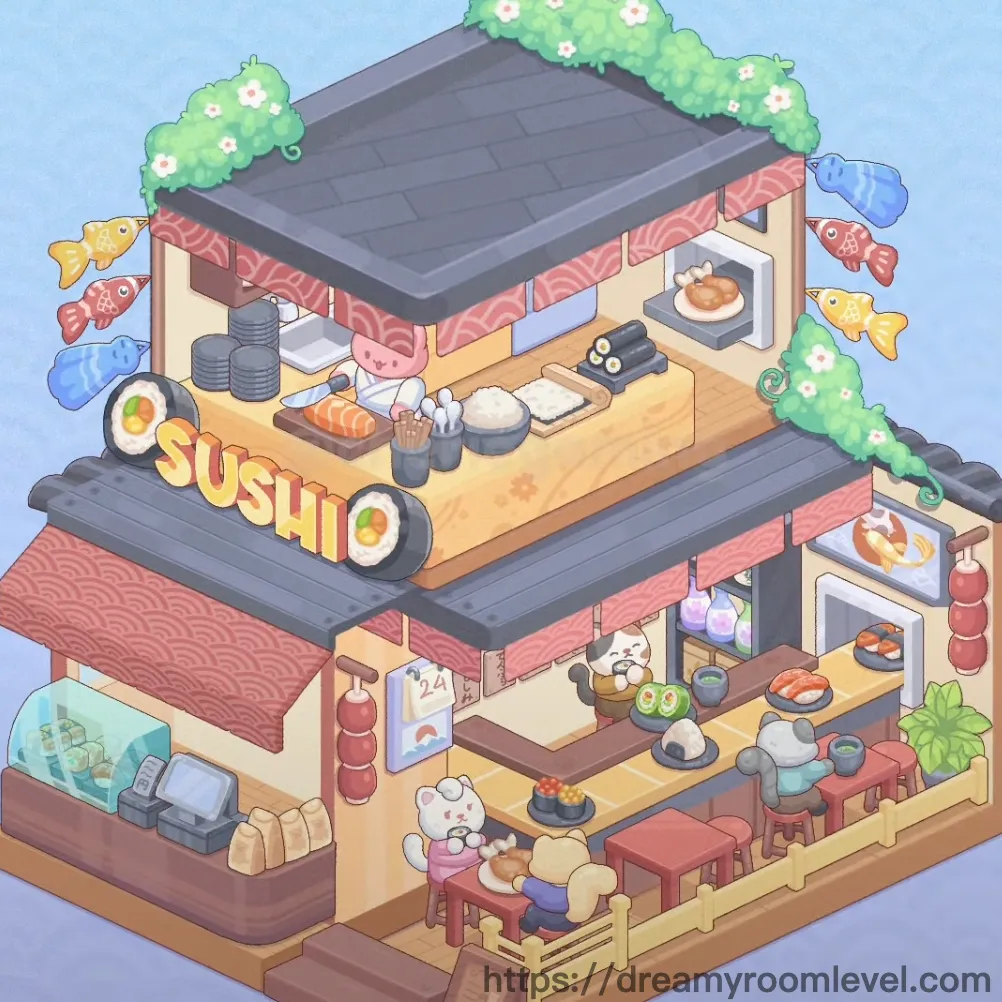
In the heart of a bustling neighborhood stands Mochi's Sushi Haven, a charming two-story establishment where tradition meets warmth. The pink cat chef, Mochi, pours her heart into every roll, while loyal customers like the gentle white bear gather around red-cushioned seats. Hanging lanterns cast a golden glow over fresh salmon and tuna, as decorative koi fish seem to swim through the air. This cozy corner of Dreamy Room Level 89 isn't just a restaurant—it's where culinary dreams come alive, one perfectly crafted sushi piece at a time.
Dreamy Room Level 89: Step-by-Step Placement Guide
Step 1. Install the Wooden Floor Foundation
Position the wooden floor as the base layer covering the entire first level. This forms the essential foundation for Dreamy Room Level 89, providing the warm wooden texture that defines the restaurant's cozy atmosphere.
Step 2. Construct Main Walls and Structural Elements
Place the wall panels to form the restaurant's outer structure on both floors. Install the door and doorway at the front entrance, then add the window on the left wall. Position the stairs connecting the first and second floors in the center-left area.
Step 3. Add the Roof Structure and Garden in Dreamy Room Level 89
Install the roof on top of the second floor, then create the roof garden area on the rooftop. Place the awning and red awning over the sushi bar section to provide shade and authentic Japanese restaurant aesthetics.
Step 4. Set Up the Dining Table and Seating Area
Position the dining table in the lower right section of the first floor. Arrange multiple chairs and red chairs around the table, then place stools near the counter areas for additional seating options according to Dreamy Room Level 89 layout requirements.
Step 5. Install the Main Counter and Bar Counter
Place the counter along the back wall of the first floor. Position the bar counter on the second floor, creating the sushi bar where the chef prepares fresh sushi. This central workspace is crucial for completing Dreamy Room Level 89 successfully.
Step 6. Arrange Storage Furniture and Display Cases
Install the wooden shelf behind the counter for ingredient storage. Add the storage cabinet near the preparation area, then position the display case to showcase fresh ingredients and prepared dishes.
Step 7. Place the Refrigerator and Cooling Equipment in Dreamy Room Level 89
Position the refrigerator in the storage area near the back wall. Install the glass door fridge on the right side of the counter, allowing customers to see the fresh ingredients stored inside.
Step 8. Hang Traditional Lanterns Throughout the Restaurant
Suspend multiple lanterns from the ceiling, focusing on hanging lanterns above the dining area. Add red lanterns along the roof line of the sushi bar to create authentic Japanese ambiance. Install ceiling lights for additional illumination.
Step 9. Decorate Walls with Frames and Signs
Mount picture frames and wall art on the interior walls following Dreamy Room Level 89 design principles. Place the calendar near the counter showing the number "24", then position the prominent sushi sign with large "SUSHI" letters at the front of the bar. Add additional decorative signs throughout the space.
Step 10. Add Decorative Stars and Lighting Accents in Dreamy Room Level 89
Scatter star decorations and yellow stars around the restaurant exterior and roof area. These floating magical elements enhance the dreamy atmosphere that defines this level's aesthetic appeal.
Step 11. Position Plant Containers and Greenery
Place plant pots near the entrance and corners. Add green bushes and flowering bushes with white flowers on the rooftop garden. Position hanging plants from the ceiling and place decorative plants on shelves throughout the interior of Dreamy Room Level 89.
Step 12. Install Swimming Fish Decorations
Arrange fish decorations around the exterior, including colorful koi fish. Position yellow fish, red fish, and blue fish in a swimming pattern around the building perimeter, creating a magical floating effect.
Step 13. Mount the Fire Extinguisher for Safety
Attach the fire extinguisher to the left wall near the entrance, ensuring it's easily accessible in case of emergency according to Dreamy Room Level 89 safety requirements.
Step 14. Set Up the Cash Register and Payment Area in Dreamy Room Level 89
Position the cash register on the counter near the entrance, creating a convenient checkout location for customers finishing their meals.
Step 15. Place Cooking Equipment on the Sushi Bar
Install the rice cooker on the sushi bar counter. Add the cutting board as the main prep surface, then position the knife holder with the knife set within easy reach of the chef.
Step 16. Arrange Chopsticks and Utensil Holders
Place the chopstick holder on the counter with chopsticks ready for customers. This placement ensures easy access following Dreamy Room Level 89 layout principles.
Step 17. Set Plates and Serving Dishes on Tables in Dreamy Room Level 89
Arrange plates and serving plates on the dining table and counter. These should be positioned where customers will be seated for their meals.
Step 18. Position Bowls Throughout the Dining Area
Place bowls and rice bowls on the table and counter surfaces. The rice bowls should be positioned near where customers sit in Dreamy Room Level 89.
Step 19. Add Cups and Drinking Vessels
Set cups and tea cups on the table and counter, ensuring each seating area has proper drinking vessels ready for service.
Step 20. Arrange Bottles, Jars, and Condiment Containers in Dreamy Room Level 89
Position bottles and sauce bottles on the shelves and counter. Place jars and storage jars in the storage cabinet for ingredient organization.
Step 21. Set Up Trays and Serving Equipment
Position trays and serving trays on the counter and bar area, ready for the chef to use when plating and serving orders according to Dreamy Room Level 89 service standards.
Step 22. Display Fresh Sushi on Plates in Dreamy Room Level 89
Arrange sushi plates with various types of sushi on the counter and display case. Place salmon sushi, tuna sushi, egg sushi, roll sushi, and nigiri sushi in an appealing presentation. Position complete sushi sets on the display counter.
Step 23. Prepare Rice and Rice-Based Items
Place rice in bowls on the counter. Position rice balls and onigiri on plates near the sushi preparation area in Dreamy Room Level 89.
Step 24. Set Out Noodle Dishes and Soups in Dreamy Room Level 89
Position the ramen bowl with noodles on the dining table. Add soup bowls with steaming content on the counter and table areas.
Step 25. Arrange Food Storage Containers
Place food containers and bento boxes on shelves and in the storage area for takeout orders following Dreamy Room Level 89 organization system.
Step 26. Display Traditional Japanese Ingredients
Position seaweed and nori sheets on the sushi bar. Place small dishes of wasabi and pickled ginger on the counter. Add soy sauce bottles and other condiments within easy reach of diners.
Step 27. Place Tea Service Equipment in Dreamy Room Level 89
Position the tea pot on the counter near the dining area, ready to serve hot tea to customers completing Dreamy Room Level 89 dining experience.
Step 28. Arrange Cooking Pots and Pans
Place the cooking pot, pan, and wok in the cooking station area on the second floor near the preparation counter.
Step 29. Set Up Utensil Storage and Tools in Dreamy Room Level 89
Position the utensil holder with cooking utensils on the counter. Place the spatula and ladle within easy reach of the cooking area.
Step 30. Add Napkins and Table Accessories
Place napkins in the napkin holder on each table, ensuring customers have easy access to dining essentials in Dreamy Room Level 89.
Step 31. Install Menu Board and Price Display in Dreamy Room Level 89
Mount the and price board near the entrance and counter area, displaying the restaurant's offerings and prices for customer reference.
Step 32. Construct Fence and Railing System
Install the wooden fence and railing along the edge of the outdoor platform and rooftop area, providing safety barriers following Dreamy Room Level 89 building codes.
Step 33. Build Entrance Steps and Platform
Position the entrance steps leading up to the restaurant door. Create the outdoor platform extending from the entrance, providing space for customers to enter.
Step 34. Place the Cat Chef Character in Dreamy Room Level 89
Position the adorable cat chef, specifically the pink cat named Mochi, behind the sushi bar counter. This chef character is preparing sushi and managing the restaurant.
Step 35. Add Customer Characters to Dining Area
Place the customer characters in the restaurant. Position the bear customer (white bear) at the dining table as a dining customer enjoying their meal in Dreamy Room Level 89.
Step 36. Arrange Cushions and Seating Comfort Items in Dreamy Room Level 89
Add cushions and seat cushions to all chairs and stools, providing comfortable seating. Place floor mats and table mats on appropriate surfaces.
Step 37. Set Up Delivery and Storage Containers
Position the delivery bag and takeout boxes near the counter. Add baskets and storage baskets for organization. Place the wooden crate, supply box, and ingredient box in the storage area.
Step 38. Designate Functional Work Zones in Dreamy Room Level 89
Organize the prep station, cooking station, and wash station on the second floor. Define the dining area, kitchen area, service counter, pickup counter, and storage area throughout the restaurant. Establish the entrance area, outdoor seating, rooftop area, and garden area.
Step 39. Install Lighting and Display Elements in Dreamy Room Level 89
Add decoration lights and ambient lights throughout the space to create warm atmosphere. Set up the food display and ingredient display areas in visible locations.
Step 40. Add Final Floral Decorations
Complete the restaurant by placing white flowers and small flowers in plant containers. Add green leaves and decorative vines around the rooftop garden and exterior to finish Dreamy Room Level 89 with natural beauty.
Tips and Precautions
Precautions
- The second-floor sushi bar has many small items clustered together—take care when placing knives, ingredients, and plates to avoid overlapping incorrectly
- The hanging lanterns must be positioned before placing taller furniture like shelves to prevent blocking issues
- Fish decorations float around the building exterior—ensure they're placed symmetrically for the best visual effect
- Don't forget the small white flowers on the rooftop bushes, as they're easy to overlook behind the roof structure
- The customer characters should be placed last to ensure they sit properly at the table without clipping through furniture
Practical Tips
- Start with larger structural elements before adding small decorative items to avoid accidentally moving placed objects
- Use the snap-to-grid feature when aligning multiple chairs around the dining table for uniform spacing
- When placing sushi pieces on the bar counter, work from left to right following the natural workflow of Dreamy Room Level 89
- Zoom in when positioning small condiments like wasabi and ginger dishes to ensure precise placement
- Place the chef character behind the counter before adding cooking equipment to establish the workspace hierarchy
- Group similar decorative elements like stars and fish together to create visual clusters that enhance the magical atmosphere