Dreamy Room Level 22
Level 22 guide walkthrough, helping players solve puzzles and explore the wonderful world of Dreamy Room.
Dreamy Room Level 22 Walkthrough Guide
Dreamy Room Level 22 Room Story
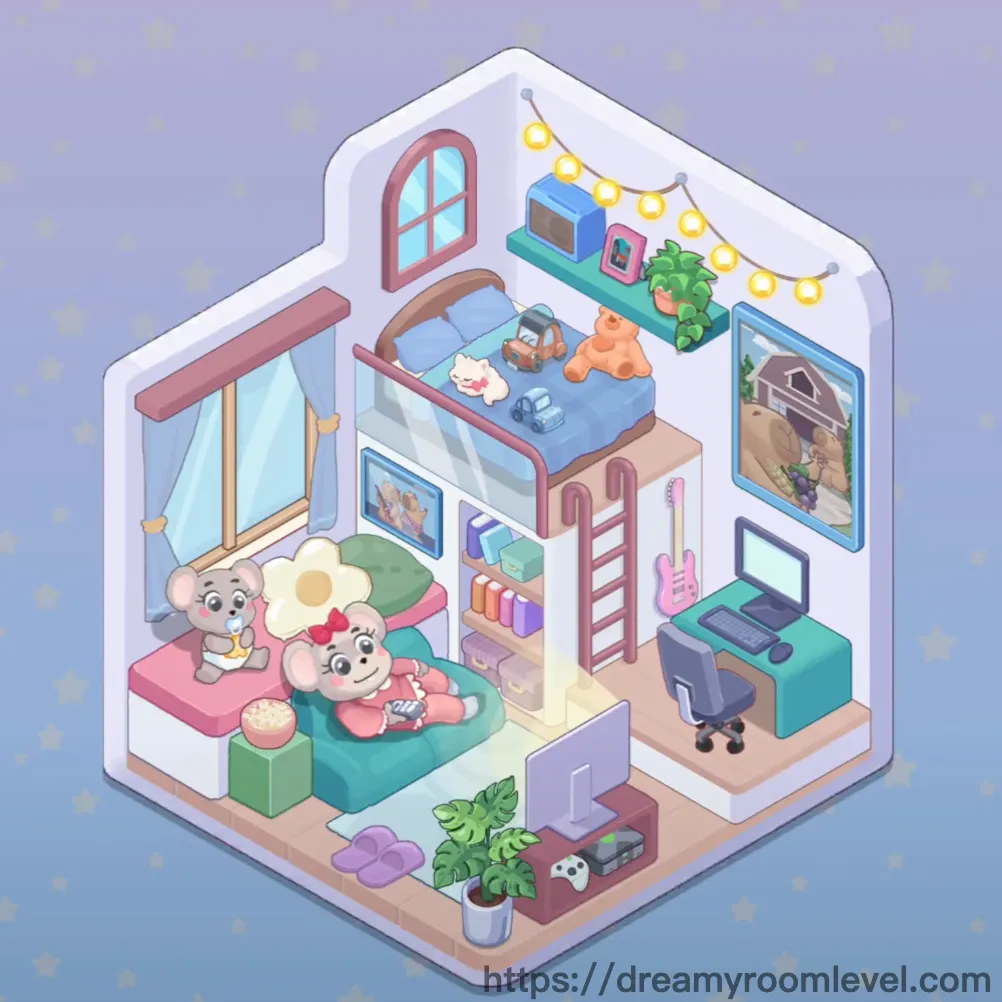
Emma's cozy loft studio reflects her creative spirit - a perfect blend of work and play in Dreamy Room Level 22. The soft purple walls embrace her collection of plush friends, while fairy lights twinkle above like captured stars. Her gaming setup sits ready for late-night adventures, and the loft bed creates a dreamy retreat above. This intimate space tells the story of a young artist who finds joy in simple comforts, from her pink guitar to the cheerful koala watching over her desk in Dreamy Room Level 22.
Dreamy Room Level 22 Step-by-Step Placement Guide
Step 1. Place the wood floor foundation
Start by dragging the wood floor panels to cover the entire room base. The wooden planks should align horizontally across the bottom surface. This creates the warm foundation essential for Dreamy Room Level 22's cozy atmosphere.
Step 2. Set up wall structure
Position the purple wall panels along the back and sides of the room. Ensure walls connect seamlessly at corners. The lavender tone sets the dreamy mood for this level's creative space.
Step 3. Install the window in Dreamy Room Level 22
Place the window frame on the left wall, approximately one-third from the top edge. The window should snap into the pre-marked wall opening. Natural light is crucial for completing Dreamy Room Level 22 successfully.
Step 4. Add the arched window detail
Position the decorative arched window element on the upper loft wall, centered above the bed area. This architectural detail adds charm to the upper level of Dreamy Room Level 22.
Step 5. Install the door frame
Drag the door frame to the wall opening, ensuring it aligns with floor level. The frame should click into place when properly positioned.
Step 6. Position the loft bed structure in Dreamy Room Level 22
Place the loft bed frame against the back wall on the upper level. The bed should occupy the elevated platform area. This two-story design maximizes space in Dreamy Room Level 22.
Step 7. Set up the bunk bed frame
Position the bunk bed support structure beneath the loft, creating the two-tier sleeping arrangement. Ensure it aligns with the upper bed frame.
Step 8. Place the ladder for access
Attach the ladder to the right side of the loft bed, leaning at a safe climbing angle. The ladder connects ground level to the upper sleeping area in Dreamy Room Level 22.
Step 9. Add the main bed mattress
Drag the bed mattress onto the loft bed frame, fitting it snugly within the wooden borders. The blue bedding adds color to Dreamy Room Level 22's upper level.
Step 10. Place pillows on the bed in Dreamy Room Level 22
Position the white pillow at the head of the bed, against the wall. The pillow should rest naturally on the mattress surface.
Step 11. Add the cozy blanket
Drape the blanket across the lower portion of the bed, creating an inviting sleeping space. Following Dreamy Room Level 22 design principles, layer bedding for maximum comfort.
Step 12. Position the green sofa
Place the green sofa and couch against the left wall on ground level, beneath the window. The sofa faces toward the room center in Dreamy Room Level 22.
Step 13. Add sofa cushions in Dreamy Room Level 22
Arrange the decorative cushion on the sofa, leaning against the backrest. The pink cushion adds a pop of color to the seating area.
Step 14. Place the coffee table
Position the small coffee table in front of the sofa, leaving walking space between furniture pieces. This placement is essential for Dreamy Room Level 22 success.
Step 15. Lay down the area rug
Center the area rug beneath the coffee table and sofa area. The rug should extend slightly beyond furniture edges, defining the living space in Dreamy Room Level 22.
Step 16. Set up the computer desk
Place the computer desk and desk on the right side of the room, below the loft area. The teal desk faces outward for easy access.
Step 17. Position the office chair in Dreamy Room Level 22
Slide the office chair and gaming chair under the desk, facing the work surface. The chair wheels should rest on the wooden floor.
Step 18. Place the laptop on desk
Set the laptop and computer on the desk surface, centered for optimal viewing angle. Completing Dreamy Room Level 22 requires proper tech placement.
Step 19. Add the monitor display
Position the monitor or tv screen on the desk beside the laptop. The dual-screen setup enhances the workspace functionality.
Step 20. Place gaming equipment in Dreamy Room Level 22
Set the gaming console next to the monitor on the desk. Add the game controller nearby for easy reach during gaming sessions.
Step 21. Position the pink guitar
Lean the pink guitar or electric guitar against the wall near the desk area. The instrument adds creative flair to Dreamy Room Level 22.
Step 22. Add the bookshelf storage
Place the bookshelf unit against the wall, filling any empty wall space. This storage solution is crucial for organization in Dreamy Room Level 22.
Step 23. Arrange books on shelves in Dreamy Room Level 22
Stack the colorful books on the bookshelf, creating an organized library display. Mix horizontal and vertical placement for visual interest.
Step 24. Place storage containers
Position storage box and storage cube units on lower shelves or floor corners. Add the basket for additional organization.
Step 25. Set up the side table
Place the side table or nightstand near the sofa for convenience. This small table holds essentials in Dreamy Room Level 22.
Step 26. Add the table lamp in Dreamy Room Level 22
Position the lamp on the side table, providing warm lighting for the seating area. Proper illumination enhances the cozy atmosphere.
Step 27. Hang string lights
Drape the string lights and fairy lights along the upper wall and loft area. The twinkling lights create magic in Dreamy Room Level 22.
Step 28. Add decorative lighting
Install additional decorative lights around the room perimeter. Layer lighting creates depth in Dreamy Room Level 22's design.
Step 29. Hang wall art and posters in Dreamy Room Level 22
Mount the picture frame and poster on the upper wall. Add the beautiful poster showing cartoon characters near the loft.
Step 30. Place additional wall decorations
Hang remaining wall art pieces to fill empty wall spaces. According to Dreamy Room Level 22 layout requirements, art should be eye-level.
Step 31. Add the terrarium display
Position the aquarium or terrarium on a shelf or desk corner. The glass container adds life to Dreamy Room Level 22.
Step 32. Place potted plants in Dreamy Room Level 22
Set the potted plant and monstera plant near the window or on the floor. Greenery brings nature into the space.
Step 33. Position the teddy bear
Place the teddy bear on the loft bed, propped against pillows. This cuddly friend watches over Dreamy Room Level 22's sleeping area.
Step 34. Add the cloud sheep plush
Set the adorable cloud sheep plush on the bed beside the teddy bear. Multiple plushies create comfort in Dreamy Room Level 22.
Step 35. Place mouse and koala plushies in Dreamy Room Level 22
Arrange the mouse plush and koala plush on the sofa. These cute companions decorate the seating area perfectly.
Step 36. Set up floor platforms
Position the floor platform and wooden platform sections to create level changes. These platforms add dimension to Dreamy Room Level 22.
Step 37. Place footwear items
Set the slippers and shoes near the door or under the bed. Proper shoe placement keeps Dreamy Room Level 22 tidy.
Step 38. Add the remote control in Dreamy Room Level 22
Place the remote control on the coffee table within easy reach from the sofa. This detail completes the entertainment setup.
Step 39. Position the cheese decoration
Place the decorative cheese item on a shelf or desk as a quirky accent. This unique touch adds personality to Dreamy Room Level 22's design.
Important Notes and Tips
Key Considerations
- Watch for the narrow space between the loft ladder and desk - items must be precisely aligned to fit
- The upper loft area has limited height clearance, requiring careful placement of taller decorations
- Small items on the coffee table may overlap if not positioned at exact corners
- The window area can block sofa placement if furniture isn't pushed fully against the wall
- String lights must be draped before placing wall art to avoid tangling issues
Pro Tips for Success
- Start with the loft bed structure first as it defines the entire upper level layout
- Use the "snap-to-grid" feeling when placing floor platforms for perfect alignment
- Drag plushies from their centers to avoid them bouncing back from the bed
- Place the guitar last to prevent it blocking access to desk items
- Layer your lighting elements from back to front for proper depth
- For perfect completion of Dreamy Room Level 22, double-check all corners for missed items