Dreamy Room Level 25
Level 25 guide walkthrough, helping players solve puzzles and explore the wonderful world of Dreamy Room.
Dreamy Room Level 25 Walkthrough Guide
Dreamy Room Level 25 Room Story
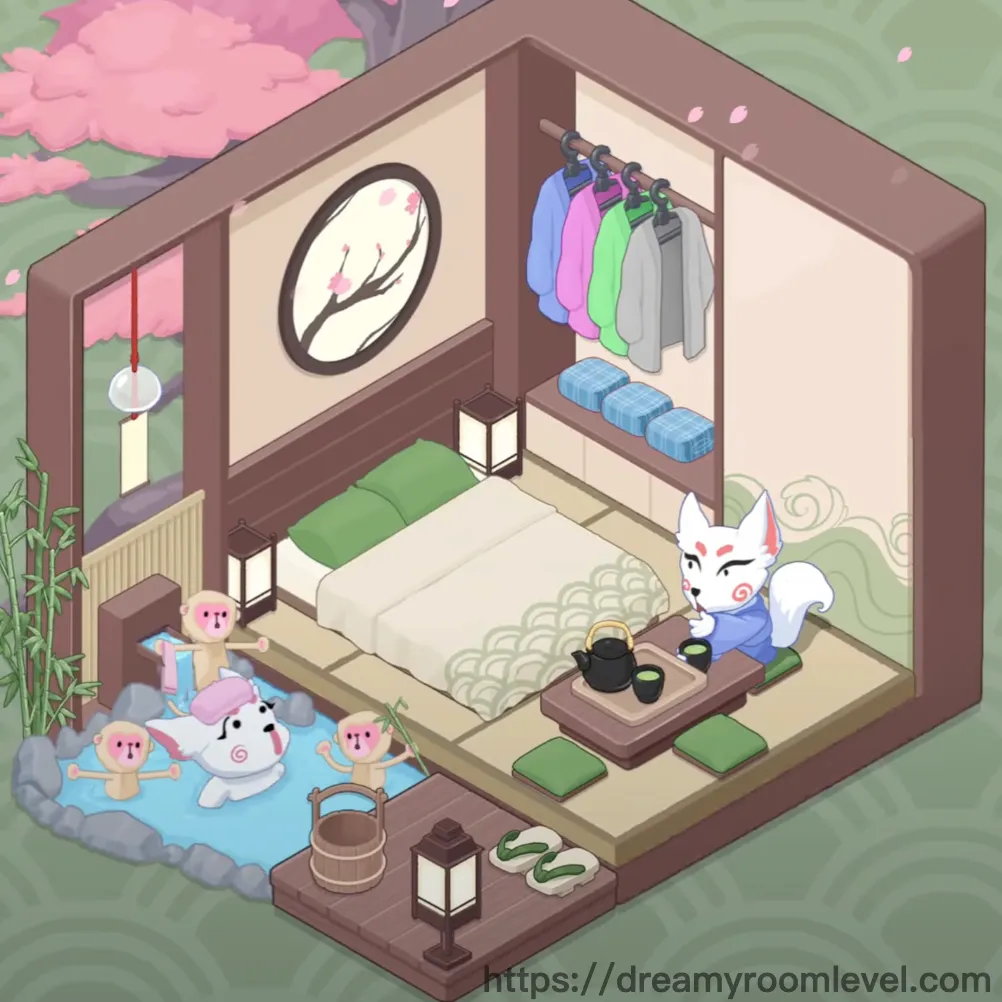
In this serene Japanese-inspired sanctuary of Dreamy Room Level 25, a young artist finds solace after long days of creating. The soft pink cherry blossoms drift through the window, landing gently on tatami mats where a friendly kitsune spirit keeps watch. This tranquil retreat blends traditional elements with playful touches, from the bubbling hot spring outside to the cozy futon within, creating the perfect harmony of rest and inspiration.
Dreamy Room Level 25 Step-by-Step Placement Guide
Step 1. Place the empty room foundation
Start by establishing the empty room as your base canvas. This creates the fundamental structure for Dreamy Room Level 25, providing walls and basic framework for all subsequent decorations.
Step 2. Install tatami mat flooring
Drag the tatami mat to cover the main floor area, aligning it perfectly with room edges. Position it as the primary flooring before adding any furniture in this traditional Dreamy Room Level 25 setup.
Step 3. Build the outdoor deck area
Place the outdoor deck extension at the room's lower entrance, creating a transitional space. This wooden platform connects the interior to the garden elements essential for completing Dreamy Room Level 25.
Step 4. Create the koi pond feature
Position the koi pond directly adjacent to the outdoor deck on the left side. The water feature should align with the deck's edge for seamless integration in Dreamy Room Level 25's garden area.
Step 5. Add stepping stones to pond
Place stepping stones across the koi pond, creating a path from deck to garden. These stones provide both function and aesthetic appeal in Dreamy Room Level 25's outdoor space.
Step 6. Position the hot spring in Dreamy Room Level 25
Install the hot spring bath feature in the lower left corner beside the koi pond. This relaxing element adds authentic Japanese atmosphere to your Dreamy Room Level 25 design.
Step 7. Place decorative rocks
Arrange rocks around the hot spring and pond edges for natural landscaping. These elements frame the water features beautifully in Dreamy Room Level 25's garden layout.
Step 8. Install the cherry tree
Position the majestic cherry tree in the upper background area behind the room. This iconic element defines the seasonal atmosphere of Dreamy Room Level 25.
Step 9. Add pink cherry blossoms
Scatter pink cherry blossoms throughout the upper canopy area. These delicate flowers create the signature spring ambiance for Dreamy Room Level 25.
Step 10. Place floating petals in Dreamy Room Level 25
Distribute floating petals gently falling across the scene. These add dynamic movement and romantic atmosphere to complete Dreamy Room Level 25's cherry blossom theme.
Step 11. Set up the futon bed
Place the futon bed in the room's center-right area on the tatami mat. This low-profile sleeping arrangement is essential for Dreamy Room Level 25's traditional layout.
Step 12. Add the white pillow
Position the white pillow at the head of the futon bed. Align it centered for comfortable sleeping in Dreamy Room Level 25.
Step 13. Apply green bedding in Dreamy Room Level 25
Spread the green bedding over the futon, tucking edges neatly. This adds color coordination to your Dreamy Room Level 25 sleeping area.
Step 14. Layer patterned bedding
Add patterned bedding as a decorative top layer on the futon. The traditional patterns enhance Dreamy Room Level 25's authentic Japanese aesthetic.
Step 15. Mount circular wall art
Hang the circular wall art on the left wall above shoulder height. This artistic element adds visual interest to Dreamy Room Level 25's wall space.
Step 16. Install cherry blossom wall art in Dreamy Room Level 25
Place the cherry blossom wall art on the back wall behind the futon. This decorative piece reinforces the seasonal theme throughout Dreamy Room Level 25.
Step 17. Mount the wall shelf
Install the wall shelf on the right wall at medium height. This storage solution keeps Dreamy Room Level 25 organized while maintaining minimalist style.
Step 18. Set up the clothes rack
Position the clothes rack against the right wall near the shelf. This functional piece provides wardrobe storage for Dreamy Room Level 25.
Step 19. Add coat hangers to rack in Dreamy Room Level 25
Arrange coat hangers evenly spaced on the clothes rack. These prepare the rack for garment storage in your organized Dreamy Room Level 25.
Step 20. Hang the green jacket
Place the green jacket on the leftmost hanger of the clothes rack. This adds a pop of color to Dreamy Room Level 25's wardrobe area.
Step 21. Hang the gray jacket
Position the gray jacket on the middle hanger next to the green jacket. Multiple garments create lived-in authenticity for Dreamy Room Level 25.
Step 22. Place blue soap bars in Dreamy Room Level 25
Arrange blue soap bars on the wall shelf in a neat row. These bathroom essentials add practical detail to Dreamy Room Level 25's storage.
Step 23. Position the tea table
Set the low tea table in front of the futon on the tatami mat. This centerpiece enables traditional tea ceremonies in Dreamy Room Level 25.
Step 24. Arrange the tea set
Place the complete tea set centered on the tea table surface. The black pottery adds elegant functionality to Dreamy Room Level 25's social space.
Step 25. Add cushions around table in Dreamy Room Level 25
Position the green cushion on the right side of the tea table for seating. Proper cushion placement ensures comfort during Dreamy Room Level 25's tea time.
Step 26. Place brown and white cushions
Add the brown cushion and white cushion around the remaining table sides. Multiple seating options accommodate guests in Dreamy Room Level 25.
Step 27. Install the floor lamp
Position the tall floor lamp in the back-right corner near the clothes rack. This provides ambient lighting for Dreamy Room Level 25's evening atmosphere.
Step 28. Place the table lamp in Dreamy Room Level 25
Set the small table lamp on the tea table's corner. This adds focused task lighting for Dreamy Room Level 25's tea ceremonies.
Step 29. Hang the lantern
Suspend the traditional lantern from the ceiling in the room's left area. This authentic lighting fixture enhances Dreamy Room Level 25's Japanese ambiance.
Step 30. Position the bamboo plant
Place the tall bamboo plant in the left corner near the circular wall art. This living element brings nature indoors for Dreamy Room Level 25.
Step 31. Set the wooden bench in Dreamy Room Level 25
Position the wooden bench along the back wall beneath the cherry blossom art. This seating provides meditation space in Dreamy Room Level 25.
Step 32. Hang wind chimes
Suspend the delicate wind chimes from the doorway or window frame. Their gentle sound adds sensory depth to Dreamy Room Level 25's atmosphere.
Step 33. Place the wooden bucket
Set the traditional wooden bucket near the outdoor deck entrance. This functional item suggests hot spring preparation in Dreamy Room Level 25.
Step 34. Position sandals at entrance in Dreamy Room Level 25
Arrange white sandals and green sandals neatly by the deck entrance. Proper footwear placement follows Japanese customs in Dreamy Room Level 25.
Step 35. Add the kitsune fox
Place the mystical kitsune fox figure sitting on the tatami near the tea table. This guardian spirit watches over Dreamy Room Level 25's peaceful space.
Step 36. Display decorative fans
Mount the blue fan and decorative fan on the walls as artistic elements. These traditional items enhance Dreamy Room Level 25's cultural authenticity.
Step 37. Position plush toys in Dreamy Room Level 25
Arrange the gingerbread man, pink pigs, and cow plushie playfully in the hot spring. These whimsical touches add charm to Dreamy Room Level 25.
Step 38. Place the black cat
Position the black cat figurine curled on the futon or cushion. This feline companion brings life to Dreamy Room Level 25's cozy interior.
Step 39. Add storage boxes
Stack the cardboard box and yellow package in the corner near the entrance. These suggest recent deliveries in Dreamy Room Level 25.
Step 40. Install water feature in Dreamy Room Level 25
Set up the small water feature fountain near the bamboo plant. The trickling water adds soothing sounds throughout Dreamy Room Level 25.
Step 41. Hang the ornament
Suspend the decorative hanging ornament from the window area. This delicate detail catches light beautifully in Dreamy Room Level 25.
Step 42. Add window decoration
Install the final window decoration element to frame the cherry blossom view. This completes the scenic backdrop essential for Dreamy Room Level 25's serene atmosphere.
Tips and Tricks
Important Notes
- Small items like soap bars require precise placement on narrow shelf edges in Dreamy Room Level 25
- The kitsune fox may blend with tatami coloring, look for its distinctive white and blue features
- Cushions must be positioned exactly around the tea table's edges for proper alignment
- Cherry blossom petals layer over other elements, place them last to avoid obstruction
- The hot spring area has multiple overlapping toys that need careful sequential placement
Helpful Tips
- Zoom in when placing tiny items like sandals near the deck entrance for Dreamy Room Level 25 precision
- Drag plush toys directly into the hot spring water, they'll automatically float at the correct height
- Use the bamboo plant's tall stalks as alignment guides for nearby wall decorations
- The tea set pieces snap together when dragged close to the table's center point
- For overlapping wall art, place larger pieces first then layer smaller decorations
- Complete outdoor elements before interior furnishing to avoid camera angle issues in Dreamy Room Level 25