Dreamy Room Level 10
Level 10 guide walkthrough, helping players solve puzzles and explore the wonderful world of Dreamy Room.
Dreamy Room Level 10 Walkthrough Guide
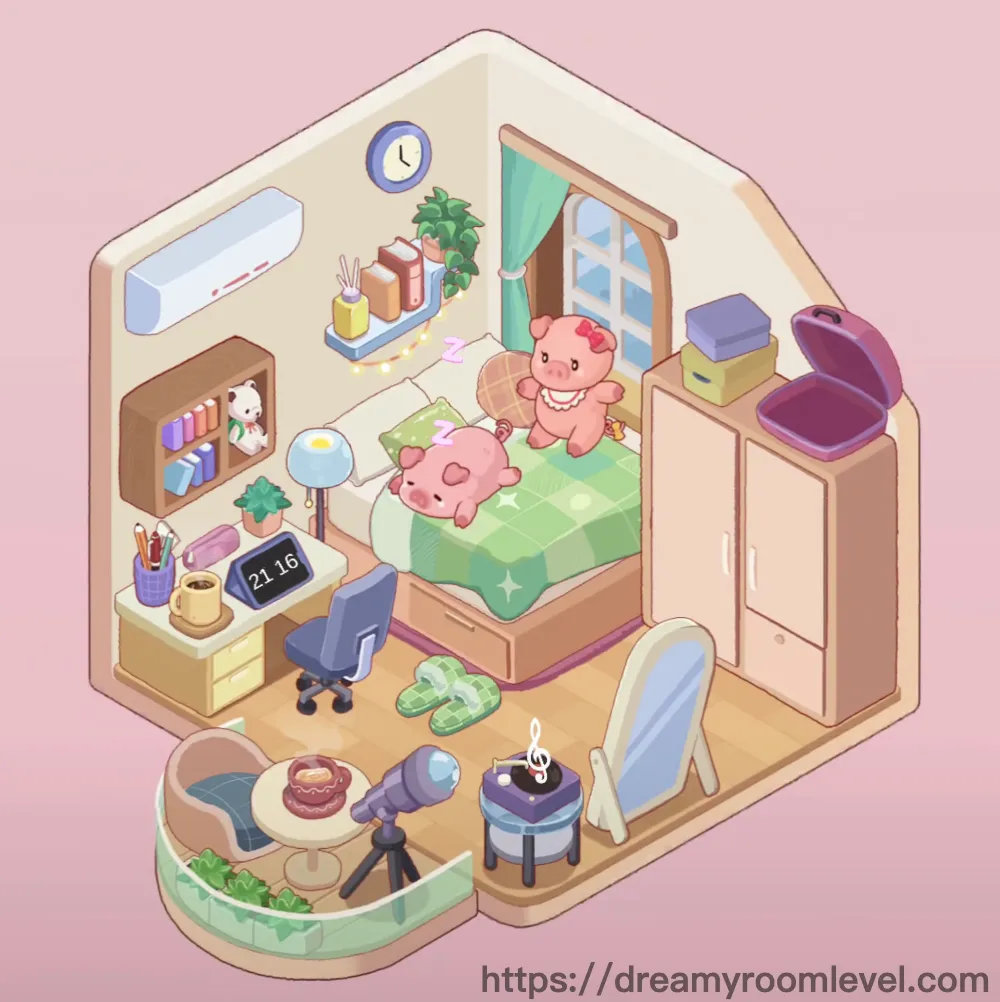
Dreamy Room Level 10 Room Story
This is Emma's cozy sanctuary in Dreamy Room Level 10, where every corner tells a story of dreams and comfort. The soft pink walls embrace a space filled with memories - from the telescope by the window for stargazing adventures to the cute pink pig plushie that guards peaceful slumbers. Here, morning light filters through turquoise curtains, illuminating a perfect blend of study and rest, where creativity blooms alongside tranquility.
Dreamy Room Level 10 Step-by-Step Placement Guide
Step 1. Place the window frame on the right wall
Position the window in the upper-right corner of the wall, centered vertically. The window should align with the wall's midpoint for proper placement in Dreamy Room Level 10.
Step 2. Hang turquoise curtains
Install the curtains directly over the window frame, ensuring they drape naturally on both sides. This creates the perfect ambiance for Dreamy Room Level 10.
Step 3. Position the air conditioner
Mount the air conditioner on the upper-left wall, approximately one-third down from the ceiling. Keep it aligned horizontally for optimal cooling.
Step 4. Set up the wooden bed in Dreamy Room Level 10
Place the bed against the right wall, directly beneath the window. The headboard should touch the wall while leaving walking space on the left side.
Step 5. Add the green checkered blanket
Spread the blanket across the bed's surface, aligning it with the mattress edges. The pattern should be visible and centered for Dreamy Room Level 10 aesthetics.
Step 6. Position the white pillow
Place the pillow at the bed's head, resting against the headboard. Center it for symmetrical appearance in this Dreamy Room Level 10 setup.
Step 7. Place the pink pig plushie in Dreamy Room Level 10
Position the adorable pink pig on the bed's center, slightly toward the foot. It should sit upright facing forward, adding charm to Dreamy Room Level 10.
Step 8. Install the brown wardrobe
Position the wardrobe in the bottom-right corner, adjacent to the bed. Ensure doors can open without hitting other furniture.
Step 9. Hang the green jacket
Place the jacket inside the wardrobe on the left side hook. It should hang naturally without touching the wardrobe floor in Dreamy Room Level 10.
Step 10. Add the green shirt in Dreamy Room Level 10
Hang the green shirt next to the jacket on the right hook. Keep both garments separated for neat organization.
Step 11. Place the backpack
Position the backpack on the wardrobe's bottom shelf, leaning against the back wall. This maximizes storage efficiency in Dreamy Room Level 10.
Step 12. Set up the wooden desk
Place the desk along the left wall, centered between corners. Leave adequate space for the chair to move freely.
Step 13. Position the office chair in Dreamy Room Level 10
Place the office chair in front of the desk, slightly pulled out. The seat should face the desk at a comfortable working distance.
Step 14. Add the desk lamp
Position the desk lamp on the desk's left corner, angled toward the center. This provides optimal lighting for Dreamy Room Level 10 study sessions.
Step 15. Place the pencil holder
Set the pencil holder on the desk's right side, within easy reach from the chair. Keep it near the desk edge for accessibility.
Step 16. Install the bookshelf in Dreamy Room Level 10
Mount the bookshelf on the left wall above the desk area. Align it horizontally at eye level when seated.
Step 17. Arrange the books
Place the books vertically in the bookshelf, filling approximately two-thirds of the space. Alternate colors for visual appeal in Dreamy Room Level 10.
Step 18. Add the teddy bear
Position the teddy bear on the bookshelf's right side, sitting upright. It adds personality to this Dreamy Room Level 10 workspace.
Step 19. Mount the wall shelf in Dreamy Room Level 10
Install the wall shelf above the wardrobe, centered on the wall. Keep it level for proper display functionality.
Step 20. Place storage boxes on shelf
Position the yellow storage box on the wall shelf's left side. Stack neatly for organized storage in Dreamy Room Level 10.
Step 21. Add the purple suitcase
Place the purple suitcase on the wall shelf's right side, balancing the composition. Ensure stable placement for safety.
Step 22. Position the round table in Dreamy Room Level 10
Place the round table in the room's lower-left area, creating a secondary activity zone. Center it in the available floor space.
Step 23. Add the stool
Position the stool next to the round table, slightly tucked under. This saves space while maintaining functionality in Dreamy Room Level 10.
Step 24. Set up the telescope
Place the telescope near the window on a tripod, angled toward the glass. Perfect positioning for stargazing in Dreamy Room Level 10.
Step 25. Add the circular rug in Dreamy Room Level 10
Center the circular rug in the room's open floor space, between the bed and desk. It defines the room's central area beautifully.
Step 26. Place the floor mat
Position the floor mat at the room's entrance area, parallel to the door. Essential for keeping Dreamy Room Level 10 clean.
Step 27. Add green slippers
Place the green slippers beside the bed on the floor, toes pointing outward. Ready for comfortable morning steps in Dreamy Room Level 10.
Step 28. Hang the wall clock in Dreamy Room Level 10
Mount the wall clock on the left wall above the bookshelf. Center it for easy time-checking throughout the day.
Step 29. Position the digital clock
Place the digital clock on the bedside area or desk corner. Angle the display for visibility from bed in Dreamy Room Level 10.
Step 30. Add the potted plant
Position the potted plant on the window sill or desk corner. It brings nature into this Dreamy Room Level 10 sanctuary.
Step 31. Hang the plant in Dreamy Room Level 10
Suspend the hanging plant from the ceiling near the window. Let it cascade naturally for organic beauty.
Step 32. Place the tissue box
Position the tissue box on the desk's back edge or bedside area. Keep it accessible but not obstructing work space.
Step 33. Add the trash can
Place the trash can under the desk's right side, slightly hidden. Maintains cleanliness in Dreamy Room Level 10 efficiently.
Step 34. Position decorative items in Dreamy Room Level 10
Place the decorative cube in the corner floor area as an accent piece. Adds geometric interest to the room design.
Step 35. Add the basketball
Position the basketball in the corner near sports equipment area. Shows the room owner's active lifestyle in Dreamy Room Level 10.
Step 36. Hang the wall poster
Mount the wall poster above the bed or desk area for inspiration. Center it at eye level for best viewing.
Step 37. Place the mirror in Dreamy Room Level 10
Position the mirror on the wardrobe door or wall near it. Ensures convenient outfit checking.
Step 38. Add the photo frame
Place the photo frame on the desk or shelf, angled for visibility. Personal memories enhance Dreamy Room Level 10's warmth.
Step 39. Position the soap bar
Place the soap bar in the designated hygiene area or storage box. Keeps it fresh and accessible.
Step 40. Add toilet paper storage in Dreamy Room Level 10
Store the toilet paper in the wardrobe's bottom section or storage box. Practical placement for this essential item.
Step 41. Place the small drawer unit
Position the small drawer unit beside the desk or bed for additional storage. Maximizes organization in Dreamy Room Level 10.
Step 42. Add the green dinosaur plush
Place the green dinosaur plush on the shelf or bed area. Adds playful character to the room.
Step 43. Position the pink creature in Dreamy Room Level 10
Place the pink creature near other plushies for a cohesive collection. Creates a whimsical atmosphere.
Step 44. Final touches
Review all placements to ensure nothing blocks pathways or overlaps incorrectly. Perfect completion of Dreamy Room Level 10 requires attention to these details.
Tips and Tricks
Important Notes
- The window curtains may require precise vertical alignment to properly attach in Dreamy Room Level 10
- Small desk items like the pencil holder need exact positioning to "snap" into place
- The wardrobe doors must remain accessible - avoid placing items too close
- Wall-mounted items require finding the exact sweet spot for attachment
- The telescope's tripod legs may overlap with nearby furniture if not carefully positioned
Pro Tips
- Start with large furniture against walls before adding smaller items in Dreamy Room Level 10
- Use the window frame as a reference point for aligning wall decorations
- Drag items from their center point for more stable placement
- For overlapping items like plushies on the bed, place larger ones first
- Hold items steady for a moment to trigger the auto-placement in tight spaces
- Complete Dreamy Room Level 10 faster by following the natural room flow from walls inward