Dreamy Room Level 74
Level 74 guide walkthrough, helping players solve puzzles and explore the wonderful world of Dreamy Room.
Dreamy Room Level 74 Walkthrough Guide
Dreamy Room Level 74 Room Story
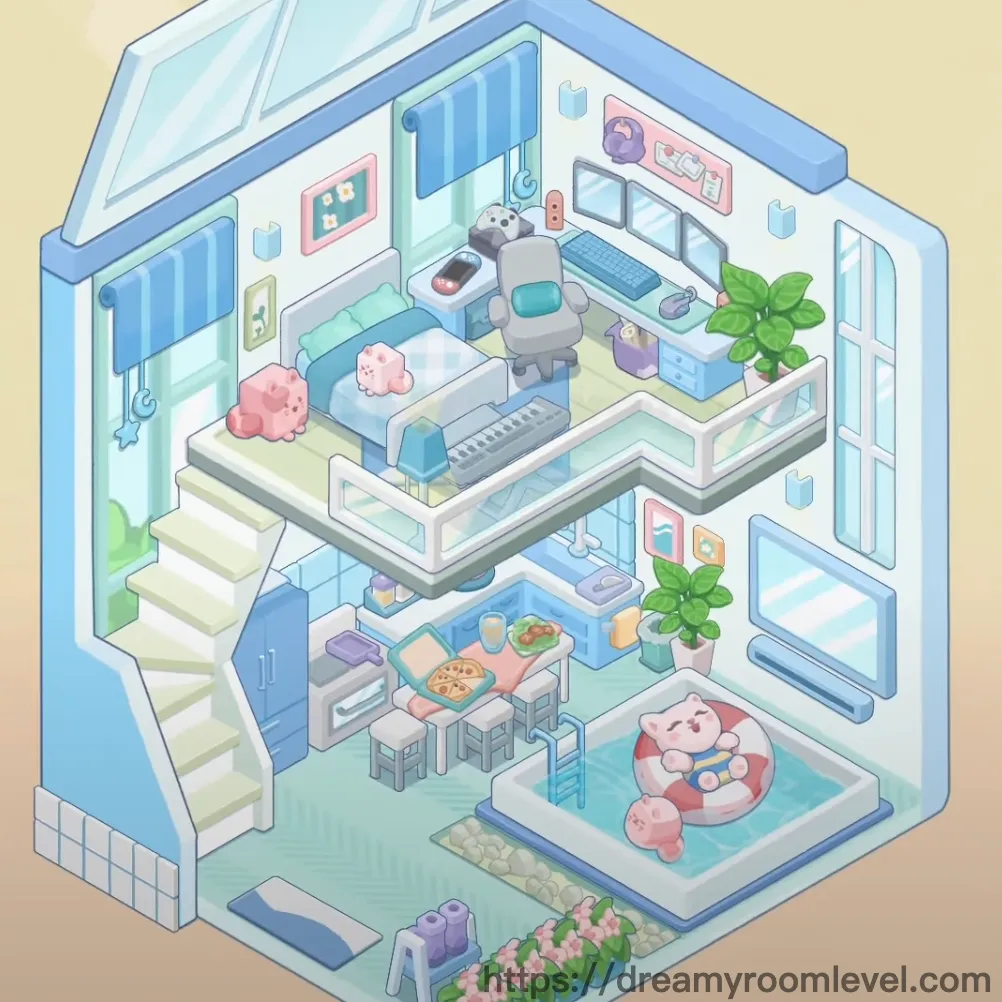
Luna, a young creative designer, crafted this cozy duplex studio where dreams take shape. On the upper floor, her loyal robot panda companion sits beside the computer, helping with late-night projects. Pink plush friends dot the blue sofa, watching over her workspace. Below, the dining area glows warmly with fresh pizza and coffee, while a pink cat naps in the pet bed near the mini pool. This Dreamy Room Level 74 sanctuary perfectly blends productivity with comfort, creating a haven where imagination flows freely.
Dreamy Room Level 74: Step-by-Step Placement Guide
Step 1. Install the Ceiling Structure and Wall Panels
Begin by placing the ceiling structure at the top of the room to establish the framework. Next, position the wall panels along the perimeter to define the room's boundaries. This foundational step in Dreamy Room Level 74 creates the essential structure for the duplex layout.
Step 2. Add Windows to Create Natural Light
Install the window left wall on the upper left side, followed by the window right wall on the right side. Place the large window glass at the front-right corner. These windows flood the space with natural light, essential for the bright atmosphere.
Step 3. Position the Striped Blue Curtains
Hang the striped blue curtains on both left-side windows using the curtain rods. Drag them to align with the window frames, ensuring they hang evenly for a polished look in Dreamy Room Level 74.
Step 4. Install the Stairs and Stair Railing in Dreamy Room Level 74
Place the stairs in the center-left area connecting both floors. Attach the stair railing along the left edge of the stairs for safety. Position them carefully to ensure smooth vertical navigation between levels.
Step 5. Set Up the Blue Sofa on Upper Floor
Drag the blue sofa to the upper left area, positioning it against the back wall below the windows. Align it parallel to the wall, creating the main seating area for the workspace in Dreamy Room Level 74.
Step 6. Arrange Cushions and Pillows on Sofa
Place the pink cloud pillow on the left side of the sofa, the blue cushion in the center, and the pink pillow on the right. Position them naturally to create a cozy seating arrangement.
Step 7. Position the Computer Desk and Chair
Place the computer desk in the upper right corner against the back wall. Position the office gaming chair directly in front of the desk, facing the wall. Ensure proper spacing for comfortable working according to Dreamy Room Level 74 layout.
Step 8. Set Up Computer Equipment in Dreamy Room Level 74
Mount the computer monitor on the desk's back edge, centered perfectly. Place the keyboard in front of it at the desk's center. Add the mouse pad to the right of the keyboard for the complete workstation setup.
Step 9. Add the Desk Lamp and Headphones
Position the desk lamp on the desk's left corner for task lighting. Place the headphones near the monitor or hanging on the desk edge for easy access during work sessions.
Step 10. Install the Bookshelf and Storage
Place the bookshelf on the upper right wall above or beside the desk. Arrange the storage boxes on the shelves or nearby floor to organize supplies. Add the decorative items shelf to display personal items in Dreamy Room Level 74.
Step 11. Place the Robot Panda Character
Position the robot panda character on the office gaming chair, sitting upright as if working at the computer. This becomes the room's main character and focal point.
Step 12. Add Pink Plush Friends on Sofa in Dreamy Room Level 74
Place the pink pig plush on the left side of the blue sofa near the armrest. Position the pink sheep plush in the center or right side of the sofa among the pillows, creating an adorable gathering.
Step 13. Hang the Pendant Lamp
Install the hanging pendant lamp from the ceiling in the center of the upper floor. Ensure it hangs at appropriate height above the furniture to provide ambient lighting for Dreamy Room Level 74.
Step 14. Decorate with Wall Picture Frames
Hang the wall picture frame pink on the upper back wall near the sofa area. Add the wall picture frame green beside it, followed by the wall picture frame blue. Space them evenly for visual balance.
Step 15. Add the Wall Artwork Poster in Dreamy Room Level 74
Position the wall artwork poster on the upper right wall near the computer desk area. Hang it at eye level when seated to create an inspiring workspace view.
Step 16. Place Wall Decorations
Arrange the wall decorations on various walls throughout the upper floor. Distribute them to fill empty wall spaces and enhance the room's personality in Dreamy Room Level 74.
Step 17. Position the Dining Table on Lower Floor
Drag the dining table to the center-left area of the lower floor, near the stairs. Ensure it's positioned with enough clearance for chairs and movement around it.
Step 18. Arrange Dining Chairs Around Table in Dreamy Room Level 74
Place the dining chair blue on one side of the table, the dining chair pink on the opposite side, and the dining chair white at another position. Arrange them naturally as if ready for a meal.
Step 19. Set Up the Meal on Dining Table
Place the pizza on table in the center of the dining table. Add the coffee cup near one chair position and the juice box nearby. Position the food plate beside the pizza to complete the dining setup.
Step 20. Install Kitchen Counter and Cabinet
Place the kitchen counter against the back wall of the lower floor on the right side. Attach the kitchen cabinet above or beside the counter for storage space in Dreamy Room Level 74.
Step 21. Position the Pink Cat Character in Dreamy Room Level 74
Place the pink cat character in the round pet bed on the lower floor, positioned in the right area near the pool. The cat should appear comfortable and relaxed.
Step 22. Set Up the Round Pet Bed
Position the round pet bed in the lower right corner of the floor, creating a cozy spot for the pink cat. Ensure it's placed on a flat surface for stability.
Step 23. Create the Small Pool Water Feature
Install the small pool water in the lower right corner adjacent to the pet bed. This mini water feature adds a unique relaxing element to Dreamy Room Level 74.
Step 24. Add Large Potted Plant in Dreamy Room Level 74
Place the potted plant large in the upper right corner of the upper floor near the desk. Position the green leafy plant on the lower floor near the stairs or pool area to bring nature indoors.
Step 25. Place Pink Flowers for Decoration
Position the flowers pink outside the room near the entrance or on a surface inside. These add a pop of color and freshness to complete the garden atmosphere.
Step 26. Lay Down the Floor Tiles
Install the floor tiles across the lower floor, particularly visible near the entrance and pool area. Ensure they cover the entire ground surface evenly in Dreamy Room Level 74.
Step 27. Place the Light Blue Rug in Dreamy Room Level 74
Position the light blue rug on the upper floor beneath the sofa and coffee table area. Align it to define the living space and add warmth to the floor.
Step 28. Add the Blue Floor Mat
Place the blue floor mat near the entrance on the lower floor or in front of the stairs. This provides a welcoming spot and protects the floor.
Step 29. Position Toy Blocks
Place the toy blocks on the lower floor near the pool or stairs area. Stack them casually to add a playful touch to the living space in Dreamy Room Level 74.
Step 30. Add the Purple Backpack in Dreamy Room Level 74
Position the backpack purple near the stairs or desk area on the upper floor. Lean it against furniture or place it on the floor as if ready for daily use.
Precautions and Tips
Precautions
- Watch for the small pool water feature in the lower right corner—it's easy to miss this unique element during initial placement
- The pink cat character must be positioned inside the round pet bed precisely, or it may not snap into place correctly
- Ensure all three dining chairs are evenly spaced around the table before adding food items to avoid overlap issues in Dreamy Room Level 74
- The robot panda character on the office chair requires precise alignment—drag it carefully to sit naturally at the desk
- Wall decorations and picture frames need proper spacing—place larger items first, then fill gaps with smaller decorative elements
Practical Tips
- Start with structural elements (walls, windows, ceiling) before adding furniture to establish the room layout
- Place the stairs early as they connect both floors and help visualize the space division
- When arranging the computer desk area, position the monitor first, then add keyboard and accessories for better alignment
- For the dining table setup, place the table and chairs before adding food items to ensure proper clearance
- Use the "snap-to-grid" feature by dragging items slowly near their intended position—they'll lock into place when correctly aligned in Dreamy Room Level 74
- Group similar items together: arrange all plush toys on the sofa, all wall art in one session, and all plants in another for efficient completion