Dreamy Room Level 106
Level 106 guide walkthrough, helping players solve puzzles and explore the wonderful world of Dreamy Room.
Dreamy Room Level 106 Walkthrough Guide
Dreamy Room Level 106 Room Story
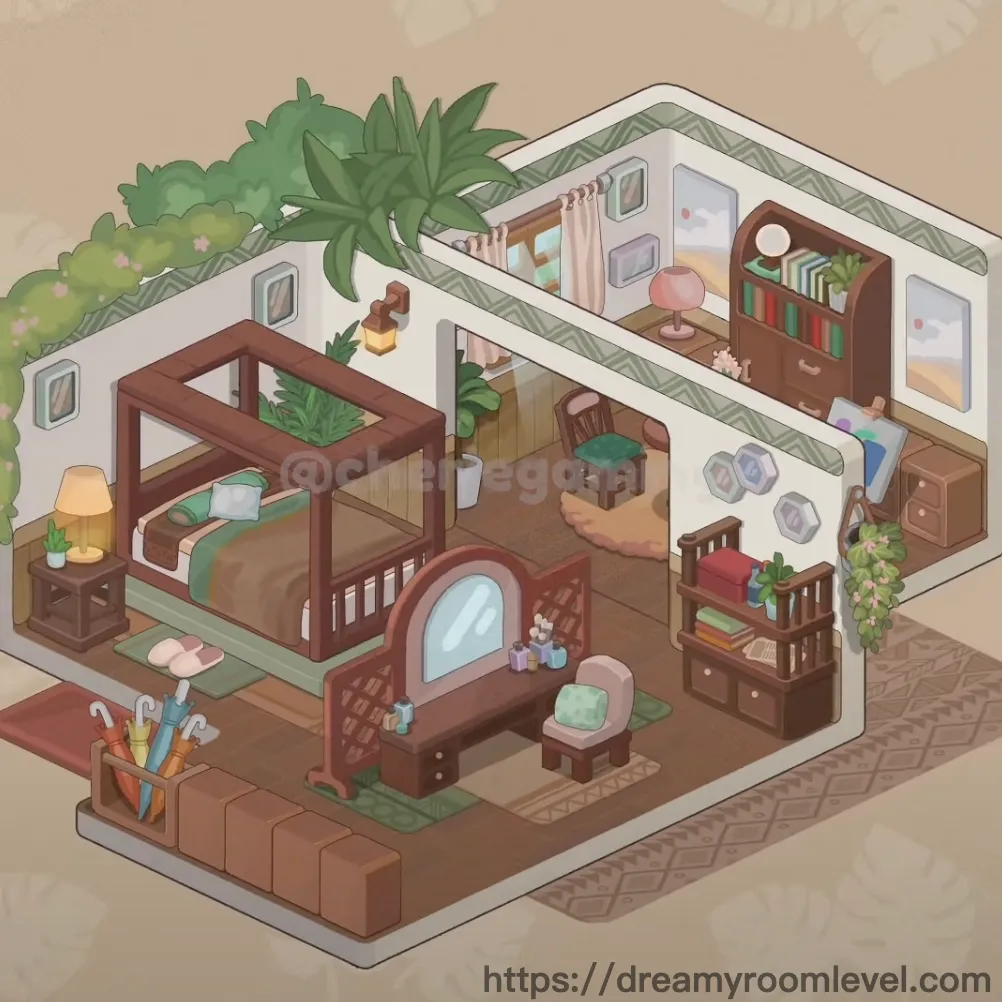
Welcome to Dreamy Room Level 106, a cozy sanctuary designed for two siblings who share everything from bedtime stories to morning giggles. This charming space features a warm wooden bunk bed adorned with soft green bedding, surrounded by lush plants that breathe life into every corner. The room sparkles with personality through colorful umbrellas by the door, a collection of beloved books on wall shelves, and playful teddy bears waiting for cuddles. Completing Dreamy Room Level 106 creates a haven where childhood memories bloom.
Dreamy Room Level 106: Step-by-Step Placement Guide
Step 1. Install Base Structure Elements
Position the wooden floor across the entire room base, ensuring the warm brown planks create a stable foundation. Add floor tiles near the entrance area and apply floor pattern for visual interest. Following Dreamy Room Level 106 design principles, these base elements establish the room's character.
Step 2. Set Up White Walls and Roof Trim in Dreamy Room Level 106
Place white wall panels around the room perimeter, creating clean boundaries. Install the roof green trim along the top edge where walls meet ceiling, adding a decorative botanical accent. This trim complements the natural theme throughout this level.
Step 3. Install Windows and Window Treatments
Mount window frames on the back wall and add wall windows on side walls for natural light. Attach the beige curtain rod above the main window, then hang flowing curtains that drape elegantly. According to Dreamy Room Level 106 layout requirements, proper window placement brightens the entire space.
Step 4. Place the Bunk Bed Frame in Dreamy Room Level 106
Position the sturdy bunk bed against the left wall, ensuring the frame sits level on the floor. This wooden furniture piece serves as the room's centerpiece. Attach the bed railing along the top bunk's edge for safety, and secure the bed ladder to the right side for easy access to the upper level.
Step 5. Add Bed Mattress and Bedding
Lay the bed mattress on both upper and lower bunk levels, aligning them perfectly with the frame edges. Spread the soft green bedding across both mattresses, smoothing out wrinkles. Completing Dreamy Room Level 106 requires proper bedding arrangement for a cozy sleeping area.
Step 6. Arrange Pillows on Both Bunks in Dreamy Room Level 106
Place regular pillow items on the upper bunk near the headboard area. Add the distinctive pink pillow to the lower bunk for a pop of color. Position pillows against the bed railing for comfortable support.
Step 7. Set Up Bedside Table and Lighting
Position the bedside table next to the lower bunk on the left side, creating a convenient surface for nighttime essentials. Place the warm yellow lamp on top, and add the nightstand lamp for additional reading light. This placement is essential for Dreamy Room Level 106 success with proper task lighting.
Step 8. Install Floor Rugs and Carpet
Spread the large green rug beside the bunk bed, covering most of the floor space. Layer the green carpet in front of the bed for extra cushioning. Place soft pink slippers on the rug near the bed ladder for easy morning access.
Step 9. Position Umbrella Stand Near Entrance in Dreamy Room Level 106
Place the umbrella stand near the room entrance at the front-left corner. Fill it with colorful umbrellas in various shades, creating a cheerful welcome point. According to Dreamy Room Level 106 layout requirements, this practical storage keeps rain gear organized.
Step 10. Mount Diamond Mirror on Wall
Install the elegant diamond shaped mirror on the left wall above the umbrella stand area. This decorative mirror reflects light and adds geometric interest. Following Dreamy Room Level 106 design principles, position it at child-friendly height for easy viewing.
Step 11. Add Vanity Mirror and Blue Mirror in Dreamy Room Level 106
Mount the vanity mirror on the back wall near the room's center for getting ready. Place the blue mirror in a complementary position, creating functional reflection points. These mirrors enhance the room's spacious feel while serving practical purposes.
Step 12. Position Pink Chair for Seating
Place the comfortable pink chair near the vanity area, providing a spot for sitting. Add the desk chair by the bookshelf zone for reading activities. Completing Dreamy Room Level 106 requires proper seating arrangements throughout the space.
Step 13. Install Wall Bookshelf System in Dreamy Room Level 106
Mount the wall bookshelf on the right wall, creating vertical storage. Add the wall shelf nearby for additional display space. These shelving units provide organized storage while maintaining the room's clean aesthetic.
Step 14. Fill Shelves with Book Collection
Arrange books on the wall shelves in neat rows, mixing sizes for visual interest. Add the complete book collection across multiple shelves. Place colored books with vibrant spines facing outward for a rainbow effect. This placement is essential for Dreamy Room Level 106 success in creating a literary corner.
Step 15. Add Teddy Bears and Stuffed Animals in Dreamy Room Level 106
Place the beloved teddy bear on the bookshelf's lower section where it's easily reachable. Position the stuffed animal on the upper bunk bed, ready for bedtime cuddles. According to Dreamy Room Level 106 layout requirements, toys should be accessible yet organized.
Step 16. Hang Wall Paintings and Art
Mount the decorative wall painting on the back wall above the seating area. Add wall art pieces throughout the room for personality. Following Dreamy Room Level 106 design principles, artwork should complement the botanical theme.
Step 17. Display Photo Frames and Wall Decorations in Dreamy Room Level 106
Hang photo frame items on various walls, showcasing cherished memories. Add wall frames in a gallery arrangement. Install the wall circle decoration as an accent piece near the ceiling area for unique visual interest.
Step 18. Install Pink Ball Lamp
Hang the whimsical pink ball lamp from the ceiling in the room's center, providing ambient overhead lighting. Ensure the table lamp shade is properly fitted for diffused, gentle illumination. Completing Dreamy Room Level 106 requires adequate lighting from multiple sources.
Step 19. Position Storage Cabinet and Dresser in Dreamy Room Level 106
Place the storage cabinet along the right wall near the bookshelf for organized storage. Position the brown dresser adjacent to it, creating a functional storage zone. Add storage drawers in accessible locations for clothing organization.
Step 20. Add Storage Boxes
Place the red storage box on top of the storage cabinet for visible organization. Arrange brown boxes on the floor near the entrance for additional storage. This placement is essential for Dreamy Room Level 106 success in maintaining tidiness.
Step 21. Position Floor Cushions in Dreamy Room Level 106
Scatter comfortable floor cushions on the front floor area, creating a cozy reading nook. Arrange them in a casual pattern for flexible seating options. According to Dreamy Room Level 106 layout requirements, cushions add comfort to hard floor surfaces.
Step 22. Add Gift Box Detail
Place the decorative gift box near the entrance corner, adding a festive touch to the room. This yellow box creates a cheerful accent point. Following Dreamy Room Level 106 design principles, small details enhance the overall charm.
Step 23. Install Ceiling Plants and Hanging Elements in Dreamy Room Level 106
Attach lush ceiling plants along the roof trim, allowing foliage to cascade downward. Add the hanging plant near the window area for natural ambiance. Drape trailing vines from various ceiling points, creating a verdant canopy effect that defines this level's botanical theme.
Step 24. Place Large Potted Floor Plants
Position the tall potted plant in the front-left corner near the entrance, creating a welcoming green focal point. Add the small plant pot on the bedside table or shelf. Place the succulent plant on the bookshelf for low-maintenance greenery. Completing Dreamy Room Level 106 requires bringing nature indoors through varied plant life.
Step 25. Arrange Botanical Decorative Elements in Dreamy Room Level 106
Add delicate pink flowers to various plant pots and vases throughout the room. Incorporate vibrant green leaves into the ceiling arrangements. Place distinctive monstera leaves as both live plants and decorative elements. This placement is essential for Dreamy Room Level 106 success in achieving the nature-inspired aesthetic.
Step 26. Add Small Decorative Accents
Scatter small decorations throughout the room on shelves, tables, and ledges. These tiny details include figurines, trinkets, and personal mementos. According to Dreamy Room Level 106 layout requirements, small touches make the space feel lived-in and loved.
Step 27. Final Walkthrough and Adjustments in Dreamy Room Level 106
Review all placed elements to ensure proper alignment and spacing. Adjust any items that appear misaligned or crowded. Following Dreamy Room Level 106 design principles, the final result should feel balanced, functional, and inviting with every element contributing to the room's harmonious atmosphere.
Tips and Tricks
Common Mistakes to Avoid
- Don't overlook the ceiling plants placement – they're easy to miss but essential for the room's botanical theme in this level
- Avoid placing the bunk bed too close to walls, which blocks access to the ladder and makes bedding arrangement difficult
- Don't forget small items like the gift box and floor cushions near the entrance, as these hidden spots are frequently missed
- Be careful with mirror placement order – installing them before large furniture helps prevent obstruction issues
- Watch for overlapping book placement on shelves, which can cause items to reject proper positioning during Dreamy Room Level 106 completion
Pro Tips for Success
- Start with floor and wall elements before adding furniture, establishing a stable base for all subsequent placements
- Use the bed ladder as a reference point when positioning bedside tables and nearby storage to maintain proper spacing
- Zoom in when placing small decorations on high shelves to ensure accurate positioning without multiple attempts
- Place ceiling plants first, then work downward to avoid having to reach through already-placed floor items
- Group similar items together (all books, all plants, all boxes) in your inventory before placing them to speed up the process in Dreamy Room Level 106
- Utilize the snap-to-grid feature by dragging items slowly near correct positions until you feel the magnetic pull indicating proper alignment