Dreamy Room Level 530
Level 530 guide walkthrough, helping players solve puzzles and explore the wonderful world of Dreamy Room.
Dreamy Room Level 530 Walkthrough Guide
Dreamy Room Level 530 Room Story
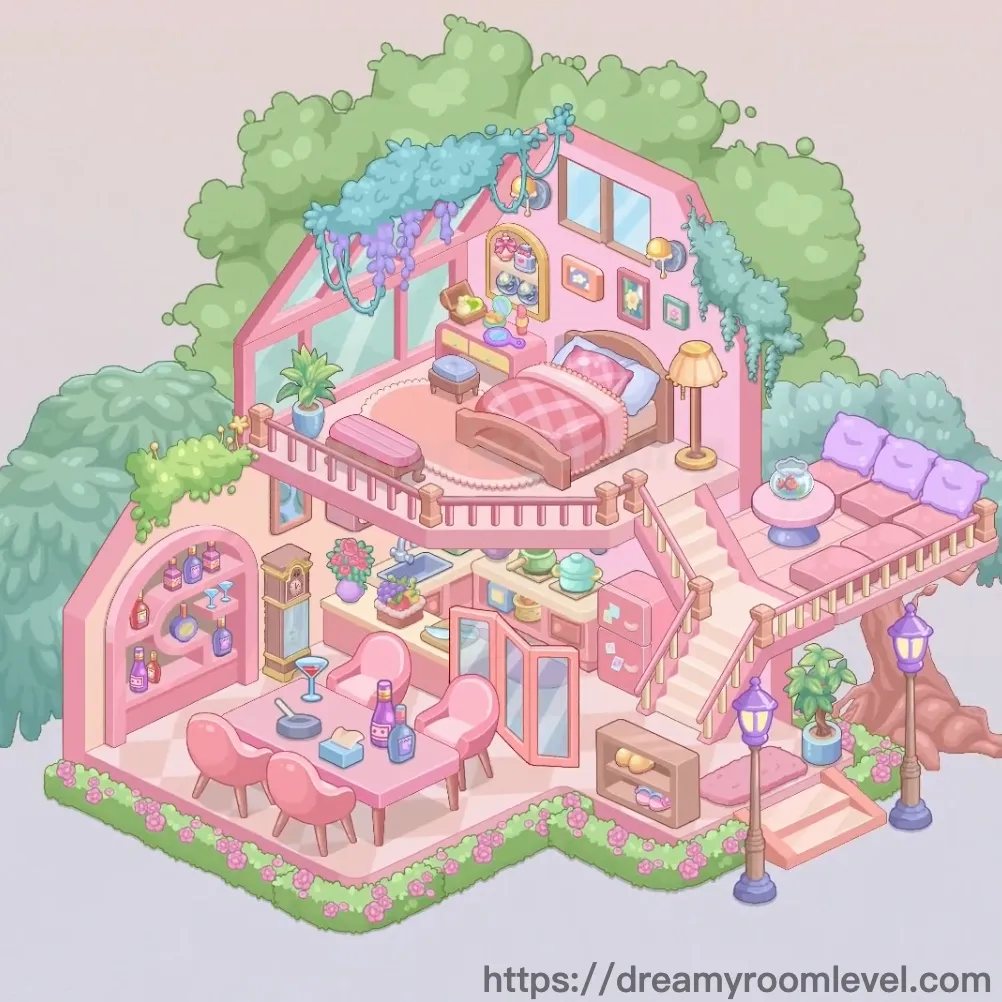
A dreamy pink villa nestled in a lush garden sanctuary where every corner whispers comfort and charm. Upstairs, soft sunlight filters through delicate curtains onto a cozy bed, while downstairs, an elegant dining space awaits afternoon tea parties. This enchanting Dreamy Room Level 530 hideaway blends indoor luxury with outdoor serenity, creating the perfect escape surrounded by blooming flowers and gentle breezes.
Dreamy Room Level 530: Step-by-Step Placement Guide
Step 1. Build the Main House Structure
Position the main house structure as the foundation of this multi-level villa. The pink-walled building should be centered in the space, establishing the two-story layout with distinct bedroom and dining areas that define Dreamy Room Level 530.
Step 2. Lay the Checkered Floor Tiles
Install the checkered floor tiles across all floor areas of the villa. These soft beige and white diamond-pattern tiles should cover the bedroom, dining room, and balcony floors, creating a cohesive elegant surface.
Step 3. Set Up Pink Walls
Place the pink walls throughout the structure. These soft rose-colored walls should define the bedroom upper level and dining room boundaries, establishing the signature pastel aesthetic of this dreamy villa.
Step 4. Position the Large Bed in Bedroom
Drag the large bed to the center of the upper bedroom floor. This wooden-framed bed should face forward, aligned with the windows and serving as the focal point of the sleeping area in Dreamy Room Level 530.
Step 5. Dress the Bed with Checkered Bedding and Pillows
Layer the pink checkered bedding over the bed, then arrange the pillows at the headboard. The gingham-patterned pink duvet should drape naturally with multiple plump pillows creating an inviting sleeping space.
Step 6. Place Bedside Table and Lamp
Set the bedside table on the right side of the bed, then position the table lamp on top. This golden floor lamp should stand beside the nightstand, providing warm ambient lighting to the bedroom.
Step 7. Install Upper Windows in Dreamy Room Level 530
Mount the upper window left and upper window right on the bedroom's back wall. These rectangular windows should be symmetrically placed, allowing natural light to flood the sleeping area.
Step 8. Hang Window Curtains
Drape the window curtains above and around the windows. These flowing fabric decorations should frame the windows gracefully, adding softness to the architectural features.
Step 9. Display Wall Paintings Collection
Arrange the wall painting yellow frame, wall painting orange frame, wall painting pink frame, and wall painting green frame on the bedroom wall. These colorful framed artworks should be hung in a gallery-style arrangement above the bed, creating visual interest in Dreamy Room Level 530.
Step 10. Set Dresser Table and Chair
Position the dresser table on the left side of the bedroom, then place the dresser chair in front of it. This vanity setup should face toward the room, creating a dedicated grooming space.
Step 11. Decorate Dresser with Tea Set and Plant
Arrange the tea set on dresser on the tabletop, including teapot and cups. Then add the potted plant on dresser beside the tea set, bringing greenery and charm to the vanity area.
Step 12. Lay Bedroom Carpet
Unroll the bedroom carpet on the bedroom floor beneath and around the bed. This decorative rug with dotted border should define the sleeping zone while adding warmth and texture to Dreamy Room Level 530.
Step 13. Install Wine Cabinet Shelf
Mount the wine cabinet shelf on the left wall of the lower dining area. This pink arched shelving unit should be positioned prominently to display the collection of beverages and decorative items.
Step 14. Stock the Wine and Cocktail Bottles
Fill the wine cabinet with wine bottles, cocktail bottles, and decorative bottles. Arrange these colorful bottles on the shelves, creating an attractive display of beverages in various shapes and hues.
Step 15. Position Round Dining Table in Dreamy Room Level 530
Place the round dining table in the center of the lower dining room. This pink circular table should be centrally positioned to serve as the gathering spot for meals and conversations.
Step 16. Arrange Four Pink Dining Chairs
Set pink dining chair 1, pink dining chair 2, pink dining chair 3, and pink dining chair 4 evenly around the dining table. These matching chairs should be spaced symmetrically, creating a complete dining set.
Step 17. Decorate Dining Table
Add the table centerpiece, drinking glasses, and candle holder to the dining table surface. Arrange these items to create an inviting tablescape ready for entertaining in Dreamy Room Level 530.
Step 18. Hang Mirror Decoration
Mount the mirror decoration on the dining room wall. This reflective piece should be positioned to enhance the sense of space and light in the lower level.
Step 19. Lay Dining Area Rug
Place the dining area rug beneath the dining table and chairs. This floor covering should define the dining zone while complementing the overall pink color scheme.
Step 20. Set Purple Balcony Sofa
Position the purple balcony sofa on the right-side balcony area. This multi-cushion seating should face outward toward the garden, creating a relaxation spot with the sofa cushions arranged comfortably.
Step 21. Add Round Coffee Table and Tea Set
Place the round coffee table in front of the balcony sofa, then set the tea set on coffee table on top. This small table should hold a teapot and serving items for outdoor refreshments in Dreamy Room Level 530.
Step 22. Install Balcony Railing
Attach the balcony railing along the edges of all outdoor platforms. These protective barriers should enclose the balcony and upper floor edges, ensuring safety while maintaining the villa's aesthetic.
Step 23. Build Staircase and Railing Posts
Construct the staircase connecting the lower and upper levels on the right side. Then install the stair railing posts along the stairs, creating a safe and elegant pathway between floors.
Step 24. Place Street Lamps Around Villa
Position street lamp 1, street lamp 2, and street lamp 3 around the villa's perimeter. These purple lantern-style lamps should stand at strategic points, providing ambient outdoor lighting.
Step 25. Plant Green Trees in Dreamy Room Level 530
Arrange the green tree left, green tree right, green tree back left, and green tree back right around the villa's exterior. These lush trees should create a natural canopy, surrounding the pink house with verdant foliage.
Step 26. Add Blue Green Vine Plants
Drape the blue green vine plants over the roof edges and along the upper walls. These cascading vines should flow naturally down from the roofline, adding organic charm to the structure.
Step 27. Plant Pink Flower Beds
Arrange the pink flower bed bottom, pink flowers left side, and pink flowers right side around the villa's base. These blooming flowers should border the structure, creating a vibrant floral frame in Dreamy Room Level 530.
Step 28. Place Potted Plants at Entry
Set the potted plant bottom left and potted plant bottom right flanking the entrance area. These containerized plants should stand symmetrically, welcoming visitors to the villa.
Step 29. Add Storage Cabinet and Hanging Decorations
Position the storage cabinet bottom in a convenient location on the lower level. Then hang the hanging decorations from the ceiling or walls, adding whimsical touches throughout the space.
Step 30. Install Vine Decorations on Roof
Drape the vine decorations on roof along the roofline and architectural elements. These final botanical accents should complete the enchanted garden villa aesthetic of Dreamy Room Level 530.
Tips and Important Notes
Important Notes
- The multi-level structure requires placing bedroom furniture on the upper floor first before arranging the lower dining area to avoid overlapping placement issues
- Wall paintings must be hung after the walls are fully established, as they attach to specific wall surfaces and won't stick to incomplete structures
- Vine plants and hanging decorations require the roof and ceiling elements to be in place before they can be properly draped
- The staircase and railing posts must be aligned precisely to connect both levels smoothly in Dreamy Room Level 530
- Small items like drinking glasses and tea set pieces have tiny placement zones; zoom in for accurate positioning
Useful Tips
- Begin with architectural elements (house structure, walls, floors) before adding any furniture or decorations to establish the villa's framework
- When arranging symmetrical pairs like trees, lamps, or potted plants, place one side completely before mirroring to the opposite side for perfect balance
- The checkered floor pattern helps align furniture; use the tile edges as guides for centering tables and beds
- Characters and small decorative items placed last will naturally find spaces between larger furniture pieces without causing overlap conflicts
- If wine bottles or small items bounce back from the cabinet, try dragging them to the center of each shelf compartment where the snap point is strongest
- The pink color palette makes it easier to identify matching sets; group similar-colored items together during placement for visual harmony in Dreamy Room Level 530