Dreamy Room Level 138
Level 138 guide walkthrough, helping players solve puzzles and explore the wonderful world of Dreamy Room.
Dreamy Room Level 138 Walkthrough Guide
Dreamy Room Level 138: Room Story
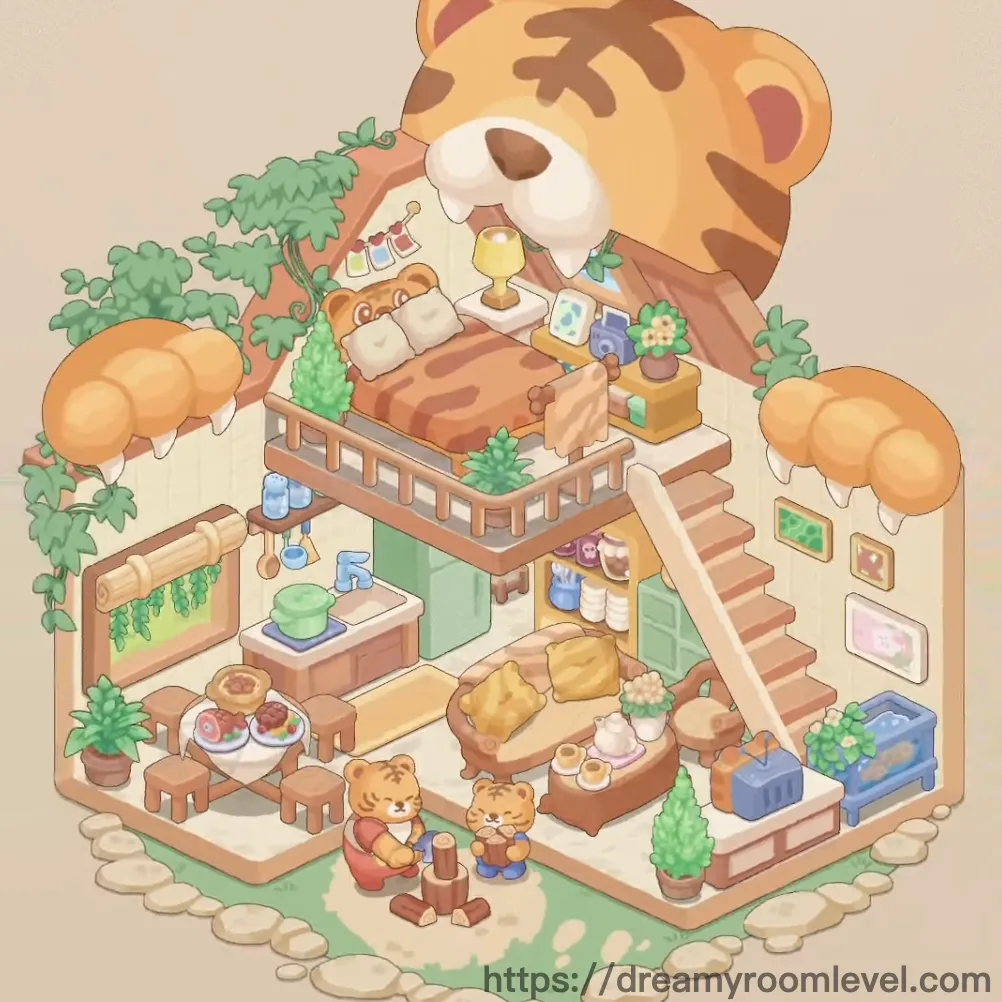
In a cozy treehouse nestled among orange autumn leaves, a creative tiger designer has built the perfect two-story sanctuary. The warm wooden tones blend beautifully with green accents and vibrant decorations. Upstairs, a peaceful loft bedroom features striped bedding and a golden trophy celebrating achievements. Below, friends gather around the dining table, sharing meals while potted plants bring life to every corner. This Dreamy Room Level 138 space perfectly captures the essence of comfort and creativity, where every item tells a story of friendship and home.
Dreamy Room Level 138: Step-by-Step Placement Guide
Step 1. Place the Tiger Character Large
Position the tiger character large decoration as the room's backdrop element at the top-center of the space. This oversized tiger head serves as the charming architectural feature that defines this Dreamy Room Level 138 treehouse aesthetic.
Step 2. Install Wall and Floor Tiles
Set up the basic wall structure with light cream-colored panels throughout the room, then lay down the floor tiles in a warm beige pattern with subtle texture across both levels. These foundational elements create the canvas for Dreamy Room Level 138.
Step 3. Add Green Vines and Orange Tree Decoration
Drape the green vines along the upper left wall area and position the orange tree decoration elements on both sides of the room. Add green leaves around the perimeter to create the natural treehouse ambiance essential to Dreamy Room Level 138.
Step 4. Build the Loft Bed Structure
Place the loft bed frame on the upper level of the room, positioned centrally with wooden railings on three sides. This elevated sleeping area is a key feature in Dreamy Room Level 138, creating the distinctive two-story layout.
Step 5. Add White Mattress and Striped Bedding
Layer the white mattress onto the loft bed frame, then dress it with striped bedding in warm brown and cream tones. Add the pillow white at the head of the bed for complete comfort in this Dreamy Room Level 138 sleeping area.
Step 6. Install Wooden Stairs and Railing
Attach the wooden stairs to the right side of the loft bed, ensuring each step aligns properly for safe access. Add the wooden railing along the staircase and loft edge following Dreamy Room Level 138 safety design.
Step 7. Place Bedside Table and Lamp
Position the bedside table wood on the loft level near the bed's right corner, then place the lamp yellow on top to provide warm lighting for nighttime reading in Dreamy Room Level 138.
Step 8. Display Yellow Trophy and Photo Frame
Set the yellow trophy prominently on the bedside table next to the lamp, and position the photo frame nearby to showcase cherished memories according to Dreamy Room Level 138 personalization.
Step 9. Arrange Books on Loft Level
Place the book red and book blue on the upper level bedside table or bed surface. Add the camera nearby to capture special moments in this Dreamy Room Level 138 creative space.
Step 10. Set Up Dining Table
Position the dining table on the lower level in the left-center area with its white circular top and wooden base. This becomes the social hub for meals and gatherings in Dreamy Room Level 138.
Step 11. Add Wooden Chair and Small Stool Brown
Place the wooden chair on one side of the dining table, and position the small stool brown nearby for additional seating following Dreamy Room Level 138 layout.
Step 12. Arrange Food Plate with Steak and Vegetables
Set the food plate on the dining table, topped with a delicious steak, fresh vegetables, and colorful fruits to create an inviting meal scene in Dreamy Room Level 138.
Step 13. Place Yellow Cat Shaped Sofa
Position the yellow cat shaped sofa in the lower-right area of the room, creating a cozy seating spot. Add the round ottoman brown in front for a complete relaxation zone in Dreamy Room Level 138.
Step 14. Add Cushion to Seating Area
Place the cushion on the cat-shaped sofa to enhance comfort and add a pop of color to this charming Dreamy Room Level 138 lounging space.
Step 15. Install Green Refrigerator and Door
Position the green refrigerator against the back wall in the kitchen area, and place the green door nearby as an accent element maintaining the cohesive color scheme of Dreamy Room Level 138.
Step 16. Set Up White Shelf Storage
Mount the white shelf on the lower level near the kitchen area to provide storage and display space for various items in this organized Dreamy Room Level 138 design.
Step 17. Arrange Bottles and Cups
Place the blue bottle small and blue bottle large on shelves or counters for hydration. Add the white cup nearby for beverages in Dreamy Room Level 138.
Step 18. Add Blue Container and Purple Item
Position the blue container on lower shelves for storage, and place the purple item as a decorative accent on the upper loft level according to Dreamy Room Level 138 color coordination.
Step 19. Place White Cylindrical Items
Arrange the white cylindrical items on shelves near the refrigerator, likely representing storage containers or decorative elements in this well-organized Dreamy Room Level 138 space.
Step 20. Add Tissue Box
Place the tissue box on the bedside table or nearby surface on the loft level for convenient access in this thoughtfully designed Dreamy Room Level 138 bedroom area.
Step 21. Position Hamster Character with Glasses
Place the hamster character with glasses on the loft level near the bed, adding personality and charm to this Dreamy Room Level 138 living space.
Step 22. Add Hedgehog Character Green
Position the hedgehog character green on the lower level near plants or furniture, bringing life to the room according to Dreamy Room Level 138 character placement.
Step 23. Place Small Tiger Characters
Set the small tiger character sitting on the floor near the dining area, and position the small tiger character standing nearby to create a friendly gathering scene in Dreamy Room Level 138.
Step 24. Add Potted Cactus
Place the potted cactus in the lower-right corner of the room, adding a touch of greenery that requires minimal care in this Dreamy Room Level 138 botanical collection.
Step 25. Position Potted Plant Round
Set the potted plant round near the kitchen area or on shelves, contributing to the natural atmosphere of Dreamy Room Level 138.
Step 26. Hang Plant Vine
Drape the hanging plant vine from the ceiling or upper areas, allowing it to cascade naturally and enhance the treehouse feeling in Dreamy Room Level 138.
Step 27. Install Aquarium Tank Green
Position the aquarium tank green against a wall on the lower level, adding aquatic life and a calming water element to this diverse Dreamy Room Level 138 environment.
Step 28. Lay White Mat
Place the white mat near the entrance or seating area on the lower level for comfort and style in this Dreamy Room Level 138 flooring plan.
Step 29. Add Yellow Rug
Position the yellow rug under the seating area or near the sofa, defining the space and adding warmth to complete the Dreamy Room Level 138 lower level.
Step 30. Place Blue Radio
Set the blue radio on a shelf or table to provide entertainment and music throughout this lively Dreamy Room Level 138 space.
Step 31. Add Wooden Log
Position the wooden log as a rustic decorative element or natural seat near the outdoor-themed areas of Dreamy Room Level 138.
Step 32. Arrange Decorative Stones Circle
Place the decorative stones circle around the base of the structure or near plants, creating a natural pathway element in Dreamy Room Level 138.
Step 33. Position Gift Box Yellow
Set the gift box yellow on the floor near the entrance or under the loft, suggesting celebration and surprises in this cheerful Dreamy Room Level 138 setting.
Step 34. Install Wooden Beam
Add the wooden beam as a structural support element connecting the levels, reinforcing the treehouse architecture of Dreamy Room Level 138.
Step 35. Hang Wall Painting Landscape
Mount the wall painting landscape on the wall to add artistic flair and visual interest to the living space in Dreamy Room Level 138.
Step 36. Add Wall Decoration Small
Place the wall decoration small items on various walls throughout the room to personalize the space in Dreamy Room Level 138.
Step 37. Position Storage Box Blue
Place the storage box blue on the lower level for organizing items and maintaining the tidy aesthetic of Dreamy Room Level 138.
Tips and Tricks for Dreamy Room Level 138
Common Pitfalls
- The loft bed area can be tricky since multiple items overlap; place the bed frame first before adding mattress and bedding to avoid repositioning
- Small items on the bedside table like the trophy and photo frame may require precise placement due to limited surface area
- The wooden stairs need proper alignment with the loft entrance; drag from the bottom step upward for accurate positioning
- Plant items around the room's perimeter can be obscured by the large tiger decoration; zoom in to locate hidden placement spots
- Characters placed on the floor may slide if not positioned on flat surfaces; ensure they're on the rug or mat areas for stability
Expert Strategies
- Start with large furniture pieces to establish the room layout, then fill in smaller decorative items around them for efficient Dreamy Room Level 138 completion
- When placing items on the loft level, approach from above for better visibility and control over precise positioning
- Use the color coordination of green items (refrigerator, door, plants) to quickly identify their correct placement zones
- Group similar items together during placement; arrange all books, bottles, and small objects in batches to maintain Dreamy Room Level 138 organization flow
- The yellow and blue color scheme provides visual cues; match item colors to their designated areas for faster completion
- Take advantage of the furniture's natural snap points; when items glow or highlight, they're correctly positioned in Dreamy Room Level 138