Dreamy Room Level 537
Level 537 guide walkthrough, helping players solve puzzles and explore the wonderful world of Dreamy Room.
Dreamy Room Level 537 Walkthrough Guide
Dreamy Room Level 537 Room Story
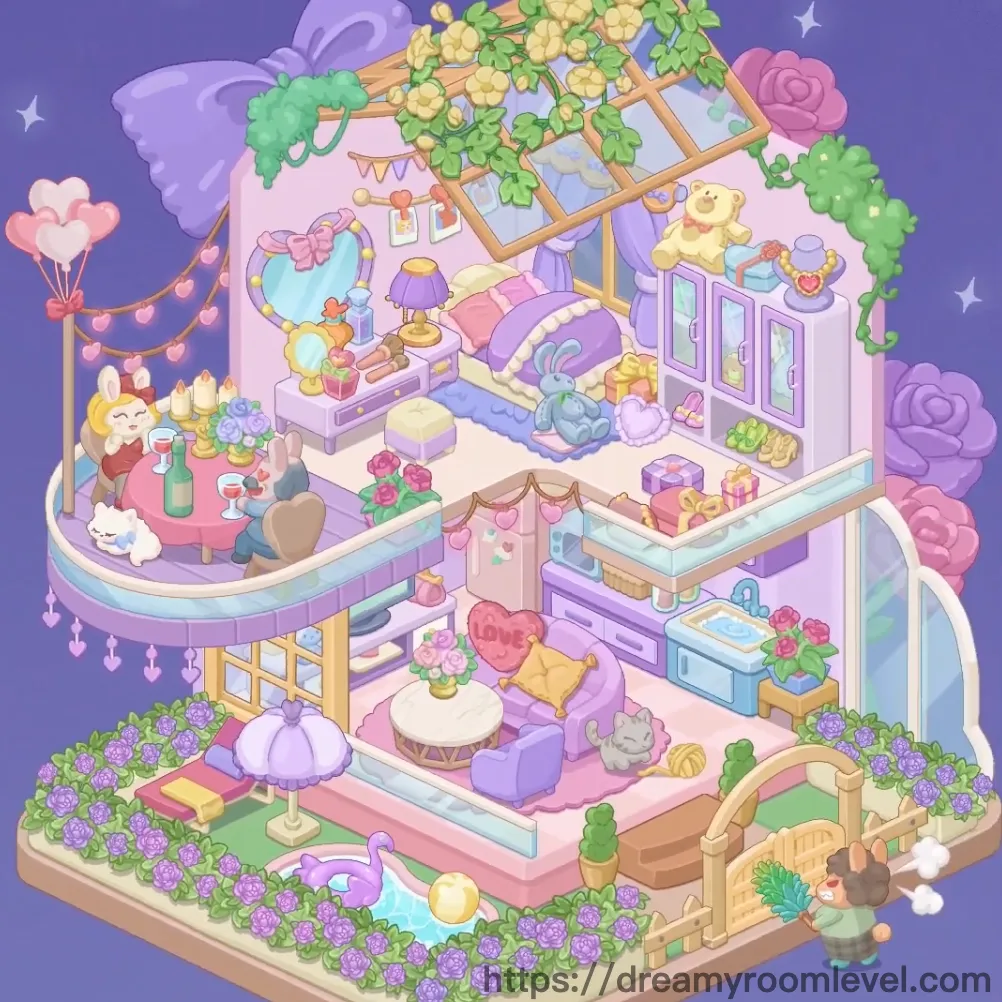
Welcome to a magical garden loft where dreams bloom in every corner. This enchanting Dreamy Room Level 537 sanctuary belongs to Luna, a young artist who transformed her rooftop space into a whimsical paradise. Purple clouds drift across starlit walls while yellow flowers cascade from wooden trellises overhead. Her cozy purple bed nestles beneath the floral canopy, surrounded by plush companions and twinkling lights. Multiple levels create intimate spaces for dining with wine and candles, relaxing on cushioned sofas, and tending to vibrant hydrangeas. Every detail reflects Luna's love for nature and comfort, making this dreamy garden loft a perfect escape from the world below.
Dreamy Room Level 537: Step-by-Step Placement Guide
Step 1. Place Green Carpet Foundation
Drag the green carpet to cover the middle floor layer completely. This carpet serves as the base foundation for Dreamy Room Level 537 and should align with the floor edges perfectly, creating a fresh garden-like atmosphere for the entire room layout.
Step 2. Add Pink Carpet Layer
Position the pink carpet on the upper floor section, covering the bedroom area. Place it precisely to align with the floor boundaries in Dreamy Room Level 537, creating a soft, dreamy foundation for the sleeping space above.
Step 3. Install Wooden Flower Trellis
Place the wooden flower trellis at the top of the room structure, spanning across the ceiling area. This wooden framework should be positioned horizontally to support climbing plants and create the garden canopy effect that defines Dreamy Room Level 537.
Step 4. Arrange Yellow Flowers on Trellis
Drag yellow flower 1, yellow flower 2, yellow flower 3, and yellow flower 4 onto the wooden trellis. Distribute them evenly across the framework, allowing them to cascade naturally downward to create the blooming garden ceiling characteristic of this level.
Step 5. Add Green Vine Plant
Position the green vine plant on the right side of the trellis, letting it drape down naturally. The vines should intertwine with the yellow flowers in Dreamy Room Level 537, creating a lush, organic canopy effect.
Step 6. Place Pink Rose Bush
Drag the pink rose bush to the upper right corner of the room structure. Position it near the edge where it can cascade down the side, adding a romantic floral accent to the garden loft design.
Step 7. Position Green Bush Decoration
Place the green bush on the upper left side of the structure. This greenery should be positioned to balance the pink rose bush on the opposite side, creating symmetrical garden aesthetics in Dreamy Room Level 537.
Step 8. Hang Colorful Light String
Drag the colorful light string across the left side of the room, draping it from the upper level down toward the middle section. The lights should create a warm, festive glow that illuminates the dining and relaxation areas below.
Step 9. Add Purple Cloud Decorations
Position the purple cloud decoration on the upper left background wall. Place it high up to create a dreamy sky effect that enhances the magical atmosphere of Dreamy Room Level 537.
Step 10. Place Pink Cloud Decoration
Drag the pink cloud decoration to the upper right background area. Position it to complement the purple clouds, creating a soft, dreamy sky backdrop for the entire room scene.
Step 11. Add Star Decorations
Place star decoration 1 and star decoration 2 on the background walls near the clouds. Scatter them to create a twinkling night sky effect that completes the celestial theme in Dreamy Room Level 537.
Step 12. Position Purple Bed in Bedroom
Drag the purple bed to the upper floor bedroom area, placing it in the center-right position beneath the flower trellis. The bed should be the focal point of the sleeping space, aligned parallel to the floor edge.
Step 13. Add Pink Pillow and Purple Blanket
Place the pink pillow at the head of the bed and drape the purple blanket across the mattress. These bedding items should be positioned naturally to create a cozy, inviting sleeping arrangement in Dreamy Room Level 537.
Step 14. Place Bedside Table and Lamp
Position the bedside table to the left of the bed, then place the table lamp on top of it. The lamp should be centered on the table surface, providing ambient lighting for the bedroom area.
Step 15. Add Teddy Bear and Duck Plush
Place the teddy bear plush on the right side of the bed and position the yellow duck plush near the headboard area. These adorable companions add warmth and personality to the sleeping space in Dreamy Room Level 537.
Step 16. Position Vanity Mirror Setup
Drag the vanity mirror to the left side of the bedroom floor, placing it against the wall. Add the makeup items on the vanity surface to create a functional beauty station.
Step 17. Arrange Photo Frames on Wall
Place photo frame 1, photo frame 2, and photo frame 3 on the bedroom wall behind the bed. Arrange them in a decorative pattern to personalize the space in Dreamy Room Level 537.
Step 18. Add Gift Boxes in Bedroom
Position gift box 1, gift box 2, and gift box 3 on the bedroom floor near the vanity area. Stack or arrange them decoratively to add a festive touch to the room.
Step 19. Place Round Dining Table
Drag the round dining table to the left balcony area on the middle level. Position it near the edge where it can serve as an intimate dining spot with a view in Dreamy Room Level 537.
Step 20. Set Wine Bottle and Glasses
Place the wine bottle on the dining table, then position wine glass 1 and wine glass 2 beside it. Arrange them to create an elegant dining setup for romantic evenings.
Step 21. Add Candles and Flower Vases
Position the candles on the dining table for ambiance, then place flower vase 1 and flower vase 2 nearby. Add purple flowers to the vases to enhance the romantic atmosphere in Dreamy Room Level 537.
Step 22. Position White Cat Plush
Place the white cat plush on the dining table or nearby surface. This adorable companion adds a playful touch to the dining area, making the space feel more lived-in and cozy.
Step 23. Place Purple Sofa in Living Area
Drag the purple sofa to the lower right section of the middle floor. Position it to create a comfortable seating area that faces inward, perfect for relaxation in Dreamy Room Level 537.
Step 24. Add Cushions to Sofa
Place the yellow cushion and heart cushion on the purple sofa. Arrange them decoratively to add color contrast and extra comfort to the seating area.
Step 25. Position White Round Table and Stool
Place the white round table in front of the sofa, then add the purple stool beside it. This creates a functional coffee table setup for the living area in Dreamy Room Level 537.
Step 26. Add Gray Cat Plush
Position the gray cat plush on the white round table or nearby floor. This cute decoration adds personality and warmth to the living space.
Step 27. Place Storage and Blue Cabinets
Drag the storage cabinet to the back wall of the middle floor, then position the blue cabinet adjacent to it. These functional pieces provide storage while maintaining the room's aesthetic in Dreamy Room Level 537.
Step 28. Arrange Flower Pots on Ground Level
Position flower pot 1, flower pot 2, and flower pot 3 around the ground level perimeter. Distribute them evenly to create a garden border effect.
Step 29. Plant Purple Hydrangeas
Place purple hydrangea 1, purple hydrangea 2, and purple hydrangea 3 in the flower pots and around the ground level. These vibrant blooms should be scattered to create a lush garden atmosphere in Dreamy Room Level 537.
Step 30. Install Arched Gate
Drag the arched gate to the lower right section of the ground level. Position it as an entrance feature that adds architectural charm and defines the garden space boundary.
Step 31. Add White Fence
Place the white fence along the ground level perimeter, particularly near the arched gate. The fence should create a charming garden border that completes the outdoor aesthetic in Dreamy Room Level 537.
Step 32. Position Bunny Plush
Place the bunny plush on the ground level near the arched gate or fence. This adorable decoration adds a whimsical touch to the garden entrance area.
Step 33. Add Green Plant Decorations
Position the green plant decoration around the ground level, filling in gaps between larger elements. These plants should enhance the lush garden atmosphere throughout Dreamy Room Level 537.
Step 34. Place Rainbow Decoration
Drag the rainbow decoration to a visible location on the structure, possibly near the arched gate or on a wall. This colorful accent adds a magical, dreamy touch to the overall scene.
Step 35. Add Final Bow Decoration
Position the bow decoration on a prominent element like a gift box, fence post, or furniture piece. This finishing touch adds a festive, polished look to complete Dreamy Room Level 537.
Tips and Tricks
Common Mistakes
- The yellow flowers on the trellis can be tricky to position correctly; ensure they cascade naturally downward rather than appearing stiff or misaligned with the wooden framework.
- Players often overlook the small plush toys scattered across different levels; check the dining table, sofa area, and ground level carefully to place the white cat, gray cat, and bunny plush in their designated spots.
- The photo frames on the bedroom wall require precise alignment; misplacing them can make the wall look cluttered rather than decoratively arranged.
- Gift boxes are easily forgotten in the bedroom corner; make sure all three are placed before moving to other areas in Dreamy Room Level 537.
- The purple hydrangeas need to be distributed evenly around the ground level; clustering them in one area will create an unbalanced garden appearance.
Useful Strategies
- Start with the carpets and structural elements first to establish the room's foundation, then work from top to bottom through each level for systematic completion.
- When placing the flower trellis and cascading plants, drag them from above and let them naturally fall into position to achieve the organic draping effect.
- For the multi-level furniture arrangement, complete one floor entirely before moving to the next level to avoid confusion and ensure proper item placement.
- Use the "snap-to" feature when aligning the dining table setup; the wine bottle, glasses, and candles will automatically position correctly when dragged near their designated spots.
- The light string and cloud decorations should be placed early to establish the dreamy atmosphere, making it easier to visualize the final layout of Dreamy Room Level 537.
- When arranging small decorative items like cushions and plush toys, place larger furniture first to identify the exact spots where these accents will fit naturally without overlapping.