Dreamy Room Level 539
Level 539 guide walkthrough, helping players solve puzzles and explore the wonderful world of Dreamy Room.
Dreamy Room Level 539 Walkthrough Guide
Dreamy Room Level 539 Room Story
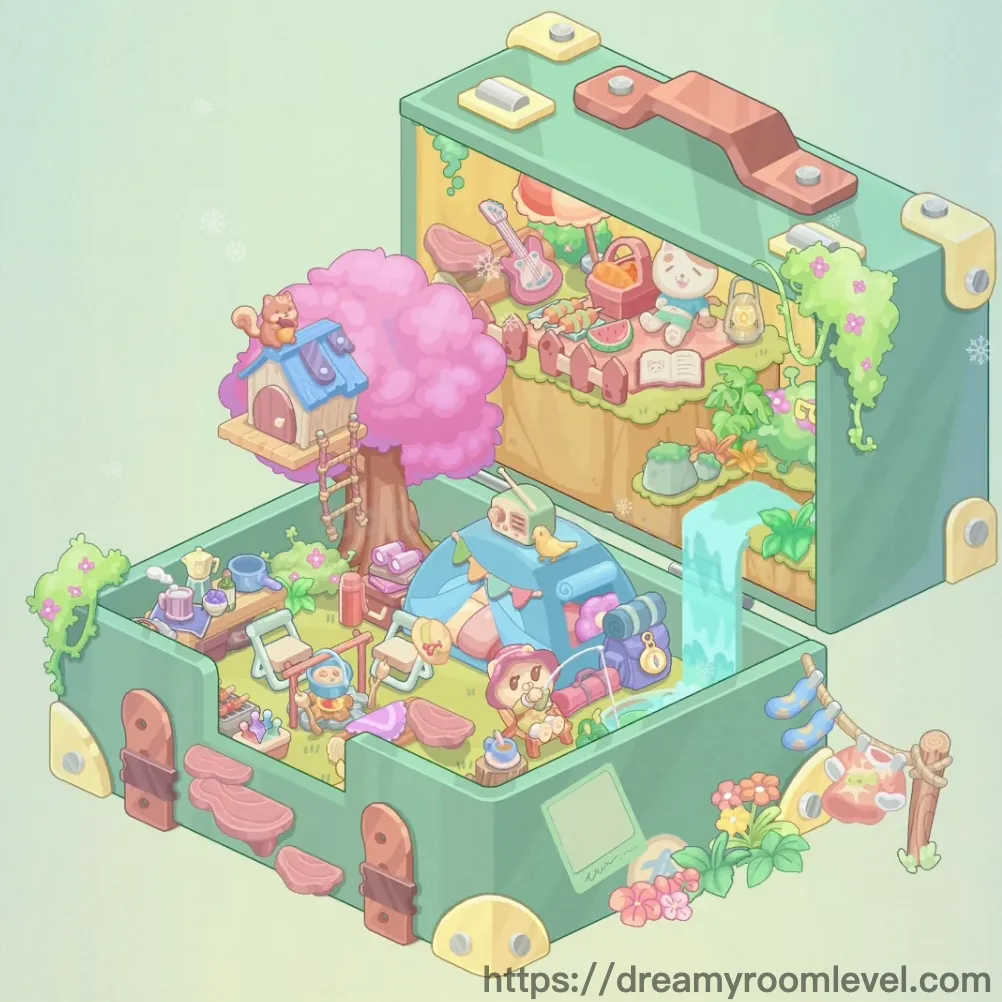
Welcome to Emma's magical outdoor camping paradise, a whimsical retreat nestled beside a sparkling waterfall. This enchanting Dreamy Room Level 539 sanctuary features a charming tree house with a pink cotton candy tree, where her favorite bear companion keeps watch from the blue-roofed perch. Below, a cozy blue tent sits on soft grass, surrounded by picnic essentials and a crackling barbecue grill. The upper deck showcases her pink guitar beneath a striped umbrella tent, while a curious white cat plush guards the watermelon slices. From the sizzling sausages on the grill to the telescope pointed at starry skies, every element reflects Emma's love for nature and adventure, creating the perfect escape for dreamy camping nights.
Dreamy Room Level 539: Step-by-Step Placement Guide
Step 1. Lay Grass Base Foundation
Drag the grass base to cover the entire ground area. This foundation should align with all floor boundaries in Dreamy Room Level 539, creating a natural grass terrain that supports the camping scene.
Step 2. Position Waterfall Feature
Place the waterfall on the right side of the scene, letting it cascade down from the upper level to the lower ground. The waterfall should flow naturally, creating the scenic water feature that defines this outdoor paradise.
Step 3. Add Stones Around Waterfall
Position stone 1 and stone 2 near the waterfall base. Place them strategically to create a natural rock formation around the water feature in Dreamy Room Level 539.
Step 4. Plant Pink Tree
Drag the pink tree to the left side of the scene. This magnificent pink-foliaged tree should be positioned prominently as it serves as the base for the tree house structure.
Step 5. Build Tree House on Pink Tree
Position the tree house within the branches of the pink tree. The blue-roofed structure should sit securely in the tree canopy, creating an elevated play space in Dreamy Room Level 539.
Step 6. Place Bear Plush on Tree House
Add the bear plush on tree house to the tree house platform or roof area. This adorable guardian should be visible from below, watching over the camping scene.
Step 7. Install Wooden Ladder
Drag the wooden ladder to connect the ground level to the tree house. Position it securely against the tree trunk to provide access to the elevated platform.
Step 8. Add Wooden Sign Board
Place the wooden sign board near the tree house or on the tree trunk. This decorative sign should be positioned where it's easily visible in Dreamy Room Level 539.
Step 9. Drape Green Vines on Walls
Position green vine 1, green vine 2, green vine 3, and green vine 4 along the back walls. Distribute them to create a lush, overgrown natural effect that frames the scene.
Step 10. Set Up Pink and White Umbrella Tent
Drag the pink and white umbrella tent to the upper rear platform area. This striped canopy should be positioned centrally on the elevated deck, creating a shaded lounging spot.
Step 11. Place Pink Guitar Under Umbrella
Position the pink guitar beneath the umbrella tent on the upper platform. Lean it casually against a surface to create a musical atmosphere in Dreamy Room Level 539.
Step 12. Add Pink Hat
Place the pink hat near the guitar on the upper deck. This accessory should rest on the platform surface, adding a personal touch to the lounging area.
Step 13. Position White Cat Plush
Drag the white cat plush to the upper platform near the umbrella tent. This adorable companion should sit upright, keeping watch over the watermelon slices.
Step 14. Add Orange Bag
Place the orange bag on the upper platform floor. Position it near the umbrella tent area to add functional storage to the camping setup in Dreamy Room Level 539.
Step 15. Arrange Watermelon Slices
Position watermelon slice 1 and watermelon slice 2 on the upper platform near the white cat plush. These refreshing treats should be displayed prominently as camping snacks.
Step 16. Place Open Book
Add the open book to the upper platform surface. Position it as if someone just set it down while reading, creating a cozy reading nook atmosphere.
Step 17. Hang Yellow Lantern
Position the yellow lantern on the upper platform or hanging from the umbrella structure. This lighting element should be placed to illuminate the evening camping scene in Dreamy Room Level 539.
Step 18. Set Up Blue Camping Tent
Drag the blue camping tent to the center-right area of the main ground level. This tent should be the focal point of the camping area, positioned with its entrance facing outward.
Step 19. Add Yellow Bird Plush
Place the yellow bird plush on top of the blue tent or nearby on the ground. This cheerful companion adds a playful touch to the camping setup.
Step 20. Lay Picnic Mat
Position the picnic mat in front of or beside the blue tent. This mat should create a comfortable sitting area for the camping scene in Dreamy Room Level 539.
Step 21. Arrange Pillows on Picnic Area
Place pink pillow 1, pink pillow 2, and purple pillow on the picnic mat and around the tent. Scatter them to create comfortable lounging spots.
Step 22. Add Sleeping Bag
Position the sleeping bag inside or near the tent entrance. Roll it out naturally to create a realistic camping sleeping arrangement.
Step 23. Place Telescope
Drag the telescope to the ground level near the tent. Position it pointing upward as if ready for stargazing activities in Dreamy Room Level 539.
Step 24. Add Pink Backpack
Position the pink backpack near the tent or picnic area. Place it on the ground as functional camping gear storage.
Step 25. Place Camping Cup
Add the camping cup to the picnic area or near the tent. This drinkware should be positioned as if ready for use during the camping trip.
Step 26. Set Up Barbecue Grill
Drag the barbecue grill to the left side of the ground level. Position it in an open area where it can serve as the cooking station in Dreamy Room Level 539.
Step 27. Add Sausages to Grill
Place the sausages on the barbecue grill. Position them as if they're cooking, creating a realistic outdoor cooking scene.
Step 28. Position Small Picnic Table and Stools
Place the small picnic table near the barbecue area, then position wooden stool 1 and wooden stool 2 around it. Create a dining setup for outdoor meals.
Step 29. Add Yellow Teapot and Blue Cup
Position the yellow teapot on the picnic table, then place the blue cup beside it. These items complete the beverage service area in Dreamy Room Level 539.
Step 30. Place Picnic Basket
Add the picnic basket near the picnic table or on the ground nearby. This storage item should be positioned as if ready to supply food for the outdoor meal.
Step 31. Position Bear Plush on Ground
Place the bear plush on ground near the picnic area. This adorable companion should sit naturally as part of the camping scene.
Step 32. Add Frog Plush Near Waterfall
Position the frog plush near the waterfall or on the stones. This cute decoration should be placed where it complements the water feature in Dreamy Room Level 539.
Step 33. Plant Pink Flowers
Drag pink flower 1, pink flower 2, pink flower 3, and pink flower 4 around the scene perimeter. Distribute them evenly to create colorful garden accents.
Step 34. Add Purple Flowers
Position purple flower 1 and purple flower 2 among the pink flowers. Scatter them to create variety in the floral decorations.
Step 35. Place Yellow Flowers
Add yellow flower 1 and yellow flower 2 to complete the flower garden border around the camping area in Dreamy Room Level 539.
Step 36. Arrange Green Plants
Position green plant 1, green plant 2, green plant 3, and green plant 4 throughout the scene. Place them to fill gaps and enhance the natural outdoor atmosphere.
Step 37. Add Roof Decorations
Place the yellow tray on roof and pink tray on roof on the upper structure rooftops. These decorative elements add colorful accents to the elevated areas.
Step 38. Install Pink Slide Steps
Position the pink slide steps on the side of the structure. This playful element should connect different levels, adding an interactive feature to Dreamy Room Level 539.
Step 39. Add Yellow Round Button
Place the on a visible surface or roof area. This decorative accent should be positioned where it complements the overall color scheme.
Step 40. Position Green Flower Pot and Bottle
Add the green flower pot to a platform or ground area, then place the bottle decoration nearby. These final touches complete the camping paradise setup in Dreamy Room Level 539.
Tips and Tricks
Common Mistakes
- The tree house placement requires careful positioning on the pink tree; if placed incorrectly, the ladder won't align properly with the structure in Dreamy Room Level 539.
- Players often overlook the small plush toys scattered throughout the scene; check near the waterfall for the frog, on the tent for the bird, and in the tree house for the bear.
- The barbecue grill and sausages need precise alignment; placing the sausages before positioning the grill can cause placement issues.
- Vine decorations on the walls should be distributed evenly; clustering them on one side creates an unbalanced appearance in the camping scene.
- The pillows around the picnic mat require specific placement; randomly scattering them can make the lounging area look messy rather than cozy.
Useful Strategies
- Start with the large structural elements like the grass base, waterfall, and pink tree before adding smaller decorative items for better spatial organization.
- When placing the camping tent and picnic area, position the tent first as an anchor point, then arrange pillows and accessories around it for balanced composition.
- Group related items together during placement; set up the entire barbecue area at once, then complete the picnic table setup before moving to other zones in Dreamy Room Level 539.
- Use the waterfall as a natural divider; place water-related items like the frog plush and stones on the right side, keeping camping equipment on the left and center.
- The upper platform items should be placed after completing the ground level; this prevents overlooking small items like the guitar and watermelon slices in the elevated areas.
- Save the flowers and plants for last; they fill visual gaps and are easier to distribute once all major furniture and equipment are positioned in this outdoor camping paradise.