Dreamy Room Level 70
Level 70 guide walkthrough, helping players solve puzzles and explore the wonderful world of Dreamy Room.
Dreamy Room Level 70 Walkthrough Guide
Dreamy Room Level 70 Room Story
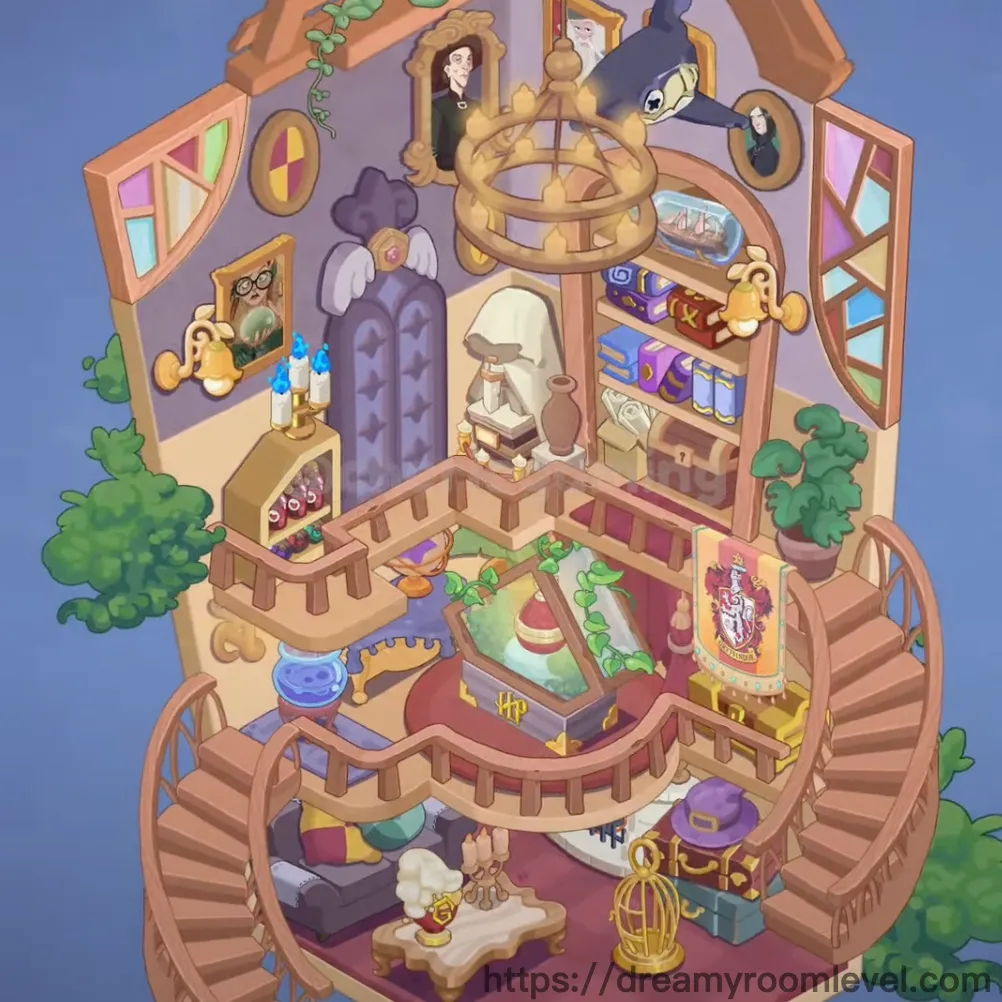
In a forgotten corner of an ancient castle tower, a young wizard has created their personal sanctuary. Surrounded by mystical portraits, spell books, and enchanted artifacts, this Dreamy Room Level 70 represents a student's dedication to mastering the magical arts. Purple hues blend with golden accents, while potions bubble softly beside weathered tomes. Through arched windows, vines creep inward, as if nature itself is drawn to the magic within these walls.
Dreamy Room Level 70: Step-by-Step Placement Guide
Step 1. Install Wooden Floor Boards as Foundation
Drag the wooden floor boards to cover the entire base of the room. This establishes the foundation for Dreamy Room Level 70 and provides the warm, aged aesthetic essential for a wizard's study.
Step 2. Position Wooden Support Beams in Dreamy Room Level 70
Place the wooden support beams along the upper corners and edges of the room. These structural elements frame the tower's architecture and support the ceiling structure above.
Step 3. Add Wooden Beams Across Ceiling
Install the wooden beams horizontally across the top portion of the room. Align them parallel to create the tower's characteristic timber framework visible in Dreamy Room Level 70.
Step 4. Place Round Window Left on West Wall
Position the round window left on the left side wall, about two-thirds up from the floor. This circular window with colorful stained glass brings magical light into the space.
Step 5. Install Round Window Right on East Wall
Place the round window right on the opposite wall, matching the height of the left window. Symmetrical placement is crucial for Dreamy Room Level 70's balanced design.
Step 6. Add Arched Window Near Center
Position the arched window on the back wall between the round windows. This larger, gothic-style window serves as the room's focal point and primary light source.
Step 7. Install Arched Doorway at Base
Place the arched doorway at the lower center section of the room. This entrance features a stone arch design typical of Dreamy Room Level 70's medieval architecture.
Step 8. Create Stone Alcove in Wall
Position the stone alcove in the center back wall, between the wooden shelving units. This recessed niche will display important magical artifacts later in the arrangement.
Step 9. Install Wooden Shelves on Right Side in Dreamy Room Level 70
Attach the wooden shelves to the right wall area, creating a tall bookcase structure. Ensure the shelves are properly aligned vertically to hold spell books and magical items securely.
Step 10. Position Wooden Chandelier Overhead
Suspend the wooden chandelier from the ceiling center, directly above the main floor area. This circular candelabra provides ambient lighting essential for Dreamy Room Level 70's atmosphere.
Step 11. Place Purple Carpet on Floor
Lay the purple carpet across the lower floor section, centered beneath where furniture will be placed. The rich purple color anchors the room's magical color scheme.
Step 12. Add Wooden Stairs Left Descending
Install the wooden stairs left along the left edge of the room, spiraling downward. These stairs connect to lower tower levels in Dreamy Room Level 70.
Step 13. Position Wooden Stairs Right Ascending
Place the wooden stairs right on the right side, creating an upward spiral. These stairs lead to higher floors, completing the tower's vertical circulation.
Step 14. Install Wooden Railings Along Stairs
Attach the wooden railings along both staircases' edges. These safety features follow the stairs' curves and are essential for Dreamy Room Level 70's functionality.
Step 15. Place Purple Armchair in Lower Area in Dreamy Room Level 70
Position the purple armchair on the purple carpet near the center-left floor area. This plush seating faces toward the stone alcove, creating a reading nook.
Step 16. Add Wooden Table Beside Chair
Place the wooden table to the right of the purple armchair. This small side table will hold magical tools and potions within easy reach.
Step 17. Position Wooden Bench Left Near Stairs
Set the wooden bench left along the left side, adjacent to the left staircase. This provides additional seating in Dreamy Room Level 70's study area.
Step 18. Place Wooden Bench Right Near Wall
Position the wooden bench right on the right side of the room, parallel to the right wall. This bench creates symmetry with the left bench placement.
Step 19. Install Bearded Wizard Portrait Above Alcove
Hang the bearded wizard portrait in a decorative frame directly above the stone alcove. This portrait of an elderly wizard watches over Dreamy Room Level 70's activities.
Step 20. Add Owl Portrait on Left Wall in Dreamy Room Level 70
Mount the owl portrait in an oval frame on the left upper wall area. This wise owl painting adds to the magical academic atmosphere.
Step 21. Hang Lady Portrait on Right Wall
Position the lady portrait in an oval frame on the right wall, mirroring the owl portrait's height. This elegant portrait balances Dreamy Room Level 70's wall decorations.
Step 22. Place Decorative Frames Around Portraits
Add the decorative frames around all three portraits. These ornate golden frames enhance the portraits' importance and add luxurious details to the walls.
Step 23. Position Stone Bust in Alcove
Place the stone bust within the stone alcove's center. This classical sculpture serves as a centerpiece in Dreamy Room Level 70's decorative scheme.
Step 24. Add Spell Books to Wooden Shelves
Arrange the spell books on the wooden shelves' upper sections. These leather-bound tomes contain ancient magical knowledge essential for study in Dreamy Room Level 70.
Step 25. Place Purple Books on Lower Shelves in Dreamy Room Level 70
Position the purple books on the middle and lower shelf sections. These violet-colored volumes complement the room's purple theme perfectly.
Step 26. Add Treasure Chest Near Shelves
Set the treasure chest on a lower shelf or floor section near the wooden shelves. This ornate chest stores valuable magical components.
Step 27. Position Ship in Bottle on Shelf
Place the ship in bottle on an upper shelf section. This delicate nautical artifact adds whimsy to Dreamy Room Level 70's collection.
Step 28. Add Gryffindor Crest Display
Mount the Gryffindor crest prominently on the lower front section or carpet area. This house emblem shows the wizard's proud house affiliation.
Step 29. Display HP Logo
Position the HP logo on the lower central area of the room. This iconic symbol reinforces Dreamy Room Level 70's Harry Potter theme.
Step 30. Place Wizard Hat on Chandelier in Dreamy Room Level 70
Perch the wizard hat atop the wooden chandelier's upper section. This pointed purple hat with stars adds a playful touch overhead.
Step 31. Add Skull Decoration Near Hat
Position the skull decoration on the chandelier beside the wizard hat. This small skull adds a darker magical element to Dreamy Room Level 70.
Step 32. Hang Golden Birdcage from Structure
Suspend the golden birdcage from the lower right area or stair section. This ornate cage adds elegant vertical interest.
Step 33. Place White Angel Wings Decoration
Position the white angel wings on the left side wall or near the left bench. These ethereal wings provide a celestial contrast in Dreamy Room Level 70.
Step 34. Add Golden Lock to Chest
Attach the golden lock to the treasure chest's front. This ornate lock secures precious magical items inside.
Step 35. Position Trunk with Straps on Floor in Dreamy Room Level 70
Place the trunk with straps on the lower floor area, near the carpet's edge. This travel trunk stores additional magical supplies.
Step 36. Add Potion Bottles to Table
Arrange the potion bottles on the wooden table surface beside the armchair. These colorful glass bottles contain various magical brews.
Step 37. Place Blue Crystals Near Potions
Position the blue crystals on the table or shelf near the potion bottles. These glowing crystals provide magical energy for Dreamy Room Level 70.
Step 38. Add Candles Throughout Room
Place the candles on the table, shelves, and chandelier. These provide warm lighting essential for nighttime study in Dreamy Room Level 70.
Step 39. Position Antique Lamp on Surface
Set the antique lamp on the wooden table or a shelf. This brass lamp provides focused reading light.
Step 40. Add Magic Wand Display in Dreamy Room Level 70
Place the magic wand on the table or in the alcove area. This essential wizard's tool should be easily accessible.
Step 41. Arrange Spell Scrolls
Position the spell scrolls on the shelves or table surface. These parchment scrolls contain important magical formulas for Dreamy Room Level 70.
Step 42. Place Red Cushion on Chair
Add the red cushion to the purple armchair's seat. This crimson accent provides comfort and color contrast.
Step 43. Add Purple Throw Pillows
Position the purple throw pillows on the armchair and benches. These plush pillows enhance seating comfort in Dreamy Room Level 70.
Step 44. Place White Sheep Decoration
Set the white sheep decoration on a lower shelf or floor area. This whimsical figure adds charm to the magical study.
Step 45. Add Potted Plants Around Room in Dreamy Room Level 70
Position the potted plants on shelves and floor areas. These green plants bring life and freshness to the tower space.
Step 46. Place Green Plant Pot Prominently
Set the green plant pot on a visible shelf or floor location. This larger plant adds a natural element to Dreamy Room Level 70.
Step 47. Add Vine Decorations Along Beams
Drape the vine decorations along the wooden beams and around windows. These climbing plants soften the tower's stone and wood surfaces, completing the enchanted atmosphere of Dreamy Room Level 70.
Tips and Tricks
Important Notes
- The stone alcove is easy to miss during initial placement - ensure it's installed before adding the stone bust, as the bust requires this recessed space
- The wooden chandelier must be placed before the wizard hat and skull decoration, as these smaller items attach to the chandelier structure
- Purple books and spell books look similar - purple books have solid violet covers while spell books show aged leather with mystical symbols
- Both staircases have railings that must be aligned precisely with the stairs' curves to avoid placement errors
- The Gryffindor crest and HP logo should be placed after the carpet to ensure proper layering visibility
Practical Tips
- When placing items on the wooden shelves, start from the top shelf and work downward to avoid blocking access to higher positions
- The armchair's position determines potion bottle and table placement - set the chair first, then arrange surrounding items for optimal accessibility
- Use the stone alcove as a central reference point when positioning portraits - both owl and lady portraits should align at similar heights on opposite walls
- Small decorative items like crystals and candles have narrow placement zones - drag them slowly near target surfaces until you feel the "snap" effect
- For vine decorations along beams, start placement at beam endpoints and drag along the length, allowing the vines to naturally drape and curve according to Dreamy Room Level 70 design principles
- The golden birdcage requires precise vertical alignment with architectural elements - use the staircase railings as visual guides for proper suspension height