Dreamy Room Level 130
Level 130 guide walkthrough, helping players solve puzzles and explore the wonderful world of Dreamy Room.
Dreamy Room Level 130 Walkthrough Guide
Dreamy Room Level 130 Room Story
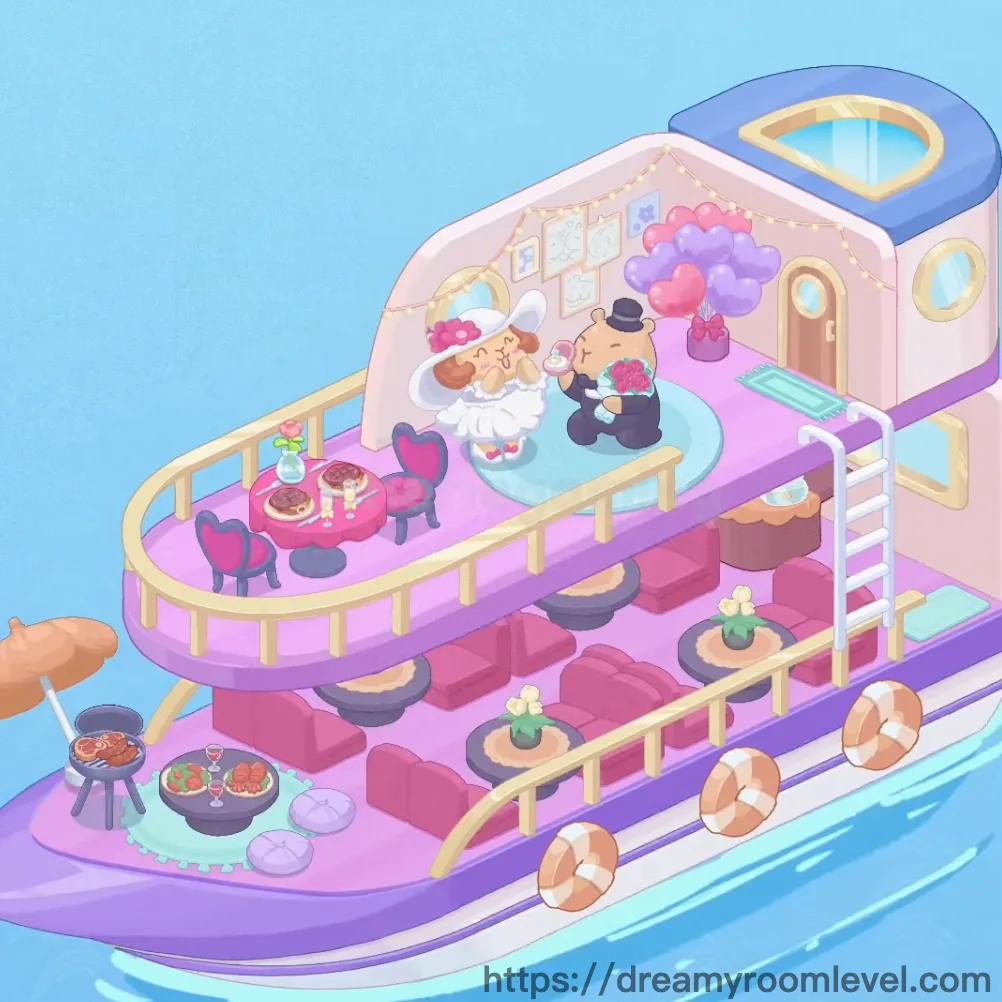
On a serene blue ocean, a charming wedding yacht awaits its special moment. The bride in her elegant white gown and the groom in his dapper suit celebrate their love aboard this three-deck vessel. Heart-shaped balloons dance in the breeze while the aroma of grilled delicacies fills the air. Pink sofas and romantic decorations create an intimate atmosphere where every corner tells a story of eternal love. This Dreamy Room Level 130 transforms a simple boat into a floating paradise of celebration.
Dreamy Room Level 130: Step-by-Step Placement Guide
Step 1. Build the Foundation with Ship Hull and Water
Begin by placing the ship hull as the base structure in the center of the screen. Position the blue water surrounding the hull to create the ocean environment. The hull should sit firmly with the purple stripe and white stripe aligned horizontally along the lower portion. This establishes the foundation for Dreamy Room Level 130.
Step 2. Establish the Three-Tier Deck Structure
Construct the upper deck at the top level with rounded edges, followed by the middle deck in the center featuring the enclosed cabin area. Place the lower deck at the bottom level near the water line. Ensure each deck is properly aligned and creates the distinctive yacht silhouette seen in Dreamy Room Level 130.
Step 3. Install the Blue Roof Structure
Position the blue roof on top of the cabin structure in the upper deck area. The roof should curve elegantly and align with the cabin walls below. This creates shelter for the romantic celebration space essential to completing Dreamy Room Level 130 successfully.
Step 4. Add Windows and Door to the Cabin
Install the round windows on the left side of the cabin wall and the oval windows on the right curved section. Place the door on the lower right side of the cabin entrance. Add the ceiling window or skylight on the blue roof to allow natural light into the cabin space.
Step 5. Install Safety Features with Life Rings
Attach the life rings and life buoys to the lower deck railing on the left side. These should hang vertically and be evenly spaced along the railing. Following Dreamy Room Level 130 safety requirements, ensure they're easily accessible.
Step 6. Set Up Deck Flooring
Lay the pink flooring across the upper and middle deck areas where guests will gather. Install the purple flooring in the lower deck sections. The color transition should be smooth and complement the overall wedding theme presented in Dreamy Room Level 130.
Step 7. Install Golden and Wooden Railings
Place the golden railing along the edges of the middle deck balcony area, creating an elegant border. Add the wooden railings on the lower deck sides for safety. Position the ladder connecting the middle and lower decks on the right side.
Step 8. Position the Bride and Groom
Place the bride wearing her beautiful wedding dress in the center of the middle deck cabin. Position the groom in his elegant suit with hat beside her, facing each other. This creates the focal point of Dreamy Room Level 130 romantic celebration.
Step 9. Arrange the Pink Sofa and Cushions
Place the comfortable pink sofa in the cabin area of the middle deck, positioned against the back wall. Add the purple cushions on the sofa for extra comfort and color coordination. According to Dreamy Room Level 130 layout requirements, this provides intimate seating for the couple.
Step 10. Set Up the Pink Dining Table
Position the elegant pink dining table on the left side of the middle deck balcony area. The table should be placed near the railing with enough space for chairs. This creates the main dining area essential for Dreamy Room Level 130 wedding celebration.
Step 11. Add Heart-Shaped Chairs to Dining Area
Place two heart shaped chairs around the pink dining table, one on each visible side. The chairs should face the table and align properly with the table edges. This placement is essential for Dreamy Room Level 130 romantic setup success.
Step 12. Position Small Round Tables
Place the small round table in the cabin area near the couple, perfect for holding the wedding cake. Add another black round table on the lower deck near the BBQ area. These tables provide functional surfaces throughout Dreamy Room Level 130.
Step 13. Set Up the BBQ Grill Station
Position the BBQ grill on the lower left deck area near the water. Ensure it's placed on a stable surface away from flammable decorations. This creates an outdoor seating and cooking space crucial to completing Dreamy Room Level 130.
Step 14. Add Grilled Food and Pizza
Place the grilled food on the grill grates, showing steaks or meat being cooked. Position the pizza on a surface near the grill or on the black round table. These items enhance the celebration atmosphere in Dreamy Room Level 130.
Step 15. Arrange Tea Set Components
Set up the tea set on the pink dining table, with the teapot as the centerpiece. Place cups and plates around the table setting. Following Dreamy Room Level 130 design principles, this creates an elegant dining experience.
Step 16. Add Wine Glasses and Champagne
Position wine glasses on the pink dining table near each place setting. Place the champagne bottle in an ice bucket or on the table as a celebratory drink. This completes the beverage setup for Dreamy Room Level 130 wedding feast.
Step 17. Display the Wedding Cake
Place the beautiful wedding cake on the small round table inside the cabin area, positioned between the bride and groom. The cake should be centered and easily visible as the celebration centerpiece. This placement is essential for Dreamy Room Level 130 success.
Step 18. Add Flower Bouquet and Roses
Position the flower bouquet in the groom's hand as he presents it to the bride. Place roses in decorative arrangements on tables or near the cabin entrance. These floral elements enhance the romance in Dreamy Room Level 130.
Step 19. Decorate with Potted Flowers and Cactus
Place potted flowers at strategic locations on each deck, particularly near railings and corners. Position a small cactus on one of the lower tables as a unique decorative element. According to Dreamy Room Level 130 layout requirements, these add natural beauty.
Step 20. Hang Flower Garland Decorations
Drape the flower garland along the cabin interior walls in a curved pattern above the couple. The garland should create a romantic arch effect and connect to existing wall fixtures. This creates the romantic setup signature to Dreamy Room Level 130.
Step 21. Install String Lights
String the string lights along the ceiling of the cabin area and around the upper deck perimeter. The lights should create a warm, twinkling ambiance. These are part of the celebration decorations crucial for Dreamy Room Level 130 atmosphere.
Step 22. Add Picture Frames and Wall Photos
Hang picture frames on the interior cabin walls in a gallery arrangement. Position wall photos showing memories or romantic scenes. These wall decorations personalize the space in Dreamy Room Level 130.
Step 23. Float Heart-Shaped Balloons
Release heart balloons in clusters near the cabin ceiling area, with strings hanging down naturally. Position them above the bride and groom as the focal decoration. Completing Dreamy Room Level 130 requires this romantic balloon display.
Step 24. Add Pink and Purple Balloon Clusters
Float pink balloons and purple balloons in mixed clusters throughout the cabin space and upper deck. Arrange them in varying heights to create depth and visual interest. Following Dreamy Room Level 130 design principles, these color-coordinated balloons enhance the celebration mood.
Tips and Tricks
Common Mistakes to Avoid
- Don't place the bride and groom before establishing the deck structure, as they need a solid foundation to stand on properly in Dreamy Room Level 130
- Avoid positioning the BBQ grill too close to balloon decorations, as the visual overlap can make precise placement difficult
- Don't forget the small cactus on the lower deck tables - it's easy to overlook this tiny element
- Be careful not to block the door with furniture or decorations, ensuring smooth visual flow
- Watch for the life rings placement on the railing - they should hang freely and not clip through other elements
Expert Placement Strategies
- Start with the ship hull and water foundation before adding any deck elements to ensure proper anchoring in Dreamy Room Level 130
- Place larger furniture items like sofas and dining tables first, then fill in smaller decorative elements around them
- Use the golden railing as a guide for positioning tables and chairs on the middle deck balcony
- When hanging balloons, work from top to bottom to prevent them from blocking your view of lower placement points
- The ladder connecting decks serves as an excellent reference point for left-right alignment
- Drag decorative items like flowers and cushions last, as they snap into place more easily when larger items are already positioned correctly in Dreamy Room Level 130
Conclusion
Congratulations on completing Dreamy Room Level 130! This wedding yacht combines romance, celebration, and maritime charm into one unforgettable scene. With 57 carefully placed elements across three decks, you've created a floating paradise perfect for the bride and groom's special day. The combination of elegant furniture, festive decorations, and thoughtful details brings this nautical wedding vision to life. Ready for your next design challenge? Set sail to the next level and continue your Dreamy Room journey!