Dreamy Room Level 54
Level 54 guide walkthrough, helping players solve puzzles and explore the wonderful world of Dreamy Room.
Dreamy Room Level 54 Walkthrough Guide
Dreamy Room Level 54 Room Story
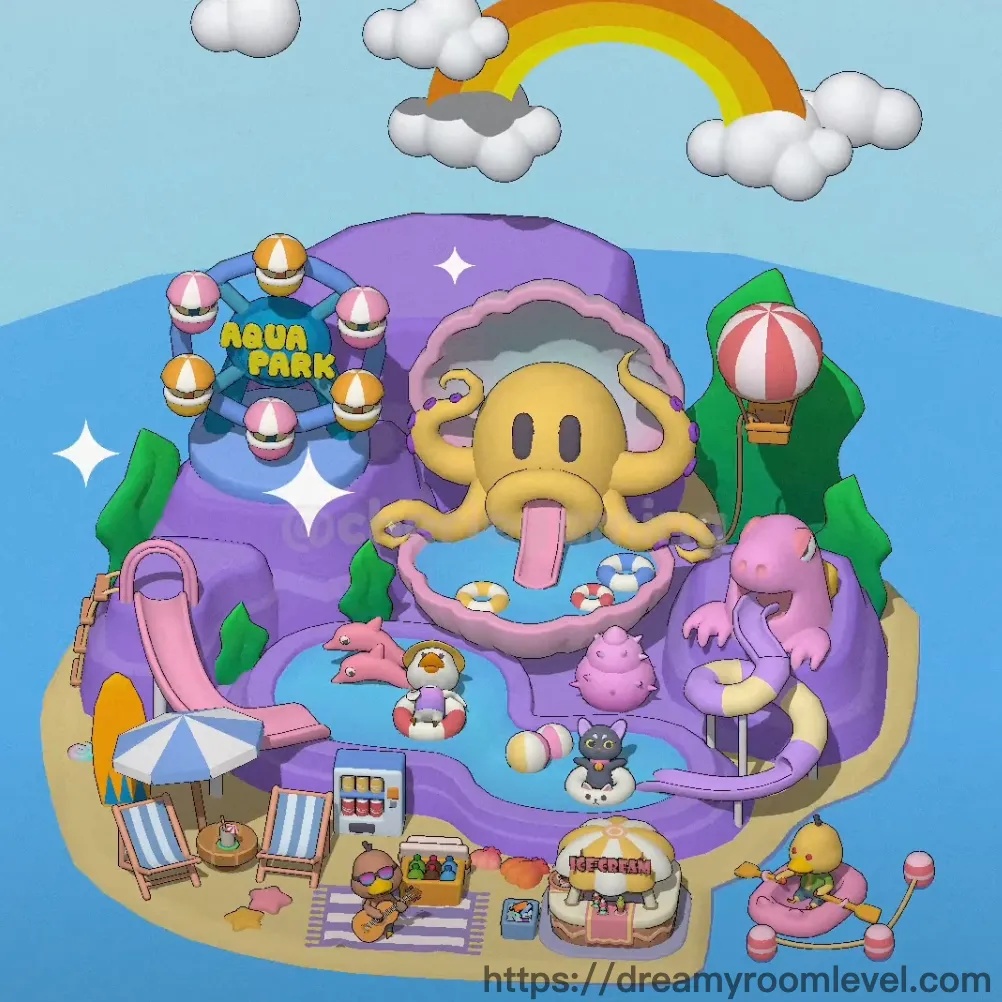
Little Emma's dream of building her own aqua park finally came true in Dreamy Room Level 54. The cheerful octopus mascot welcomes visitors with its bright smile, while colorful floats dance on the sparkling purple pool. Under the rainbow's gentle arc, beach chairs await tired swimmers, and the ice cream cart stands ready to serve sweet treats. This vibrant water wonderland brings endless summer joy to everyone who steps onto its sandy shores.
Step-by-Step Guide
Step 1. Place the Purple Pool in the Center
Position the purple pool at the heart of your aqua park layout in Dreamy Room Level 54. This large circular water feature serves as the main attraction, so drag it to the central area where it can be surrounded by other elements. The pool should occupy the middle ground, leaving space around the edges for decorations and facilities.
Step 2. Set Up the Octopus Mascot Above the Pool
Drag the giant octopus mascot to hover above the purple pool in the upper-center position. This cheerful yellow character with its purple hat and extended tongue should be positioned as the park's focal point. Align it carefully so it appears to be emerging from behind the pool area, creating a playful centerpiece for Dreamy Room Level 54.
Step 3. Install the Pink Slide and Water Slide on the Left Side
Place the pink slide and water slide on the left edge of the layout. These curved slide elements should extend from the upper left area downward, creating a dynamic flow. Position them so the slide's entrance is elevated and the exit leads toward the pool area in Dreamy Room Level 54.
Step 4. Add the Mountain Slide Structure
Position the purple mountain and mountain slide formation in the upper-left section. This decorative purple mountain backdrop adds height variation to the scene. Place it behind the pink slide to create depth, ensuring the mountain's curved shape complements the overall layout.
Step 5. Place the Aqua Park Sign on the Left
Drag the aqua park sign to the left side of the pool area. This blue circular sign with yellow text should be positioned where it's clearly visible to indicate the park's branding. Place it slightly above the pool level so it stands out as an identifying marker in Dreamy Room Level 54.
Step 6. Set Up Beach Chairs and Deck Chair
Position the deck chair, beach chair, and blue lounge chair on the sandy beach area at the bottom-left. Arrange these seating options in a relaxed formation near the beach umbrella, creating a comfortable lounging zone for Dreamy Room Level 54.
Step 7. Add the Beach Umbrella and Striped Umbrella
Place the beach umbrella and striped umbrella above the beach chairs on the left side. This blue and white striped parasol should be positioned to provide shade coverage for the seating area. Drag it to stand upright with its pole firmly planted in the sand section.
Step 8. Position the Picnic Setup in Dreamy Room Level 54
Drag the picnic blanket and striped blanket to the sandy area between the chairs and pool. Place the picnic basket on one corner of the blanket, and add the drink, beverage, snack box, , and treats nearby to create an inviting picnic scene.
Step 9. Set Up the Ice Cream Stand and Cart
Position the ice cream stand and ice cream cart on the right side of the sandy beach area. This colorful vendor stand should be placed where it's easily accessible, near the bottom-right corner. Ensure it faces toward the main pool area in Dreamy Room Level 54.
Step 10. Add Colorful Pool Floats to the Water
Place the colorful floats, pool floats, pink flamingo float, duck float, yellow duck, donut float, and inner tube scattered across the purple pool surface. Arrange these floating toys at different angles to create a fun, lived-in appearance.
Step 11. Position Beach Balls Around the Park
Drag the beach ball and striped beach ball to different locations - one near the pool edge and another on the sandy area. These playful spheres add activity to the scene in Dreamy Room Level 54.
Step 12. Add Animal Characters
Place the cat and gray cat on the picnic blanket area, and position the pink sheep and sheep near the pool's edge on the right side. These adorable characters bring life to the scene in Dreamy Room Level 54.
Step 13. Install Green Trees and Pine Trees
Position the green trees and pine trees around the perimeter of the layout. Place taller trees in the background on the right side and smaller ones scattered around the edges. These natural elements frame the aqua park environment.
Step 14. Set Up the Hot Air Balloon in Dreamy Room Level 54
Drag the hot air balloon and striped balloon with its red and white pattern to the right side of the layout. Position it in the mid-air space near the green trees, creating a sense of floating adventure above the park.
Step 15. Add the Rainbow Above
Place the rainbow in the upper portion of the sky area, arcing from the center toward the right. This colorful gradient arch should span across the top section, positioned above the octopus mascot. Ensure it creates a magical atmosphere over the entire aqua park scene in Dreamy Room Level 54.
Step 16. Position Clouds in the Sky
Scatter the clouds and white clouds across the sky area. Place several fluffy cloud formations at different heights in the upper portion, some near the rainbow and others floating independently to create a peaceful backdrop.
Step 17. Add Beach Towel and Sand Elements
Place the towel and beach towel on the sandy beach area near the lounge chairs. Ensure the sand and beach sand cover the lower portion of the layout in Dreamy Room Level 54, creating the beach foundation.
Step 18. Add Sparkles and Stars for Magic
Scatter sparkles and stars throughout the scene to add magical touches. Place them around the octopus mascot, near the rainbow, and floating above the pool water. These twinkling elements enhance the dreamy atmosphere.
Step 19. Position Purple Roof and Tent Roof
Place the purple roof and tent roof structures over designated areas. The purple canopy should cover the ice cream cart on the right, while other tent elements can shade portions of the seating area in Dreamy Room Level 54.
Step 20. Complete the Sky Backdrop
Set up the sky backdrop with its light blue gradient covering the entire upper portion. This atmospheric element should transition smoothly from the horizon to the top of the layout, providing the perfect background for all aerial elements.
Step 21. Fill Pool with Blue Water and Pool Water
Ensure the blue water and pool water fill the purple pool basin completely. The water should appear to ripple beneath the floating toys and reach the pool's edges, completing the aqua park theme in Dreamy Room Level 54.
Tips and Tricks
Important Notes
- The octopus mascot must be positioned before adding smaller pool decorations, as it's the largest central element that other items align with
- Pool floats can overlap slightly in the water, but ensure each one remains partially visible for the completion check
- The pink slide and mountain slide structure work together as one unit - position the mountain first to properly anchor the slide
- Beach chairs and umbrella form a cluster that should be placed as a group on the sandy area before adding smaller items like towels
- The ice cream cart and tent roof need to be aligned carefully so the roof appears to provide proper coverage
Useful Techniques
- When placing floats in the pool, drag them from the edges toward the center to utilize the water surface's "snap" zones in Dreamy Room Level 54
- For small items like beach balls and treats, zoom in slightly to ensure precise placement on the picnic blanket or near specific furniture pieces
- Layer clouds at different heights by placing some in the far background first, then adding closer ones to create depth perception
- The rainbow should be positioned after the sky and clouds to ensure it arches naturally over the scene without getting hidden
- Place trees from back to front, starting with background elements near the edges and finishing with foreground details
- Use the sparkles last to add finishing touches around key features like the mascot and pool, ensuring they enhance rather than obscure important elements in Dreamy Room Level 54