Dreamy Room Level 118
Level 118 guide walkthrough, helping players solve puzzles and explore the wonderful world of Dreamy Room.
Dreamy Room Level 118 Walkthrough Guide
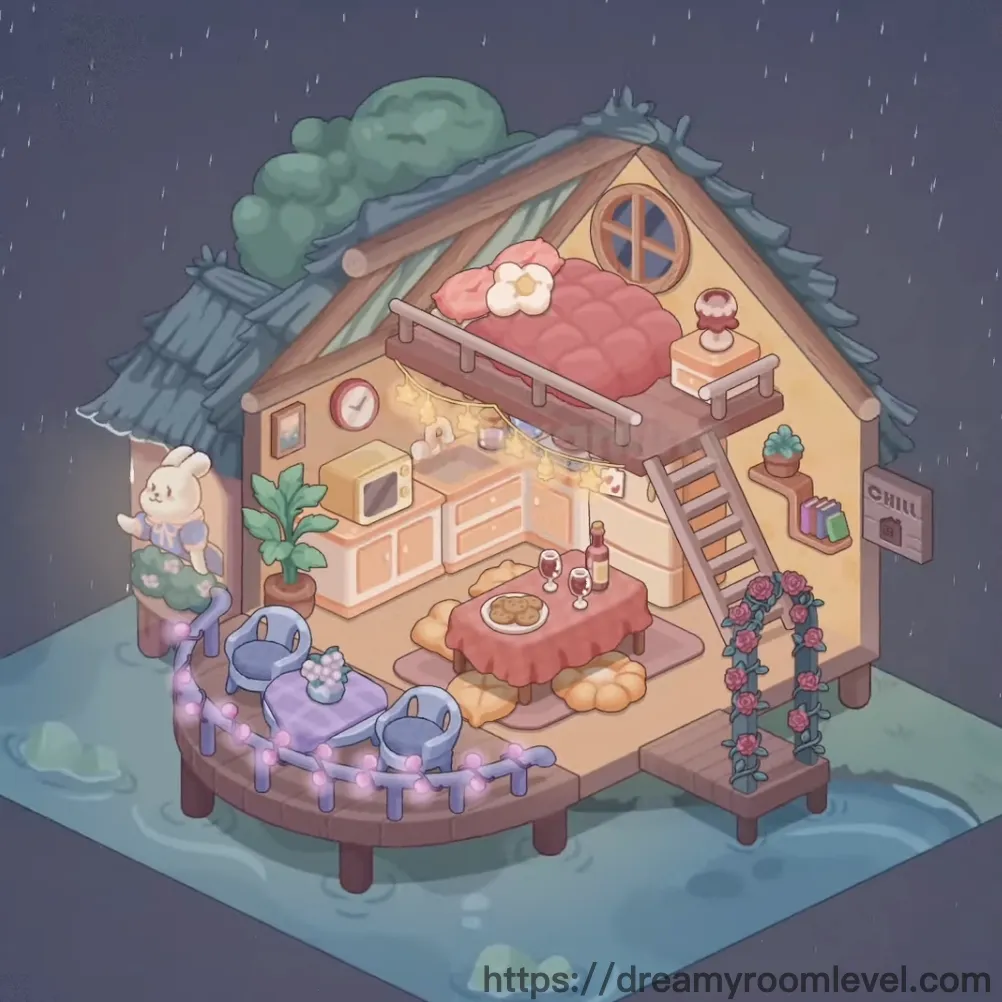
Dreamy Room Level 118: Room Story
On a rainy evening, Luna found herself in her cozy cottage sanctuary. The soft patter of rain on the roof tiles created a soothing melody as she climbed the ladder to her loft bed. Below, her purple coffee table held wine and fresh bread, while fairy lights twinkled along the blue fence. This charming space in Dreamy Room Level 118 reflects her love for simple pleasures - morning coffee, good books, and the company of her bunny friend outside. Every corner tells a story of peaceful living.
Dreamy Room Level 118: Step-by-Step Placement Guide
Step 1. Build the Foundation Structure
Start by placing the walls to form the cottage shape, then lay down the floor inside. Add the roof tiles on top at an angle, supported by wooden beams running across the roof peak. Position wooden support posts at the bottom corners. Following Dreamy Room Level 118 design principles, this creates the basic cottage framework.
Step 2. Create the Outdoor Platform Deck
Drag the platform deck to the front base of the cottage, forming an elevated wooden porch area. This placement is essential for Dreamy Room Level 118 success as it provides the foundation for outdoor furniture.
Step 3. Install the Ladder to Loft
Position the ladder against the right interior wall, ensuring it reaches from the floor to the upper level. The ladder should lean at approximately 75 degrees for proper access to the loft area.
Step 4. Place Loft Bed Platform and Round Window
Drag the loft bed platform to the upper right section, creating a second level. Install the round window on the upper front wall near the loft, providing natural light to the sleeping area in Dreamy Room Level 118.
Step 5. Set Up the Main Bed with Bedding
Place the bed frame on the loft platform, then add the pink bedding on top. Position a soft pillow at the headboard. This cozy sleeping arrangement is central to completing Dreamy Room Level 118.
Step 6. Position Kitchen Cabinet System
Drag the kitchen cabinet along the left interior wall. This L-shaped counter unit creates the main cooking and storage area, featuring multiple compartments and workspace surfaces according to Dreamy Room Level 118 layout requirements.
Step 7. Add Nightstand Near Bed
Place the nightstand beside the loft bed on the left side. This small table provides convenient storage for bedside items and complements the sleeping area.
Step 8. Install Kitchen Appliances
Position the microwave on the left section of the kitchen cabinet. Place the coffee maker and toaster on the upper back counter. Set the blue kettle on the right side of the stovetop area. These appliances are crucial for Dreamy Room Level 118 functionality.
Step 9. Set Up Dining Table with Tablecloth in Dreamy Room Level 118
Drag the dining table to the center-right of the main floor area. Cover it with the pink tablecloth, ensuring the cloth drapes naturally over the edges. This creates the main dining focal point.
Step 10. Arrange Blue Chairs Around Seating Areas
Position two blue chairs - place one on the outdoor deck facing left, and another inside near the purple coffee table. These chairs provide multiple seating options throughout the space.
Step 11. Position Purple Coffee Table with Cushions
Place the purple coffee table in front of the outdoor deck area, slightly to the left. Add comfortable cushions on the blue chairs for extra comfort in Dreamy Room Level 118.
Step 12. Lay Pink Rug for Floor Comfort
Drag the pink rug underneath and around the dining table area. The rug should extend slightly beyond the table edges, creating a cozy defined dining zone.
Step 13. Display Fresh Bread Loaves in Dreamy Room Level 118
Place multiple bread loaves around the cottage - put some on the dining table and one or two on the floor near the table. These golden-brown loaves add a homey touch.
Step 14. Set Wine Service on Tables
Position wine glasses on both the dining table and purple coffee table. Place the wine bottle next to the glasses on the coffee table, creating an elegant refreshment setup.
Step 15. Add Plate with Cookies to Dining Table
Drag the to the center of the dining table. The round plate should display golden-brown cookies prominently.
Step 16. Place Kitchen Utensils and Tools
Position the cutting board on the kitchen counter workspace. Add the wooden spoon nearby, and place a teacup on the nightstand or cabinet top in Dreamy Room Level 118.
Step 17. Install Wall Clock in Dreamy Room Level 118
Hang the clock on the left interior wall above the kitchen area. The round clock face should be clearly visible and centered.
Step 18. Hang Picture Frames on Walls
Place picture frames on various wall sections - put one near the clock, another on the right wall. Include the heart picture on the nightstand or wall near the bed for a personal touch.
Step 19. Stack Books for Reading Corner
Arrange books in a small stack on the nightstand and near the clock on the wall shelf. The colorful book spines add character to the space.
Step 20. Add Table Lamp for Lighting
Position the table lamp on the nightstand next to the bed. This provides warm lighting for the sleeping area according to Dreamy Room Level 118 requirements.
Step 21. Place Potted Plant Indoors in Dreamy Room Level 118
Drag the potted plant to the floor near the left wall, beside the kitchen cabinet. The leafy green plant brings life to the interior space.
Step 22. Install Flower Vine Trellis
Position the flower vine trellis on the right side of the outdoor deck platform. The wooden trellis should stand vertically with pink roses climbing up its structure.
Step 23. Add Flowers in Vase to Coffee Table
Place flowers in vase on the purple coffee table. The small arrangement adds a fresh decorative element to the outdoor seating area in Dreamy Room Level 118.
Step 24. Position Cactus Plant Decoration
Drag the cactus plant to a spot near the nightstand or on a cabinet shelf. This small succulent provides additional greenery with minimal maintenance needs.
Step 25. Install Fairy Lights Along Fence in Dreamy Room Level 118
String the fairy lights along the outdoor blue fence railing. Position the blue fence around the deck perimeter first, then drape the lights with pink glowing bulbs creating a magical ambiance.
Step 26. Plant Tree and Bush in Garden
Place the tree behind the cottage on the left side, with full green foliage visible. Add the bush near the base of the tree or beside the cottage for landscaping depth.
Step 27. Add Decorative Bone and Chill Sign
Position the bone decoration on the wall or hanging near the kitchen area. Place the chill sign outside near the fence or on the right exterior wall, promoting the cottage's relaxed atmosphere in Dreamy Room Level 118.
Step 28. Set Glass Jar and Brown Vase in Dreamy Room Level 118
Place the glass jar on the kitchen counter among the appliances. Position the brown vase on the nightstand or near the dining area for rustic charm.
Step 29. Add Roof Decorations and Debris
Place the wooden log on roof near the left edge of the roof tiles. Add patches of moss on roof in various spots for weathered character. Position crumpled paper on roof and green fabric on roof as scattered elements.
Step 30. Place Orange Box and Blue Object on Roof
Drag the orange box on roof to the upper right section of the rooftop. Add the blue object on roof nearby, creating a lived-in appearance for Dreamy Room Level 118.
Step 31. Position Yellow Delivery Box in Dreamy Room Level 118
Place the yellow delivery box on the ground near the front of the cottage, typically at the bottom center. This bright package awaits opening.
Step 32. Add Bunny Character Outside
Position the bunny character on the left side of the outdoor area, standing on the ground beside the deck. This cute companion adds life to the scene.
Step 33. Create Rain Effect with Raindrops
Add rain drops throughout the dark sky background. The raindrops should fall vertically across the entire scene, creating the cozy rainy atmosphere that defines Dreamy Room Level 118.
Tips and Common Mistakes
Common Mistakes
- Missing the moss and debris elements on the roof - these small decorative items are easy to overlook but add important weathered character to the cottage exterior
- Placing the ladder at the wrong angle - ensure it leans properly against the wall at approximately 75 degrees to create functional access to the loft
- Forgetting to position the yellow delivery box on the ground level - this bright element is often missed in the outdoor scene
- Incorrectly arranging the kitchen appliances - the microwave, coffee maker, toaster, and kettle each have specific placement spots on different counter sections
- Skipping the fairy lights installation on the blue fence - these lights must be strung after the fence is placed to create the proper magical ambiance
Pro Tips for Dreamy Room Level 118
- Start with structural elements before adding furniture - complete the walls, roof, floor, and platform deck first to establish the cottage framework properly
- Layer decorative items strategically - place larger furniture like the bed and dining table first, then add smaller items like books, picture frames, and plants around them
- Use the snap-to-grid feature for precise cabinet and counter placement - the kitchen cabinet system aligns better when dragged slowly into position
- Pay attention to the loft bed platform orientation - ensure the platform sits flush against the upper wall before adding the bed and bedding
- Create depth by placing items at different heights - utilize both the ground floor and loft level, plus add elements on the roof and outdoor deck
- Drag items from the center when placing small objects like cookies and wine glasses - this prevents accidental displacement of nearby items and ensures accurate placement in the current stage