Dreamy Room Level 124
Level 124 guide walkthrough, helping players solve puzzles and explore the wonderful world of Dreamy Room.
Dreamy Room Level 124 Walkthrough Guide
Dreamy Room Level 124 Room Story
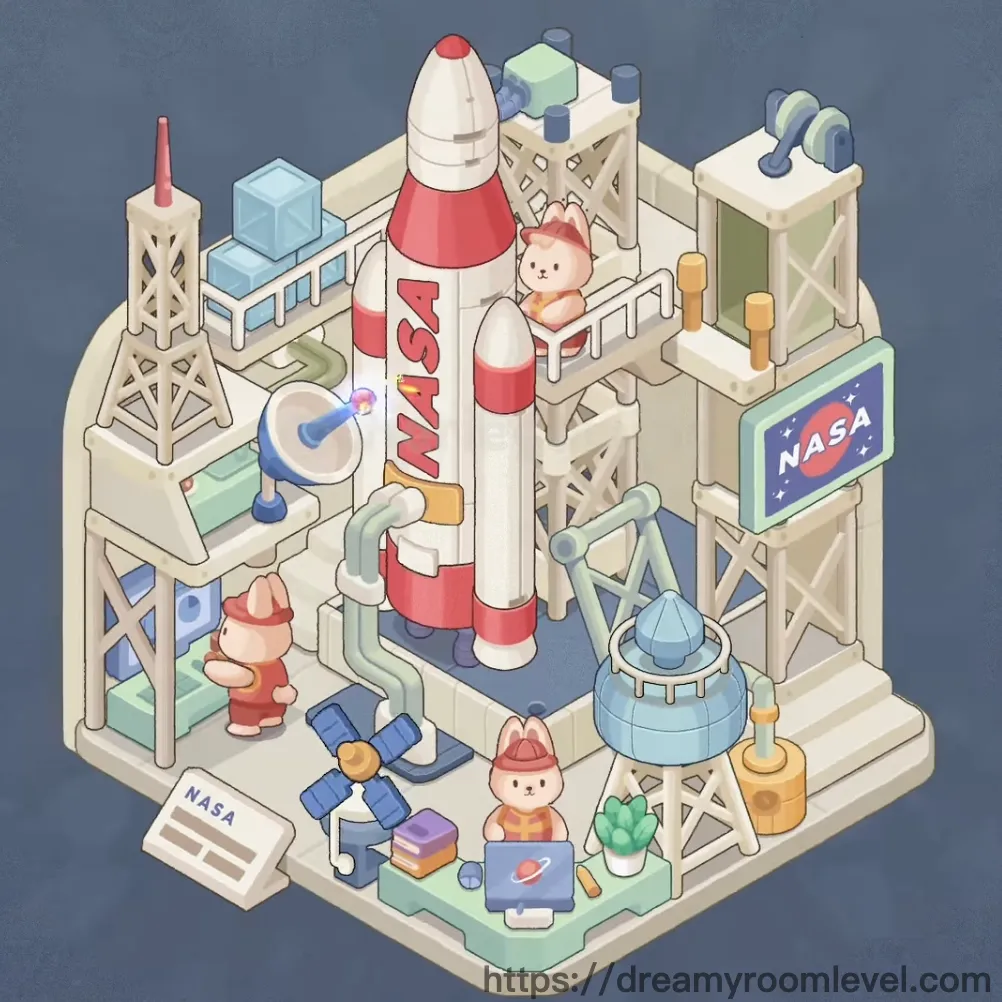
Welcome to the heartwarming world of Dreamy Room Level 124, where three adorable bear astronauts prepare for their dream mission to the stars. In this cozy NASA command center, our fuzzy space explorers work together building their magnificent red-and-white rocket, surrounded by gleaming towers, twinkling satellites, and mysterious crystals from distant galaxies. With laptops displaying star charts and tiny paws adjusting control panels, these determined bears show us that even the biggest dreams start with careful preparation and teamwork in the most delightful corner of the cosmos.
Dreamy Room Level 124: Step-by-Step Placement Guide
Step 1. Position the Foundation Platform
Place the foundation platform at the center-bottom of the room. This blue-tinted base serves as the primary surface for Dreamy Room Level 124. Drag it to align with the floor grid, ensuring it sits flush against the ground level.
Step 2. Install the Launch Platform in Dreamy Room Level 124
Position the launch platform directly on top of the foundation platform at the center. This elevated blue platform will support the main rocket structure. Align it carefully with the foundation's center point for perfect symmetry.
Step 3. Assemble the NASA Rocket Components
Drag the NASA rocket to the center of the launch platform. Stack the rocket nose cone at the very top with its red cap facing upward. Attach the rocket booster red and rocket booster white sections to form the complete three-stage rocket typical of Dreamy Room Level 124's space theme.
Step 4. Build the Launch Tower Framework
Place the launch tower directly behind and to the left of the rocket. This tall beige structure should reach approximately the same height as the rocket. Position the metal scaffolding connecting to the launch tower's right side, creating the characteristic gantry arm seen in Dreamy Room Level 124.
Step 5. Install Support Towers in Dreamy Room Level 124
Position the tower structure left on the far left side of the room. Place the tower structure right on the far right side. Add the observation tower near the right tower structure. These vertical elements frame the central rocket assembly perfectly.
Step 6. Add Metal Framework Support
Install the metal beams connecting various tower sections. Place support structure pieces between towers to create the industrial aesthetic. Add metal frame diagonal elements for cross-bracing, essential for completing Dreamy Room Level 124's authentic NASA launch facility appearance.
Step 7. Position the Communication Tower in Dreamy Room Level 124
Place the communication tower red on the upper-left platform area. This distinctive red antenna tower should stand vertically, clearly visible above surrounding structures. Drag it to the left-side elevated platform for optimal placement.
Step 8. Deploy Satellite Equipment
Position the satellite on the upper-right platform section with its blue solar panels extended. Place the satellite solar panels oriented horizontally. Add the antenna dish to the lower-right area, angled slightly upward to create Dreamy Room Level 124's communication hub.
Step 9. Install Radar and Antenna Systems in Dreamy Room Level 124
Place the radar dish on the center-right elevated area. Position the antenna array green on the upper-left platform near the workspace table. These elements complete the tracking systems essential for Dreamy Room Level 124.
Step 10. Position the UFO Spaceship
Place the ufo spaceship on the upper-right corner platform. This light blue dome-shaped craft with golden antennae should hover above the satellite area, adding a whimsical touch to Dreamy Room Level 124's space narrative.
Step 11. Set Up Telescope in Dreamy Room Level 124
Position the telescope on the left-side platform, angled toward the upper-left corner. This white and blue scientific instrument should be clearly accessible, pointing skyward as though observing distant stars.
Step 12. Deploy the Space Capsule
Place the space capsule on the upper-center platform area behind the rocket. This small blue pod should sit near the top-left elevated section, representing the return vehicle for Dreamy Room Level 124's bear astronauts.
Step 13. Position Bear Astronaut with Orange Hat in Dreamy Room Level 124
Drag the bear astronaut orange hat to the upper-center platform, standing on the scaffolding near the rocket. This adorable crew member should appear to be supervising the launch preparations.
Step 14. Place Bear Astronaut with Red Hat
Position the bear astronaut red hat on the lower-left platform area. This bear should be placed near the workspace table, appearing to monitor equipment in Dreamy Room Level 124.
Step 15. Position Bear with Laptop in Dreamy Room Level 124
Place the bear with laptop at the front-center area, sitting at a small desk facing forward. This bear engineer works on mission data, serving as the mission controller for Dreamy Room Level 124.
Step 16. Install Control Panels
Position the control panel green on the left-side lower platform. Place the control console light blue near the center-right area. These monitoring stations are vital for Dreamy Room Level 124's operations.
Step 17. Add NASA Signage in Dreamy Room Level 124
Place the NASA sign board on the right-side elevated platform, displaying the iconic NASA logo prominently. Add the NASA logo decal on the platform base where visible from the front view.
Step 18. Position Workspace Equipment
Place the workspace table on the left-side lower platform beneath the communication tower. Add the equipment rack next to the workspace table for tool storage, essential for Dreamy Room Level 124's maintenance operations.
Step 19. Install Computer Systems in Dreamy Room Level 124
Position the laptop computer on the front-center desk where the bear with laptop sits. Place the monitor screen on the workspace table showing mission data readouts.
Step 20. Deploy Navigation Equipment
Place the on the center-right elevated section near the satellite dish. This specialized device helps guide missions in Dreamy Room Level 124's space operations.
Step 21. Add Blue Ice Block Structures in Dreamy Room Level 124
Position the ice blocks blue on the upper-left platform area. Stack the blue cube large nearby, then place the blue cube small next to it, creating an interesting crystalline formation.
Step 22. Install Storage Containers
Place the storage crate on the lower-left area near the equipment rack. Position the wooden crate beige on the front-left corner, providing essential storage for Dreamy Room Level 124's supplies.
Step 23. Position Yellow Box in Dreamy Room Level 124
Drag the yellow box to the front-left corner of the foundation platform. This bright storage cube should be clearly visible from the front view, adding a pop of color to the composition.
Step 24. Add Green Pipe Systems
Install the green pipes on the left-side lower area, connecting between the foundation and equipment areas. Position the connector pipes mint near the green pipes, creating Dreamy Room Level 124's cooling or fuel system.
Step 25. Place Crystal Decorations in Dreamy Room Level 124
Position the crystal gem purple on the lower-left platform near the storage area. Add the crystal cluster on the front-right area, representing collected space minerals in this level.
Step 26. Install Lighting Equipment
Place the lamp device on the center-left elevated platform, angled to illuminate the workspace. This provides essential lighting for Dreamy Room Level 124's night operations.
Step 27. Add Blue Orb Sphere in Dreamy Room Level 124
Position the orb sphere blue on the front-right platform area. This glowing sphere adds a mystical element to the scientific setting of Dreamy Room Level 124.
Step 28. Place Space Helmet
Position the space helmet on the upper-center platform near one of the bear astronauts. This essential safety equipment should be readily accessible for the crew in Dreamy Room Level 124.
Step 29. Add Books and Research Materials in Dreamy Room Level 124
Place the books stack purple on the workspace table or nearby shelf. These technical manuals provide essential reference information for the bear engineers working on Dreamy Room Level 124.
Step 30. Position Toy Blocks
Place the toy blocks scattered on the front-center area, adding a playful touch. These colorful blocks show that even in serious space work, the bears of Dreamy Room Level 124 enjoy their playtime.
Step 31. Install Platform Base Blue in Dreamy Room Level 124
Ensure the platform base blue is properly aligned beneath the launch platform, providing the structural foundation for the entire rocket assembly in this level.
Step 32. Add Cactus Plant Decoration
Position the plant pot cactus on the front-right area or near a workspace. This small green plant adds life and warmth to Dreamy Room Level 124's technical environment, showing the bears care about their surroundings.
Notes and Tips
Important Reminders
- Check all elevated platform areas carefully, as small items like the crystal gem purple and orb sphere blue can be easily overlooked in Dreamy Room Level 124's complex structure
- The metal scaffolding and support structures must connect properly to tower elements; if they appear disconnected, adjust the placement angle slightly
- The three bear astronauts have specific stations; placing them incorrectly may block access to equipment panels in Dreamy Room Level 124
- Satellite solar panels and antenna arrays need sufficient clearance; overlapping with tower structures may cause placement rejection
- The green pipes and connector pipes system requires sequential placement—install the main green pipes before attempting to attach the connector pieces in Dreamy Room Level 124
Practical Tips
- When placing items on elevated platforms, drag them to the edge first, then slide inward for precise positioning in Dreamy Room Level 124
- The rocket assembly (nose cone, boosters, main body) utilizes strong snap-alignment; release each piece when you feel the magnetic "pull"
- For densely packed areas like the workspace table zone, place larger items (equipment rack, storage crates) first, then fit smaller items around them
- The blue cube large and blue cube small work best when stacked with a slight offset, creating visual depth
- Completing Dreamy Room Level 124 efficiently requires placing foundation elements first, followed by vertical structures, then equipment, and finally decorative items
- Use the (snap-to) mechanism by hovering items near their intended location—when placement turns valid, release immediately for perfect alignment in Dreamy Room Level 124