Dreamy Room Level 547
Level 547 guide walkthrough, helping players solve puzzles and explore the wonderful world of Dreamy Room.
Dreamy Room Level 547 Walkthrough Guide
Dreamy Room Level 547 Room Story
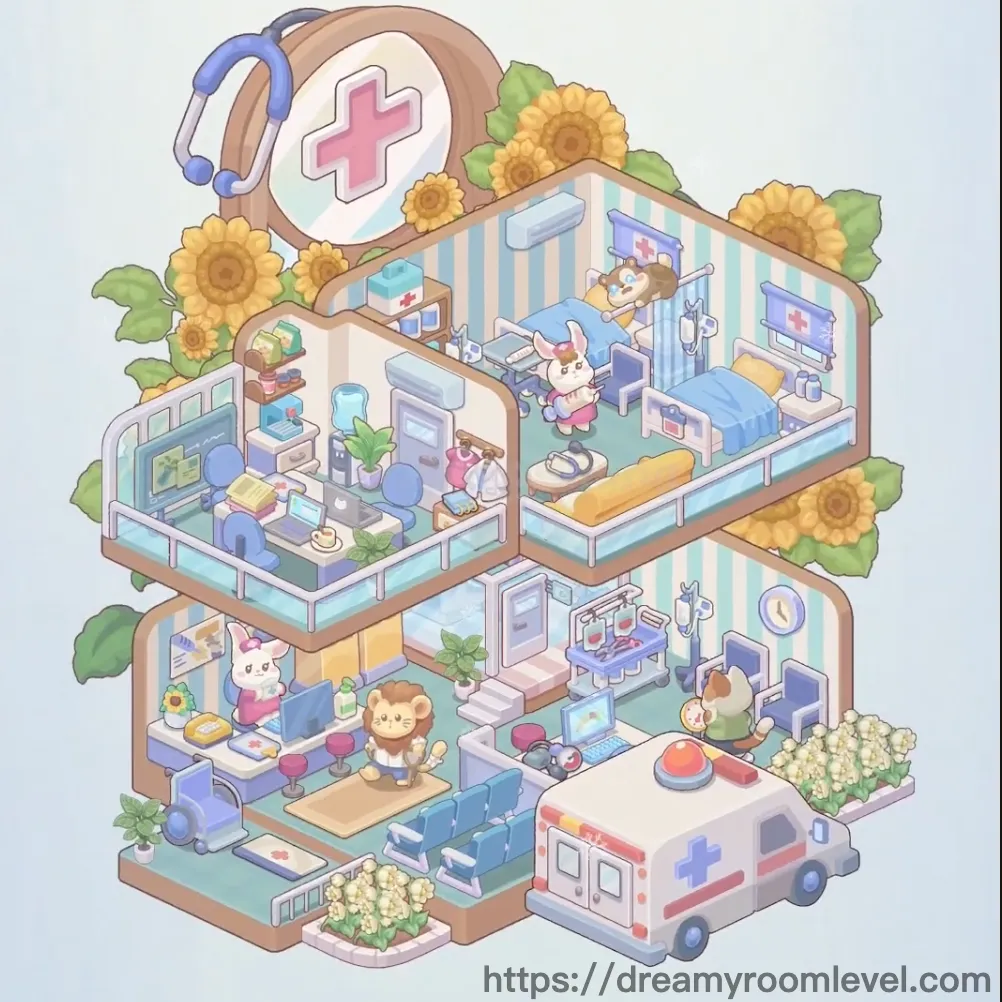
Welcome to the cheerful Sunflower Animal Hospital where furry friends receive the best care with gentle paws and warm hearts. This adorable Dreamy Room Level 547 medical center is run by Dr. Lion, a kind-hearted physician who works alongside his dedicated rabbit nurse team to help every patient feel better. The multi-story facility features a cozy waiting room where worried families sit beneath cheerful sunflower decorations, a state-of-the-art treatment room with modern equipment, and a recovery ward where patients rest on comfortable beds. From the friendly ambulance parked outside ready for emergencies to the gentle beeping of medical monitors, every detail shows how this special hospital combines professional care with a comforting atmosphere that makes even the most nervous patients smile.
Dreamy Room Level 547: Step-by-Step Placement Guide
Step 1. Lay Green Checkered Floor
Drag the green checkered floor to cover all floor areas across the multi-level hospital structure. This soft green tiled flooring should fill every room in Dreamy Room Level 547.
Step 2. Install Striped Blue Walls
Position the striped blue walls on all wall sections. These calming blue and cream striped panels should create a soothing hospital environment.
Step 3. Add White Railings
Place white railing 1, white railing 2, and white railing 3 along the floor edges between levels. These safety barriers should protect the open areas in Dreamy Room Level 547.
Step 4. Install White Stairs
Position the white stairs connecting the different floor levels. These steps should provide access between the waiting area and treatment rooms.
Step 5. Place Hospital Bed
Drag the hospital bed to the upper right room against the wall. Add the blue bed sheet on top for patient comfort in Dreamy Room Level 547.
Step 6. Set Up IV Drip Stands
Position iv drip stand 1 beside the hospital bed and iv drip stand 2 near the treatment area. These medical poles should be ready for patient care.
Step 7. Hang Blue Privacy Curtain
Place the blue privacy curtain on the ceiling track near the hospital bed. This curtain should provide privacy for patients in Dreamy Room Level 547.
Step 8. Install Surgical Robot Arm
Drag the surgical robot arm to the treatment room ceiling area. This high-tech equipment should assist with medical procedures.
Step 9. Position Yellow Recliner Chair
Place the yellow recliner chair in the upper treatment room. This comfortable chair should be positioned for patient examinations in Dreamy Room Level 547.
Step 10. Add X-Ray Equipment
Position the x-ray viewer on the wall and place the x-ray film on the viewer. These diagnostic tools help doctors examine patients.
Step 11. Install Medical Monitors
Place medical monitor 1 near the hospital bed and medical monitor 2 in the treatment area. These screens should display patient vital signs in Dreamy Room Level 547.
Step 12. Add Air Conditioner
Position the air conditioner on the upper wall to keep the hospital cool and comfortable for patients and staff.
Step 13. Place First Aid Supplies
Add the first aid kit box on a shelf or cabinet. Position medicine bottle 1, medicine bottle 2, and medicine bottle 3 nearby in Dreamy Room Level 547.
Step 14. Position Bedside Cabinet
Drag the bedside cabinet next to the hospital bed. This storage unit should hold patient belongings and medical supplies.
Step 15. Add Blue Footstool and Slippers
Place the blue footstool near the examination area and the blue slippers beside the bed for patient use in Dreamy Room Level 547.
Step 16. Position Medical Chart
Add the medical chart clipboard hanging on the bed rail or nearby wall for patient records.
Step 17. Set Up Doctor Desk
Place the doctor desk in the middle level office area. Add blue office chair 1 behind the desk for Dr. Lion in Dreamy Room Level 547.
Step 18. Add Desk Accessories
Position the desk lamp, laptop computer 1, coffee cup, and document papers on the doctor desk surface.
Step 19. Install Bookshelf Unit
Place the bookshelf unit against the wall in the office area. Add medical books on the shelves for reference in Dreamy Room Level 547.
Step 20. Position Examination Bed
Drag the examination bed to the consultation room area. This bed should be ready for patient checkups.
Step 21. Add Medical Equipment
Place the weight scale and blood pressure monitor near the examination area for routine checkups in Dreamy Room Level 547.
Step 22. Set Up Reception Counter
Position the reception counter on the ground floor near the entrance. Add blue office chair 2 behind for the receptionist.
Step 23. Install Reception Desk Equipment
Place the reception desk with computer monitor, keyboard, and laptop computer 2 for administrative work in Dreamy Room Level 547.
Step 24. Arrange Waiting Chairs
Position the waiting chairs row in the ground floor waiting area. Add blue waiting chair 1, blue waiting chair 2, blue waiting chair 3, and blue waiting chair 4 in rows.
Step 25. Install Medical Vending Machine
Place the medical vending machine against the wall in the waiting area. This machine should provide snacks for visitors in Dreamy Room Level 547.
Step 26. Position MRI Scanner
Drag the mri scanner machine to the diagnostic room area. This large equipment should be the centerpiece of the imaging department.
Step 27. Add Surgical Instruments
Place the surgical instrument tray near the treatment area and the blood bags stand beside the equipment in Dreamy Room Level 547.
Step 28. Install Wall Clock
Position the wall clock on the waiting room wall so patients can track appointment times.
Step 29. Set Up Pharmacy Area
Place the pharmacy cabinet and medicine shelf against the wall for medication storage in Dreamy Room Level 547.
Step 30. Add Red Stools
Position red stool 1 and red stool 2 near workstations for staff to sit during procedures.
Step 31. Place Floor Mat
Drag the floor mat near the entrance area to keep the hospital floor clean in Dreamy Room Level 547.
Step 32. Add Yellow Pillow
Position the yellow pillow on the hospital bed or recliner chair for patient comfort.
Step 33. Place Medical Suitcase
Add the medical suitcase near the doctor desk or treatment area for house calls in Dreamy Room Level 547.
Step 34. Add Plants for Healing Atmosphere
Position green plant 1, green plant 2, and green plant 3 throughout the hospital. Add the potted sunflower for cheerful decoration.
Step 35. Install Hospital Signs
Place the hospital cross sign on the rooftop and the stethoscope sign beside it. Add the medical cross wall sign inside in Dreamy Room Level 547.
Step 36. Add Emergency Equipment
Position the on the wall and the syringe decoration in the treatment area.
Step 37. Place Lion Doctor Character
Drag the lion doctor character to the waiting area or office. Dr. Lion in his white coat should be ready to help patients in Dreamy Room Level 547.
Step 38. Add Rabbit Nurse Characters
Position rabbit nurse character 1 at the reception counter and rabbit nurse character 2 in the treatment room. These helpful nurses assist with patient care.
Step 39. Place Patient Characters
Add the cat patient character in the hospital bed and the hamster patient character in the waiting area. These patients need gentle care in Dreamy Room Level 547.
Step 40. Position Ambulance and Garden
Place the ambulance vehicle outside the hospital entrance. Add sunflower bush 1, sunflower bush 2, white flower bush 1, and white flower bush 2 around the exterior to complete this cheerful animal hospital.
Tips and Tricks
Common Mistakes
- The multi-level hospital structure requires careful attention to which floor each item belongs; placing the hospital bed on the wrong level or the waiting chairs upstairs creates confusion in Dreamy Room Level 547.
- Players often overlook the small medical supplies scattered throughout; check for medicine bottles, syringes, and the medical chart clipboard on shelves and surfaces.
- The two IV drip stands need specific placement; one goes beside the hospital bed and one near the treatment equipment, not together.
- The white railings must be positioned along specific floor edges; missing one creates safety hazards and visual gaps between levels.
- Character placements require attention to their roles; Dr. Lion belongs in the office area while nurses work at reception and treatment rooms.
Useful Strategies
- Start with the floor and walls structure across all levels before adding any furniture to establish the hospital's multi-story layout properly.
- Complete one floor entirely before moving to the next; finish the waiting area first, then the office level, and finally the treatment room in Dreamy Room Level 547.
- When arranging the waiting area, place the chair rows first as anchor points, then position the reception desk and vending machine around them.
- Group similar medical equipment together during placement; add all monitors first, then all IV stands, then all small accessories for efficient completion.
- The large equipment like the MRI scanner and surgical robot arm should be placed early as they define the treatment room layout.
- Save the character placements for last; Dr. Lion, the rabbit nurses, and patient characters are easier to position once all furniture and medical equipment define their workstations and rest areas in this adorable animal hospital.