Dreamy Room Level 136
Level 136 guide walkthrough, helping players solve puzzles and explore the wonderful world of Dreamy Room.
Dreamy Room Level 136 Walkthrough Guide
Dreamy Room Level 136 Room Story
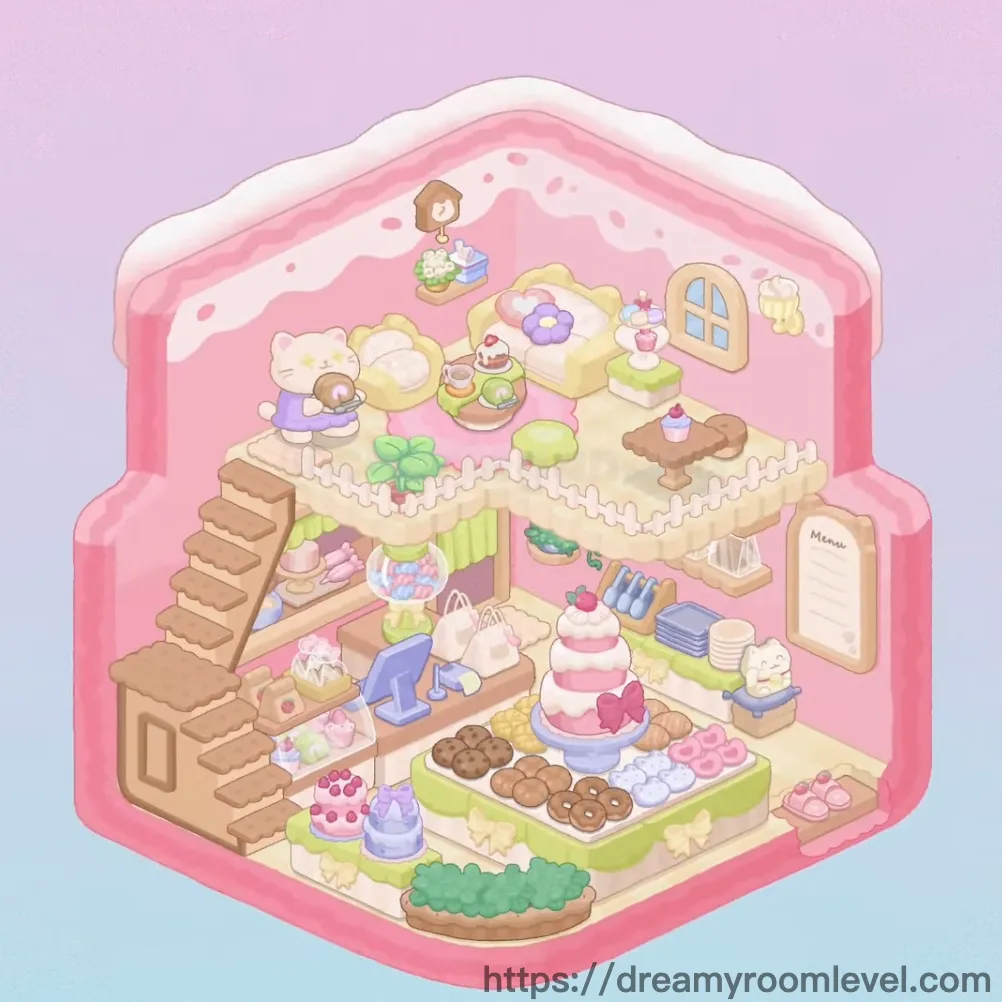
Emma's two-story bakery café is a sweet sanctuary where warmth meets whimsy. The pink walls embrace visitors like a gentle hug, while freshly baked cookies and pastries fill the air with comfort. Downstairs, her beloved white cat lounges on a blue cushion, watching customers browse the glass display cabinet. Upstairs in Dreamy Room Level 136, a cream sofa and yellow bed create a perfect resting spot where Emma dreams up new recipes, surrounded by hanging plants and purple flower decorations that dance in the sunlight streaming through the round window.
Dreamy Room Level 136: Step-by-Step Placement Guide
Step 1. Set Up the Pink Walls and Decorative Trim
Place the pink walls to form the room structure, then add the white frosting trim along the top edges and the pink trim at the borders. Position the ceiling decoration with its wavy pattern along the upper edge. This creates the foundation for Dreamy Room Level 136's sweet aesthetic.
Step 2. Install the Checkered Floor
Drag the checkered floor to cover the ground level area, then overlay the cream floor tiles in a diagonal pattern. The tiles should align perfectly with the room corners to create proper spacing following Dreamy Room Level 136 design principles.
Step 3. Build the Stairs and Upper Level in Dreamy Room Level 136
Position the stairs on the left side of the room, connecting the ground floor to the upstairs level. The stairs should angle upward from bottom-left to upper-left, with the lattice fence and white fence trim running along the upper platform edge for safety.
Step 4. Place Display Cabinet with Glass Window
Set the display cabinet with its glass display window on the left wall of the ground floor. Inside, arrange the bread in display on the visible shelf. This becomes the main attraction in Dreamy Room Level 136's storefront area.
Step 5. Hang the Green Curtain Door
Install the green curtain door with its door curtain next to the display cabinet, creating an entrance with the striped green fabric hanging naturally according to Dreamy Room Level 136 layout requirements.
Step 6. Set Up Counter with Register and Scale
Place the counter on the middle-left area of the ground floor. On top of it, position the cash register on the left side and the blue scale on the right side for customer transactions in Dreamy Room Level 136.
Step 7. Arrange Shopping Bags Near Counter
Place the shopping bags including the white shopping bag directly in front of the counter on the floor, ready for customers completing Dreamy Room Level 136.
Step 8. Position Main Display Table in Dreamy Room Level 136
Drag the main display table with its green display platform to the center-front area of the ground floor. This wide table becomes the focal point for product displays.
Step 9. Arrange Brown Cookies and Chocolate Donuts
On the left section of the main table, place the on a plate and the chocolate donuts on the donut display. These treats should be arranged in neat circular patterns following Dreamy Room Level 136 layout requirements.
Step 10. Add Blue Pastries and Purple Meringues
Position the blue pastries in the middle-left area and the purple meringues in clusters on the display table. Space them evenly for visual appeal in Dreamy Room Level 136's arrangement.
Step 11. Display Pink Treats and Cookies
Place the pink pastries on the right side of the main table and arrange the on the nearby, creating a colorful dessert showcase according to Dreamy Room Level 136 design principles.
Step 12. Set Up Pastry Stand and Food Plate in Dreamy Room Level 136
Position the pastry stand on another food plate on the display table to add height variation to the product arrangement.
Step 13. Mount Wooden Shelf on Right Wall
Install the wooden shelf on the right wall of the ground floor at medium height. This shelf will hold storage items and decorative elements essential for Dreamy Room Level 136 success.
Step 14. Hang Plant with Green Vine
Suspend the hanging plant with its green hanging vine from the ceiling above the wooden shelf, letting the trailing vines cascade naturally in Dreamy Room Level 136.
Step 15. Place Glass Jars and Storage Containers in Dreamy Room Level 136
Arrange the glass jars and storage jars on the wooden shelf. Position the blue bottles alongside them for a coordinated display.
Step 16. Position White Cat on Blue Cushion
Place the blue cushion on the floor near the right wall, then set the white cat on the cushion. The cat on cushion creates a cozy corner following Dreamy Room Level 136 design principles.
Step 17. Install Menu Board on Wall
Mount the with the on the right wall near the display area. This placement is essential for Dreamy Room Level 136 success.
Step 18. Display Layered Cake in Dreamy Room Level 136
Place the layered cake, also known as the pink white cake, on the counter or display area as a centerpiece attraction.
Step 19. Add Large Floor Plant
Position the large floor plant, which is the green bush plant, in the front-left corner of the ground floor. This adds natural greenery according to Dreamy Room Level 136 layout requirements.
Step 20. Place Golden Box Storage in Dreamy Room Level 136
Set the box, which is the golden box, on the floor near the front-left area for storage purposes.
Step 21. Add Corner Plant Decoration
Position the corner plant in a decorative spot to enhance the natural ambiance completing Dreamy Room Level 136.
Step 22. Install Wall Shelf for Display
Mount the wall shelf on the appropriate wall section to provide additional display space following Dreamy Room Level 136 design principles.
Step 23. Set Up Cat with Purple Sweater Upstairs in Dreamy Room Level 136
On the upstairs level, place the cat with purple sweater in the back area, adding a charming character to the upper floor.
Step 24. Position Cream and Yellow Sofa
Place the cream sofa, also referred to as the yellow sofa, on the left side of the upstairs level. This creates a comfortable seating area according to Dreamy Room Level 136 layout requirements.
Step 25. Add Round Tea Table in Center in Dreamy Room Level 136
Position the round tea table with its green rimmed table design in the center of the upstairs seating area.
Step 26. Arrange Tea Set on Table
Place the tea set on the round table, including the teapot in the center and teacups arranged around it. This placement is essential for Dreamy Room Level 136 success.
Step 27. Position Yellow Bed on Upper Level in Dreamy Room Level 136
Place the bed, which is the yellow bed, in the back-right area of the upstairs level.
Step 28. Add Flower Pillow and Decorations
Set the flower pillow on the bed and place the purple flower decoration nearby to enhance the bedding area according to Dreamy Room Level 136 design principles.
Step 29. Place Side Table Near Bed
Position the side table, which is the green side table, next to the bed on the upper level completing Dreamy Room Level 136.
Step 30. Add Pink Cupcake on Side Table in Dreamy Room Level 136
Place the cupcake, which is the pink cupcake, on the side table as a sweet decoration.
Step 31. Install Round Window on Wall
Mount the round window with its blue window frame on the back wall of the upstairs level. This placement is essential for Dreamy Room Level 136 success.
Step 32. Add Beer Mug Decoration in Dreamy Room Level 136
Place the beer mug decoration, also known as the drink decoration, on a wall or shelf in the upper area.
Step 33. Position Gift Box with Small Gift
Set the gift box containing the small gift on a shelf or table in the upstairs area according to Dreamy Room Level 136 layout requirements.
Notes and Tips
Important Notes
- Don't overlook the corner plant near the golden box on the ground floor, as it's easy to miss in the front-left corner of Dreamy Room Level 136.
- The layered cake can block smaller items on the counter, so place it after positioning the cash register and scale to avoid repositioning.
- Both cats (white cat on blue cushion downstairs and cat with purple sweater upstairs) need proper cushion or seating placement first before adding the cats themselves.
- The hanging plant with green vine must be positioned carefully to avoid overlapping with the wooden shelf below in Dreamy Room Level 136.
- The tea set on the upstairs table requires precise placement - teapot first, then arrange teacups evenly around it to prevent items from bouncing back.
Useful Tips
- When placing small pastries on the main display table, drag from slightly above and drop gently to utilize the snap-to-grid mechanism in Dreamy Room Level 136.
- For items on the wooden shelf (glass jars, storage jars, blue bottles), place them from left to right in a single smooth motion to maintain alignment.
- The stairs and lattice fence form a connected structure - complete the stairs first, then the fence will snap into place automatically.
- Use the green display platform's edges as visual guides when arranging cookies and donuts in circular patterns for perfect placement.
- For the upstairs seating area in Dreamy Room Level 136, position the sofa and tea table first, then add smaller decorative items to avoid obstruction issues.
- The cream floor tiles align best when placed after the checkered floor is fully set, ensuring seamless coverage across the entire room.