Dreamy Room Level 552
Level 552 guide walkthrough, helping players solve puzzles and explore the wonderful world of Dreamy Room.
Dreamy Room Level 552 Walkthrough Guide
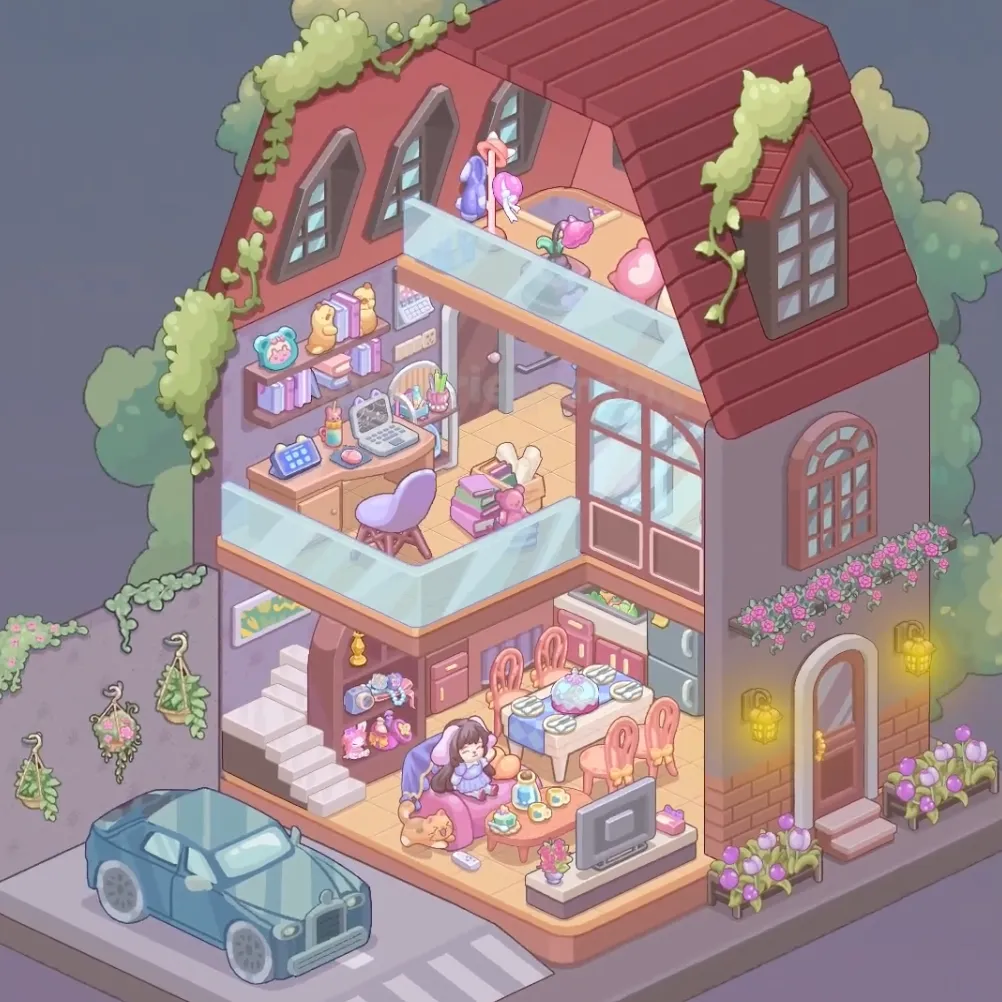
Dreamy Room Level 552 Room Story
Welcome to a charming three-story cottage where a loving family of cats creates their perfect sanctuary. In Dreamy Room Level 552, the purple cat prepares delicious meals in the cozy ground-floor kitchen while the orange cat enjoys afternoon tea at the pink dining table. Upstairs, a peaceful study room with purple chair and computer awaits creative work sessions surrounded by beloved books. The top floor bedroom features a fluffy white cat curled up on the large bed beneath the red-tiled roof, while pink flowers bloom outside and golden lanterns glow warmly. A vintage blue car sits parked outside this dreamy home where every corner radiates comfort and joy.
Dreamy Room Level 552: Step-by-Step Placement Guide
Step 1. Build the Red Tiled Roof Structure
Drag the red tiled roof sections to form the complete rooftop. Position roof tiles section 1, roof tiles section 2, roof tiles section 3, and roof tiles section 4 to create the distinctive sloped roof covering all three floors in Dreamy Room Level 552.
Step 2. Install Windows and Doors
Place the front door at the ground level entrance on the right side. Add the arched window ground on the lower right, window middle floor on the second story, and window top left and window top right on the top floor to allow natural light throughout Dreamy Room Level 552.
Step 3. Add Balcony Railing and Stairs
Position the balcony railing along the top floor's outdoor edge. Place the white stairs connecting the ground floor to the middle level inside the house structure in Dreamy Room Level 552.
Step 4. Plant Large Trees
Drag the large tree left to the upper left corner and large tree right to the upper right corner. These lush green trees should frame the cottage beautifully in Dreamy Room Level 552.
Step 5. Add Hanging Vines and Flowers
Position hanging vine left draping down the left side and hanging vine right on the right side. Place pink flower bush left and pink flower bush right at the base corners to add colorful garden charm.
Step 6. Install Outdoor Lanterns
Hang yellow lantern left and yellow lantern right outside the house near the entrance. These glowing lanterns should illuminate the pathway in Dreamy Room Level 552.
Step 7. Park the Blue Car
Drag the blue car to the lower left corner on the street. This vintage vehicle should be parked in front of the cottage in Dreamy Room Level 552.
Step 8. Set Up Dining Table and Chairs
Position the dining table in the center of the ground floor dining area. Place pink chair 1 and pink chair 2 on opposite sides of the table for seating in Dreamy Room Level 552.
Step 9. Arrange Tea Set on Table
Place the teapot on the dining table along with teacup 1, teacup 2, and plate with food. This tea service should be ready for afternoon refreshments in Dreamy Room Level 552.
Step 10. Install Kitchen Cabinets and Oven
Position the kitchen cabinet lower at floor level and kitchen cabinet upper mounted on the wall above. Place the pink oven in the kitchen area for cooking in Dreamy Room Level 552.
Step 11. Add Kitchen Wall Clock
Hang the wall clock on the kitchen wall above the cabinets. This timepiece should help track cooking times in Dreamy Room Level 552.
Step 12. Hang Kitchen Plants
Suspend hanging plant pot 1 and hanging plant pot 2 from the ceiling in the kitchen and dining area. These trailing plants should add fresh greenery overhead in Dreamy Room Level 552.
Step 13. Position Purple Cat Chef
Drag the purple cat chef to stand near the pink oven in the kitchen. This adorable chef should be preparing delicious meals in Dreamy Room Level 552.
Step 14. Add Orange Cat at Table
Place the orange cat sitting on one of the pink chairs at the dining table. This cat should be enjoying tea time in Dreamy Room Level 552.
Step 15. Place Pink Storage Box
Position the pink storage box near the stairs or kitchen area. This container should store household items on the ground floor in Dreamy Room Level 552.
Step 16. Set Up Wooden Desk
Drag the wooden desk to the center of the middle floor study room. This workspace should be the focal point of the second level in Dreamy Room Level 552.
Step 17. Add Purple Office Chair
Position the purple office chair in front of the wooden desk. This comfortable chair should provide seating for work sessions in Dreamy Room Level 552.
Step 18. Install Computer Setup
Place the computer monitor on the desk along with the keyboard in front. Add the desk lamp on the desk corner for task lighting in Dreamy Room Level 552.
Step 19. Add Desk Accessories
Position the pencil holder, notebook, and potted plant desk on the wooden desk surface. These items should create an organized workspace in Dreamy Room Level 552.
Step 20. Install Bookshelves
Place the bookshelf left and bookshelf right on the walls of the study room. These shelves should provide storage for the book collection in Dreamy Room Level 552.
Step 21. Fill Shelves with Books
Arrange books on shelf 1, books on shelf 2, and books on shelf 3 on the bookshelves. These colorful books should fill the shelves completely in Dreamy Room Level 552.
Step 22. Add Decorative Items to Study
Position the decorative box and photo frame on the bookshelves or desk area. These personal touches should add character to the study in Dreamy Room Level 552.
Step 23. Place Large Bed
Drag the large bed to the top floor bedroom area against the wall. This comfortable bed should be the centerpiece of the sleeping quarters in Dreamy Room Level 552.
Step 24. Add Pillows and Blanket
Position pillow 1 and pillow 2 at the head of the bed. Drape the pink blanket across the bed for cozy comfort in Dreamy Room Level 552.
Step 25. Position White Cat on Bed
Place the white cat on bed curled up sleeping on the pillows. This peaceful cat should be napping comfortably in Dreamy Room Level 552.
Step 26. Add Bedside Items
Position bedside items near the bed. These accessories should be within reach of the sleeping area in Dreamy Room Level 552.
Step 27. Arrange Balcony Plants
Place balcony plant pot 1 and balcony plant pot 2 on the top floor balcony. These potted plants should decorate the outdoor space in Dreamy Room Level 552.
Step 28. Add Balcony Furniture
Position the small table balcony and pink cushion on the balcony area. This seating arrangement should create a relaxing outdoor spot to complete Dreamy Room Level 552.
Tips and Tricks
Common Mistakes
- The roof sections must be placed in correct order to form the proper slope; starting from the wrong section creates misaligned tiles in Dreamy Room Level 552.
- Players often confuse the three floors and place furniture on wrong levels; the dining area is ground floor, study is middle floor, and bedroom is top floor.
- The hanging plant pots require precise ceiling placement; dragging them too low causes them to float incorrectly in the kitchen area.
- Multiple similar items exist like pillows and plant pots; ensure each is placed in its designated location rather than grouping them together.
- The balcony railing must align perfectly with the top floor edge; misplacement blocks access to the outdoor balcony space in Dreamy Room Level 552.
Useful Strategies
- Build from bottom to top; complete the ground floor dining and kitchen area entirely before moving to the middle floor study room in Dreamy Room Level 552.
- Install all structural elements first including roof, windows, doors, and stairs before adding any furniture or decorative items.
- Group items by room function; place all kitchen items together, all study items together, and all bedroom items together for efficient organization.
- Position the three cat characters last after their respective areas are complete; the purple chef needs the kitchen, orange cat needs the dining table, and white cat needs the bed.
- Use the windows as reference points for floor levels; the arched window marks ground floor, single window marks middle floor, and double windows mark top floor.
- The exterior decorations including trees, vines, flowers, and lanterns should frame the house symmetrically; balance left and right sides for visual harmony in Dreamy Room Level 552.