Dreamy Room Level 540
Level 540 guide walkthrough, helping players solve puzzles and explore the wonderful world of Dreamy Room.
Dreamy Room Level 540 Walkthrough Guide
Dreamy Room Level 540 Room Story
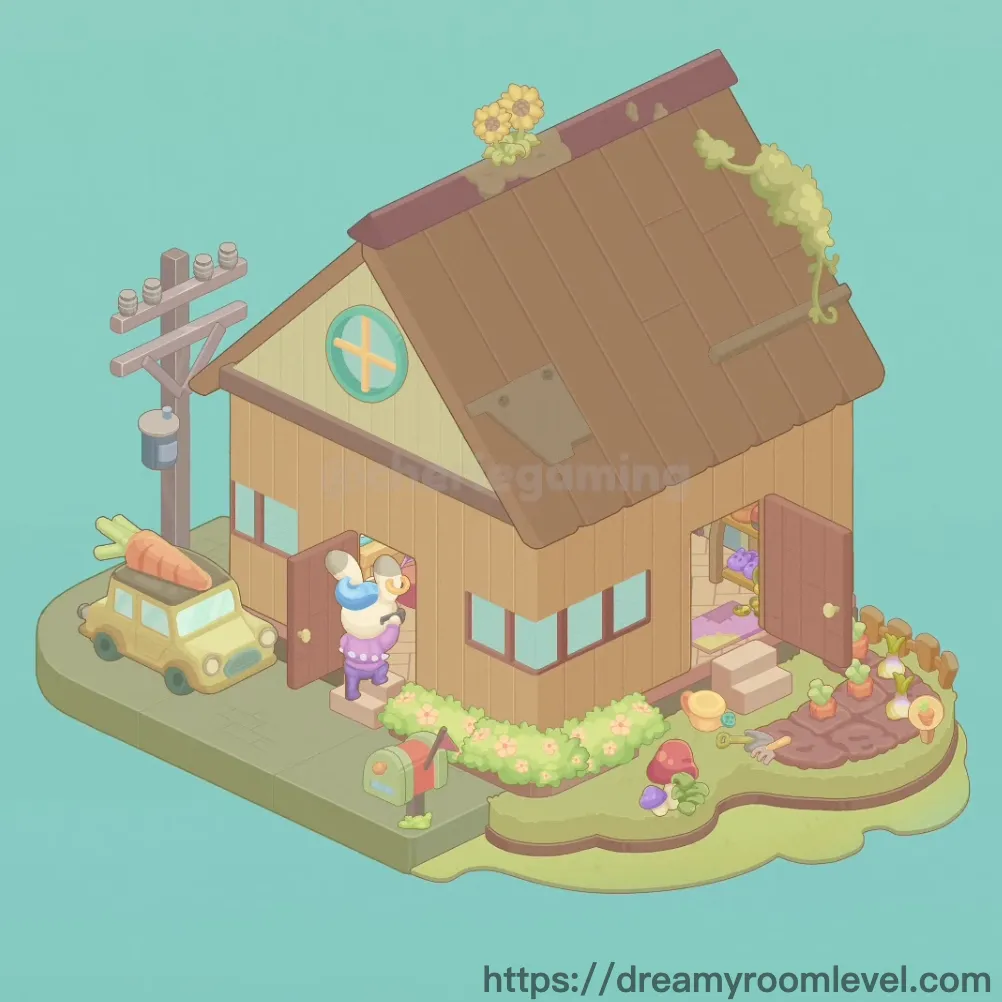
Welcome to Pepper's charming animal cottage, a delightful countryside retreat where a cheerful penguin homeowner tends to her cozy abode. This enchanting Dreamy Room Level 540 sanctuary features a warm attic bedroom with a pink bed tucked beneath wooden beams, while downstairs offers a complete kitchen setup with colorful dishes and fresh ingredients. Outside, a sunny garden blooms with pink flowers where Pepper enjoys afternoon tea at her round wooden table surrounded by cheerful blue and pink chairs. Her rooftop companion, a sleepy hamster plush, lounges on a blue pillow while green vines cascade down the walls. From the yellow delivery car loaded with carrots to the purple mushrooms dotting the garden, every detail celebrates simple country living and friendship.
Dreamy Room Level 540: Step-by-Step Placement Guide
Step 1. Install Herringbone Floor Tiles
Drag the herringbone floor tiles to cover the entire floor surface. This foundation should align perfectly with all floor boundaries in Dreamy Room Level 540, creating the classic parquet pattern that defines the cottage interior.
Step 2. Place Center Area Rug
Position the center area rug in the middle section of the floor. This square rug should be centered precisely to create a defined living space within the larger room area.
Step 3. Apply Striped Wallpaper
Add the striped wallpaper to all interior walls. The vertical yellow and blue stripes should cover the walls completely, creating the cottage's signature cozy atmosphere in Dreamy Room Level 540.
Step 4. Position Pink Bed in Attic
Drag the pink bed to the upper attic level on the left side. The bed should be positioned beneath the sloped roof beams, creating the main sleeping area.
Step 5. Add Green Blanket and Pink Pillow
Place the green blanket on the bed, then position the pink pillow at the headboard. These bedding items should be arranged naturally to create an inviting sleeping space in Dreamy Room Level 540.
Step 6. Place Bedside Table and Yellow Lamp
Position the bedside table next to the bed, then add the yellow lamp on top. The lamp should be centered on the table surface to provide bedside lighting.
Step 7. Add Spider Web Decorations
Place spider web decoration 1 and spider web decoration 2 in the attic corners near the bed. These whimsical details add character to the cozy sleeping loft.
Step 8. Position Television
Drag the television to the attic area, placing it on a surface visible from the bed. This entertainment piece should be positioned where it can be easily viewed from the sleeping area in Dreamy Room Level 540.
Step 9. Add Wooden Shelf Unit
Place the wooden shelf unit in the attic or upper area. This storage piece should be positioned against a wall to display decorative items and provide organization.
Step 10. Install Kitchen Counter
Drag the kitchen counter to the lower level interior, positioning it against the back wall. This functional workspace should serve as the main food preparation area.
Step 11. Add Blue Basket on Counter
Position the blue basket on the kitchen counter surface. This storage container should be placed where it can hold kitchen essentials in Dreamy Room Level 540.
Step 12. Arrange Pink Bowl and Green Cup
Place the pink bowl on the counter or nearby surface, then add the green cup beside it. These colorful dishes add cheerful accents to the kitchen area.
Step 13. Add Cooking Pot and Ingredients
Position the cooking pot on the counter, then place the food ingredients nearby. These cooking items should be arranged as if ready for meal preparation.
Step 14. Place Condiment Bottles and Sink
Add the condiment bottles to the counter area, then install the sink basin in the counter section. Complete the functional kitchen setup in Dreamy Room Level 540.
Step 15. Set Up Round Wooden Table Outside
Drag the round wooden table to the outdoor patio area in front of the house. This table should be centrally positioned to create the main outdoor dining space.
Step 16. Arrange Blue and Pink Chairs
Place blue chair 1 and blue chair 2 around the table, then add the pink chair to complete the seating arrangement. Position chairs evenly around the table perimeter in Dreamy Room Level 540.
Step 17. Add Dinner Plate and Drinking Cup
Position the dinner plate on the outdoor table surface, then place the drinking cup beside it. These dining items create a realistic outdoor meal setting.
Step 18. Place Wicker Basket and Purple Cushion
Add the wicker basket near the outdoor table, then position the purple cushion seat on the ground or on a chair. These comfort items enhance the outdoor lounging area.
Step 19. Position Hamster Plush on Roof
Drag the hamster plush on roof to the top of the cottage roof. Place the blue pillow under hamster beneath it to create the adorable rooftop lounging scene in Dreamy Room Level 540.
Step 20. Add Green Vine Plants
Position green vine plant 1 and green vine plant 2 on the roof edges or walls. Let them drape naturally down the cottage sides to create an overgrown, charming effect.
Step 21. Place Yellow Flower Decorations
Add yellow flower decoration 1 and yellow flower decoration 2 to the roof area near the vines. These bright blooms add cheerful color to the rooftop garden.
Step 22. Install Red Ladder
Drag the red ladder to lean against the roof edge. Position it securely to provide access to the rooftop area in Dreamy Room Level 540.
Step 23. Add Circular Window Sign
Place the circular window sign on the front wall of the cottage. This decorative element should be prominently displayed on the exterior facade.
Step 24. Position Utility Pole and Canisters
Drag the utility pole to the left side of the property, then add the pole canisters attached to it. This utility element adds realistic neighborhood details.
Step 25. Plant Green Flowering Bushes
Position green flowering bush 1 and green flowering bush 2 in front of the cottage. These lush bushes with pink flowers create the garden border in Dreamy Room Level 540.
Step 26. Arrange Flower Pots
Place flower pot 1, flower pot 2, and flower pot 3 around the garden area. Distribute them to add organized gardening touches to the outdoor space.
Step 27. Add Carrot Vegetables
Position carrot vegetable 1 and carrot vegetable 2 in the garden area. Place them as if freshly harvested from the vegetable patch.
Step 28. Place Pumpkin
Add the pumpkin to the garden area near other vegetables. This seasonal produce should be positioned prominently among the harvest items in Dreamy Room Level 540.
Step 29. Add Purple Mushrooms
Position purple mushroom 1 and purple mushroom 2 in shaded garden spots. These whimsical fungi add magical forest touches to the cottage garden.
Step 30. Place Gardening Tools
Add the gardening shovel and gardening rake near the garden area. These tools should be positioned as if ready for gardening work.
Step 31. Install Mailbox
Drag the mailbox to the front yard area near the road. This communication fixture should be easily accessible from the cottage entrance in Dreamy Room Level 540.
Step 32. Position Yellow Delivery Car
Place the yellow delivery car in the front yard or driveway area. Add the carrot on car roof on top to create the charming delivery vehicle scene.
Step 33. Add Penguin Character
Position the penguin character near the front door or in the yard. This adorable homeowner should be placed where they appear to be greeting visitors or tending the garden.
Step 34. Install Front Door and Windows
Place the front door in the cottage entrance, then add window 1 and window 2 to the exterior walls. These architectural elements complete the cottage structure in Dreamy Room Level 540.
Step 35. Add Roof Tiles
Position the roof tiles to cover the cottage roof completely. These tiles should be arranged in the traditional overlapping pattern to finish the cozy animal cottage exterior.
Tips and Tricks
Common Mistakes
- The center area rug placement requires precise centering on the floor; misalignment can make the entire room layout appear unbalanced in Dreamy Room Level 540.
- Players often forget the small rooftop items like the hamster plush and blue pillow; these elevated decorations are easily overlooked but essential for completion.
- The kitchen counter items need specific arrangement; placing the cooking pot before positioning the counter itself can cause placement conflicts.
- Spider web decorations in the attic corners are frequently missed; check both upper corners near the bed carefully before moving to other areas.
- The outdoor dining setup requires balanced chair placement; uneven distribution around the table creates an awkward appearance in the patio area.
Useful Strategies
- Start with structural elements like floors, walls, and the center rug before adding furniture to establish the room's foundation and spatial layout.
- Complete the attic bedroom area entirely before moving to the kitchen level; this top-to-bottom approach prevents overlooking elevated items in Dreamy Room Level 540.
- When arranging the outdoor dining area, place the table first as an anchor point, then position chairs evenly around it for balanced composition.
- Group garden items together during placement; add all vegetables, flowers, and tools in sequence to efficiently complete the outdoor gardening zone.
- The rooftop decorations should be placed after completing ground level items; this ensures you don't forget the hamster, vines, and flowers in elevated positions.
- Save the penguin character and delivery car for last; these movable elements are easier to position once all stationary furniture and landscaping are in place for this cozy cottage scene.