Dreamy Room Level 115
Level 115 guide walkthrough, helping players solve puzzles and explore the wonderful world of Dreamy Room.
Dreamy Room Level 115 Walkthrough Guide
Dreamy Room Level 115 Room Story
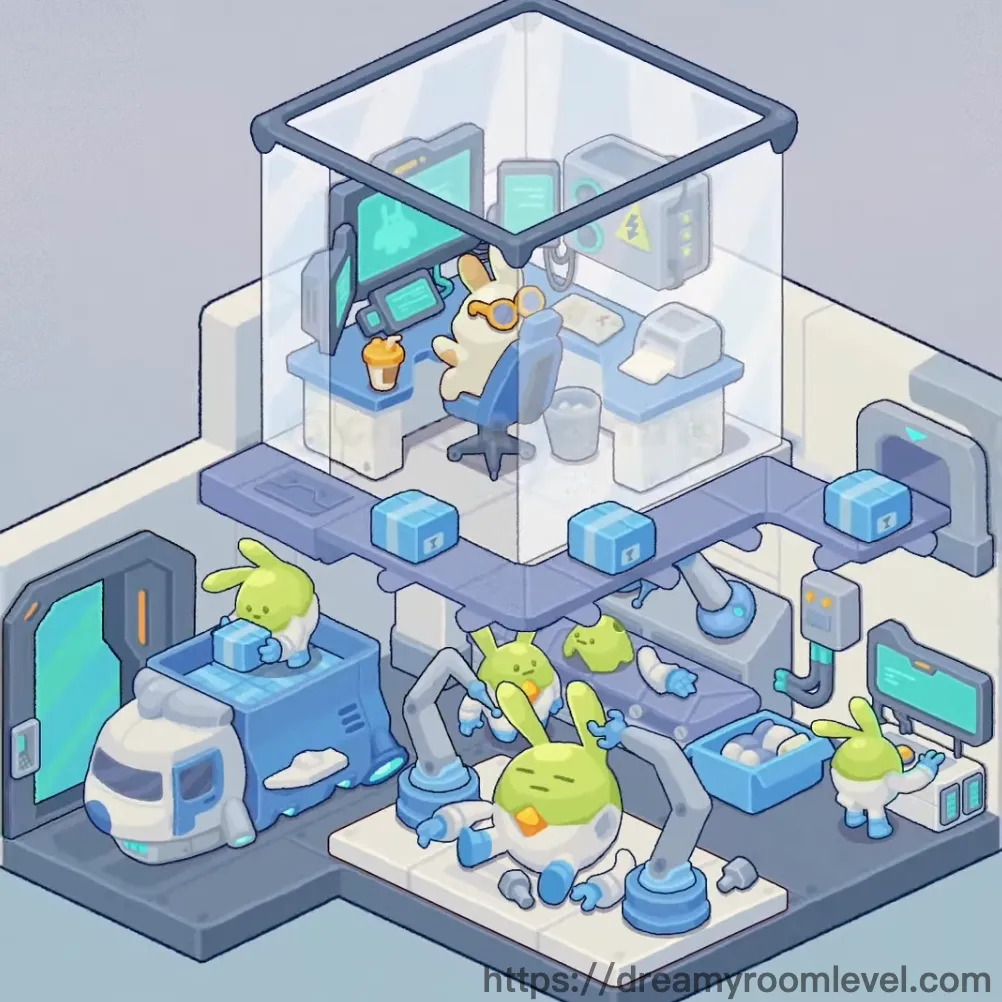
In a cutting-edge research facility, a passionate yellow cat scientist works tirelessly on the upper floor, monitoring experiments through glowing cyan screens while sipping warm coffee. Below, cheerful green blob assistants operate sophisticated machinery, carefully assembling components on the blue conveyor belt. This futuristic workspace perfectly blends innovation and warmth, where Dreamy Room Level 115 creates a harmonious environment for technological breakthroughs and friendly collaboration between the dedicated research team.
Dreamy Room Level 115: Step-by-Step Placement Guide
Step 1. Install Floor Tiles and Floor Panel Foundation
Place the floor tiles across the entire base level area, then add the floor panel sections to create distinct work zones. Start from the bottom left corner and work towards the right, ensuring complete coverage for Dreamy Room Level 115.
Step 2. Build Wall Structure with Wall Tiles and Panels
Position wall tiles along the outer boundaries, then attach wall panel segments on both levels. Place the corner wall pieces at room intersections to define spaces properly in Dreamy Room Level 115.
Step 3. Install Ceiling Structure and Frame
Drag the ceiling structure to the upper level workspace, then secure the ceiling frame around the office area perimeter. This creates the enclosed upper workspace essential for Dreamy Room Level 115 design.
Step 4. Place the Entry Door
Install the door on the left side wall near the large blue machine area. Position it aligned with the wall tiles, ensuring proper access to the facility in Dreamy Room Level 115.
Step 5. Install Glass Wall and Transparent Barrier
Mount the glass wall panels around the upper office area, then add transparent barrier sections to create visual separation. These transparent elements allow light flow throughout Dreamy Room Level 115.
Step 6. Position Stairs and Platform
Place the stairs connecting the lower and upper levels on the right side, then install the platform at the top landing. Ensure proper alignment for smooth character movement in Dreamy Room Level 115.
Step 7. Install Large Blue Machine in Dreamy Room Level 115
Position the large blue machine on the lower left area against the wall. This prominent equipment piece should be placed near the door, serving as the main manufacturing unit.
Step 8. Place White Pod Chamber
Drag the white pod to the lower right section near the platform base. This cylindrical chamber should sit firmly on the floor tiles, providing storage functionality in Dreamy Room Level 115.
Step 9. Set Up Conveyor Belt and Assembly Line
Install the conveyor belt in the central lower area, then attach the assembly line components connecting to production zones. These should form a continuous workflow path for Dreamy Room Level 115.
Step 10. Position Office Desk in Upper Workspace
Place the office desk in the center of the upper floor office area. Orient it facing the large wall screen, creating the primary workstation for Dreamy Room Level 115.
Step 11. Add Office Chair in Dreamy Room Level 115
Position the office chair directly in front of the office desk. Ensure it's centered and facing the computer monitor, ready for the yellow cat character.
Step 12. Install Work Table on Lower Level
Place the work table on the lower level near the conveyor belt system. This provides an additional workspace for assembly tasks in Dreamy Room Level 115.
Step 13. Mount Computer Monitor
Drag the computer monitor onto the office desk surface, positioning it towards the back center area. This should face the office chair for optimal viewing in Dreamy Room Level 115.
Step 14. Install Large Wall Screen Behind Desk
Mount the large wall screen on the upper rear wall directly behind the office desk. This prominent cyan display should be centered on the wall for Dreamy Room Level 115.
Step 15. Add Small Monitor and Display Screen
Place the small monitor on the left side of the work area, then position the display screen near machinery controls. These provide additional data visualization for Dreamy Room Level 115.
Step 16. Place Keyboard and Mouse on Desk
Position the keyboard directly in front of the computer monitor, then add the mouse to its right side. Arrange them in a natural typing position.
Step 17. Add Papers to Desk Surface in Dreamy Room Level 115
Place the papers on the left side of the office desk near the edge. These document sheets should be neatly arranged, adding detail to the workspace.
Step 18. Position Coffee Cup on Desk
Drag the coffee cup to the right front corner of the office desk. This warm beverage container adds a cozy touch to Dreamy Room Level 115 workspace.
Step 19. Place Trash Can Under Desk
Position the trash can on the floor beneath the right side of the office desk. Ensure it's tucked close but accessible in Dreamy Room Level 115.
Step 20. Install Storage Shelves on Upper Wall
Mount the storage shelves on the upper level wall near the office area. These should be positioned above work surfaces for easy access.
Step 21. Add Storage Unit and Wall Mount in Dreamy Room Level 115
Place the storage unit on the lower level near the white pod, then install the wall mount brackets on nearby walls. These provide organized storage solutions.
Step 22. Position Mechanical Arm on Assembly Line
Attach the mechanical arm to the conveyor belt area on the lower level. This robotic component should extend over the assembly line for Dreamy Room Level 115.
Step 23. Install Robotic Arm Near Production Area
Place the robotic arm adjacent to the work table on the lower level. Position it with the gripper facing the assembly area.
Step 24. Connect Pipes and Ventilation Pipe System
Install the pipes along walls and ceiling areas, then add the ventilation pipe sections throughout the facility. These should create an interconnected system for Dreamy Room Level 115.
Step 25. Mount Control Panel and Control Station
Place the control panel on the wall near the large blue machine, then position the control station adjacent to the machinery. These provide operational controls in Dreamy Room Level 115.
Step 26. Add Blue Cargo Box and Blue Container in Dreamy Room Level 115
Position the blue cargo box on the conveyor belt, then place the blue container near the storage areas on the lower level. These hold materials and components.
Step 27. Place Blue Cube Storage Items
Drag blue cube units onto the conveyor belt and near work surfaces. These stackable storage items should be scattered across production areas.
Step 28. Position Blue Seat for Workers
Place the blue seat near the work table on the lower level. This provides a resting spot for the blob characters in Dreamy Room Level 115.
Step 29. Install Machinery and Industrial Equipment
Position the machinery components throughout the lower level, then add industrial equipment pieces near the assembly line. These form the core production systems for Dreamy Room Level 115.
Step 30. Add Mechanical Device Units in Dreamy Room Level 115
Place mechanical device components near the conveyor belt system and work areas. These smaller mechanical parts enhance the facility's functionality.
Step 31. Position Orange Ball Tool
Place the orange ball on the lower level floor near the work table. This colorful item adds a playful element to Dreamy Room Level 115.
Step 32. Add White Robot Helmet Equipment
Position the white robot helmet near the white pod on the lower level. This protective gear should be easily accessible for the characters.
Step 33. Install Wall Decoration Elements
Mount wall decoration pieces on upper level walls near the office area. These add visual interest and personality to Dreamy Room Level 115.
Step 34. Add Lighting Fixture Illumination in Dreamy Room Level 115
Install the lighting fixture on the ceiling structure above the office area. This provides bright illumination for the workspace in Dreamy Room Level 115.
Step 35. Place Green Blob Character
Position the green blob character on the lower level near the work table and machinery. This cheerful assistant should be in the production area.
Step 36. Add Yellow Cat Character to Office
Place the yellow cat character sitting in the office chair at the desk on the upper level. This scientist should be positioned at the computer in Dreamy Room Level 115.
Step 37. Define Workspace Area
The workspace concept encompasses both the upper office zone and lower production floor. Ensure all elements work together harmoniously to complete Dreamy Room Level 115.
Tips and Important Notes
Important Notes
- The transparent barrier and glass walls can be tricky to place precisely in Dreamy Room Level 115 - align them carefully with the ceiling frame edges before releasing
- Small items like the blue cube and orange ball may be hidden behind larger equipment - check around the conveyor belt area thoroughly
- The mechanical arm and robotic arm are similar in appearance but have different mounting points - verify correct placement before confirming
- Pipes and ventilation systems must be placed before certain wall decorations, or they may block proper installation in Dreamy Room Level 115
- The stairs and platform must connect seamlessly for characters to move between levels - ensure perfect alignment
Useful Tips
- When placing the large blue machine, drag it slowly to the corner until you feel the magnetic snap indicating correct placement in Dreamy Room Level 115
- For items on the office desk, place larger objects first (monitor, keyboard) then fill in smaller items (mouse, papers, coffee cup) around them
- The conveyor belt has specific connection points - look for the highlighted blue areas that indicate proper attachment zones
- To avoid items bouncing back, release them only when the placement area glows green, confirming valid positioning in Dreamy Room Level 115
- Group similar small items together in one dragging session - place all blue cube units consecutively for faster completion
- Use the zoom function to precisely position wall-mounted elements like the control panel and lighting fixture without obstruction