Dreamy Room Level 549
Level 549 guide walkthrough, helping players solve puzzles and explore the wonderful world of Dreamy Room.
Dreamy Room Level 549 Walkthrough Guide
Dreamy Room Level 549 Room Story
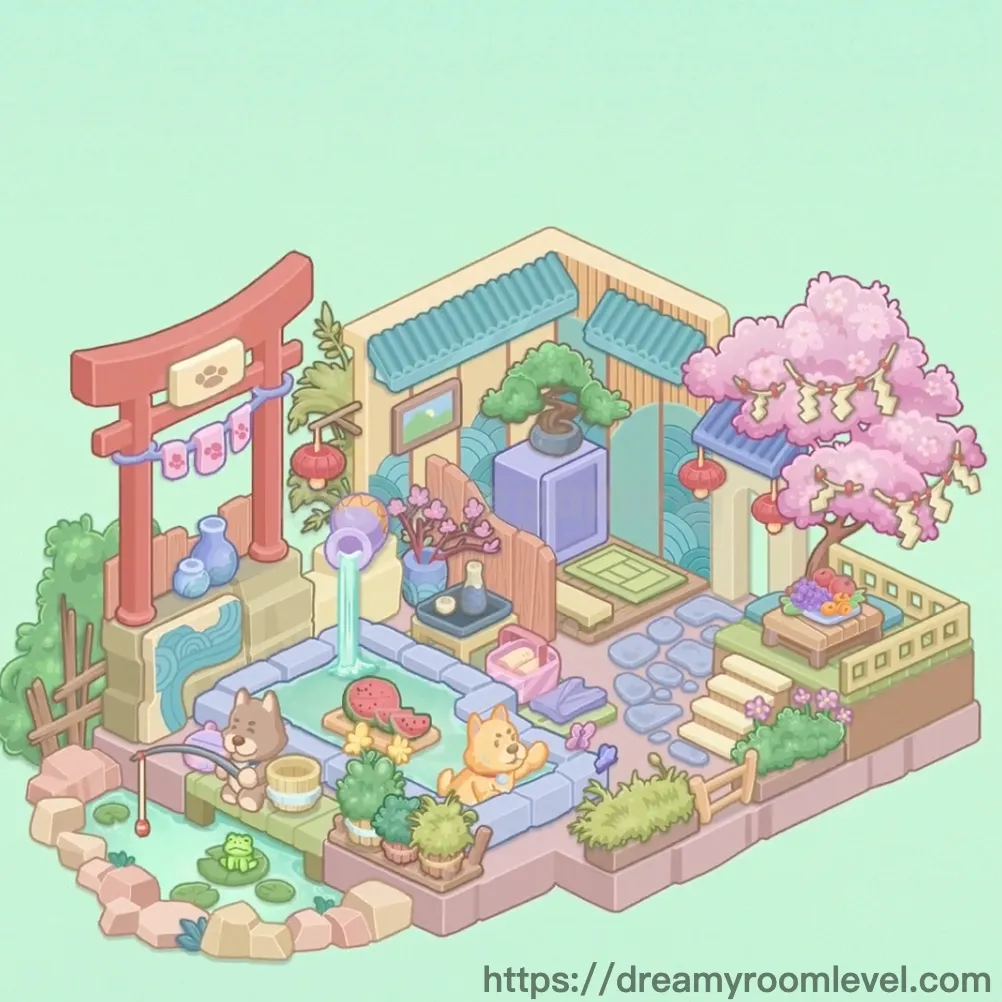
Soak away your worries at the most adorable hot spring retreat where two friendly Shiba Inu dogs enjoy the ultimate relaxation experience. This charming Dreamy Room Level 549 onsen features a traditional Japanese bathhouse with blue wave-patterned walls and elegant tile roofs sheltering the steamy waters below. One happy Shiba lounges in the warm mineral bath while his friend sits by the pond trying to catch fish with a tiny rod. A majestic red torii gate stands guard at the entrance while a magnificent cherry blossom tree showers pink petals over the scene. From the refreshing watermelon slices waiting on a wooden tray to the sake bottles chilling by the refrigerator, every detail promises a peaceful escape where even the frogs and butterflies come to enjoy the serene atmosphere.
Dreamy Room Level 549: Step-by-Step Placement Guide
Step 1. Lay Pink Floor
Drag the pink floor to cover the entire ground area. This soft pink flooring should form the foundation of the onsen retreat in Dreamy Room Level 549.
Step 2. Install Wooden Panel Walls
Position the wooden panel walls to form the L-shaped room structure. These warm wooden panels should create the traditional Japanese backdrop.
Step 3. Add Blue Wave Pattern Panels
Place blue wave pattern panel 1, blue wave pattern panel 2, and blue wave pattern panel 3 in the arched wall sections. These decorative panels should display the classic Japanese wave motif in Dreamy Room Level 549.
Step 4. Install Blue Tile Roofs
Position blue tile roof 1 over the main building section and blue tile roof 2 over the entrance area. These traditional tiled roofs should shelter the onsen.
Step 5. Build Hot Spring Bath
Drag the hot spring bath to the center-left area of the room. This blue-tiled pool should be the main bathing feature of Dreamy Room Level 549.
Step 6. Add Waterfall Feature
Position the waterfall feature at the edge of the hot spring bath. This cascading water should flow into the pool creating a soothing atmosphere.
Step 7. Install Red Torii Gate
Place the red torii gate on the left side of the room. This iconic Japanese gate should mark the sacred entrance to the onsen in Dreamy Room Level 549.
Step 8. Plant Cherry Blossom Tree
Position the cherry blossom tree on the right side of the room. This magnificent pink sakura should be the natural centerpiece of the garden area.
Step 9. Add Bonsai Tree
Place the bonsai tree near the building entrance area. This carefully cultivated miniature tree should add zen elegance in Dreamy Room Level 549.
Step 10. Create Small Pond
Drag the small pond to the front left corner near the torii gate. This water feature should provide a peaceful fishing spot.
Step 11. Add Stone Rock Border
Position the stone rock border around the pond edges. These natural stones should create a rustic pond boundary in Dreamy Room Level 549.
Step 12. Place Tatami Mat
Add the tatami mat inside the building area near the refrigerator. This traditional floor covering should define the indoor relaxation space.
Step 13. Install Purple Refrigerator
Position the purple refrigerator against the back wall inside the building. This appliance should keep drinks and refreshments cool in Dreamy Room Level 549.
Step 14. Build Wooden Deck Platform
Place the wooden deck platform beside the hot spring bath. This raised wooden area should provide a place to relax before bathing.
Step 15. Add Wooden Bench
Position the wooden bench near the garden area. This seating should offer a spot to enjoy the cherry blossoms in Dreamy Room Level 549.
Step 16. Install Wooden Fence
Place the wooden fence along the garden border near the cherry blossom tree. This fence should define the outdoor garden boundary.
Step 17. Lay Stone Pathway
Drag the stone pathway from the entrance toward the bath area. These stepping stones should guide visitors through the onsen in Dreamy Room Level 549.
Step 18. Add Stone Stairs
Position the stone stairs connecting different levels of the retreat. These steps should provide access to elevated areas.
Step 19. Place Bathing Accessories
Add the wooden bucket near the bath and position the pink towel basket with rolled towels nearby for guests in Dreamy Room Level 549.
Step 20. Set Up Refreshment Area
Place the red lacquer tray on the deck with watermelon slice 1 and watermelon slice 2. Add sake bottle 1 and sake bottle 2 near the refrigerator.
Step 21. Add Fruit Basket
Position the fruit basket on the deck or near the seating area. This colorful arrangement should offer healthy snacks in Dreamy Room Level 549.
Step 22. Hang Red Lanterns
Place red lantern 1 and red lantern 2 hanging from the roof eaves. These traditional lanterns should provide warm lighting for evening soaks.
Step 23. Add Banner Decorations
Position the on the torii gate and hang the across the entrance area in Dreamy Room Level 549.
Step 24. Place Lightning Decoration
Add the lightning bolt decoration on the refrigerator or wall as a quirky accent piece.
Step 25. Hang Mountain Picture Frame
Position the mountain picture frame on the interior wall. This scenic artwork should add peaceful imagery to the building in Dreamy Room Level 549.
Step 26. Arrange Vases
Place the blue ceramic vase near the torii gate area and position the cherry blossom vase inside the building with pink flowers.
Step 27. Plant Garden Bushes
Add green bush 1, green bush 2, and green bush 3 around the garden. Position yellow flower bush, pink flower bush, and purple flower bush for color in Dreamy Room Level 549.
Step 28. Add Bamboo Plant
Position the bamboo plant near the torii gate or building entrance. This tall green plant should add vertical interest to the garden.
Step 29. Place Lily Pads
Add lily pad 1, lily pad 2, and lily pad 3 floating on the small pond surface in Dreamy Room Level 549.
Step 30. Add Green Grass Patches
Position green grass patch 1 and green grass patch 2 around the garden areas for natural ground cover.
Step 31. Place Blue Wave Tile Insert
Add the blue wave tile insert near the waterfall or bath area as additional decorative detail in Dreamy Room Level 549.
Step 32. Position Pink Floor Cushion
Place the pink floor cushion on the tatami mat or deck area for comfortable seating.
Step 33. Add Purple Paper Umbrella
Position the purple paper umbrella leaning against a wall or displayed decoratively near the bath in Dreamy Room Level 549.
Step 34. Place Decorative Items
Add the crystal ball decoration on a surface and position the red mushroom in the garden area for whimsical touches.
Step 35. Position Shiba Dog Bath Character
Drag the shiba dog bath character to relax inside the hot spring bath. This happy Shiba should be enjoying the warm waters in Dreamy Room Level 549.
Step 36. Add Shiba Dog Fishing Character
Place the shiba dog fishing character sitting by the pond with the fishing rod. This patient Shiba should be waiting for a catch.
Step 37. Position Frog Characters
Add the green frog roof sitting on the roof edge and place the frog pond character near the lily pads in Dreamy Room Level 549.
Step 38. Add Purple Butterfly
Position the purple butterfly fluttering near the flowers or cherry blossom tree. This delicate visitor adds movement to the scene.
Step 39. Add Sparkle Effects
Place the sparkle star effects around the scene to add magical ambiance to the onsen retreat in Dreamy Room Level 549.
Tips and Tricks
Common Mistakes
- The hot spring bath and small pond are separate water features; placing them too close together or confusing their locations disrupts the layout flow in Dreamy Room Level 549.
- Players often overlook the multiple blue wave pattern panels that need to fill each arched wall section; missing one creates incomplete wall decoration.
- The two Shiba dog characters have specific activity spots; the bathing Shiba goes in the hot spring while the fishing Shiba sits by the pond with the rod.
- The red torii gate requires proper positioning on the left side to frame the entrance; placing it elsewhere loses the traditional gateway effect.
- Small items like the wooden bucket, sake bottles, and watermelon slices are easily forgotten; check all refreshment and accessory areas carefully.
Useful Strategies
- Start with the floor and walls structure before adding the water features to establish the room's foundation and Japanese architectural style properly.
- Complete the hot spring bath area first (pool, waterfall, deck) before decorating the garden pond section to avoid confusion between water features in Dreamy Room Level 549.
- When arranging the garden area, place the cherry blossom tree and torii gate first as anchor points, then add bushes and smaller plants around them.
- Group similar decorative items together during placement; add all lanterns first, then all vases, then all bushes for efficient completion.
- The stone pathway should be laid early to define the walkable route through the onsen before positioning furniture and accessories around it.
- Save the character placements for last; the two Shiba dogs and frog friends are easier to position once all furniture, water features, and garden elements define their relaxation spots in this adorable Japanese retreat.