Dreamy Room Level 111
Level 111 guide walkthrough, helping players solve puzzles and explore the wonderful world of Dreamy Room.
Dreamy Room Level 111 Walkthrough Guide
Dreamy Room Level 111 Room Story
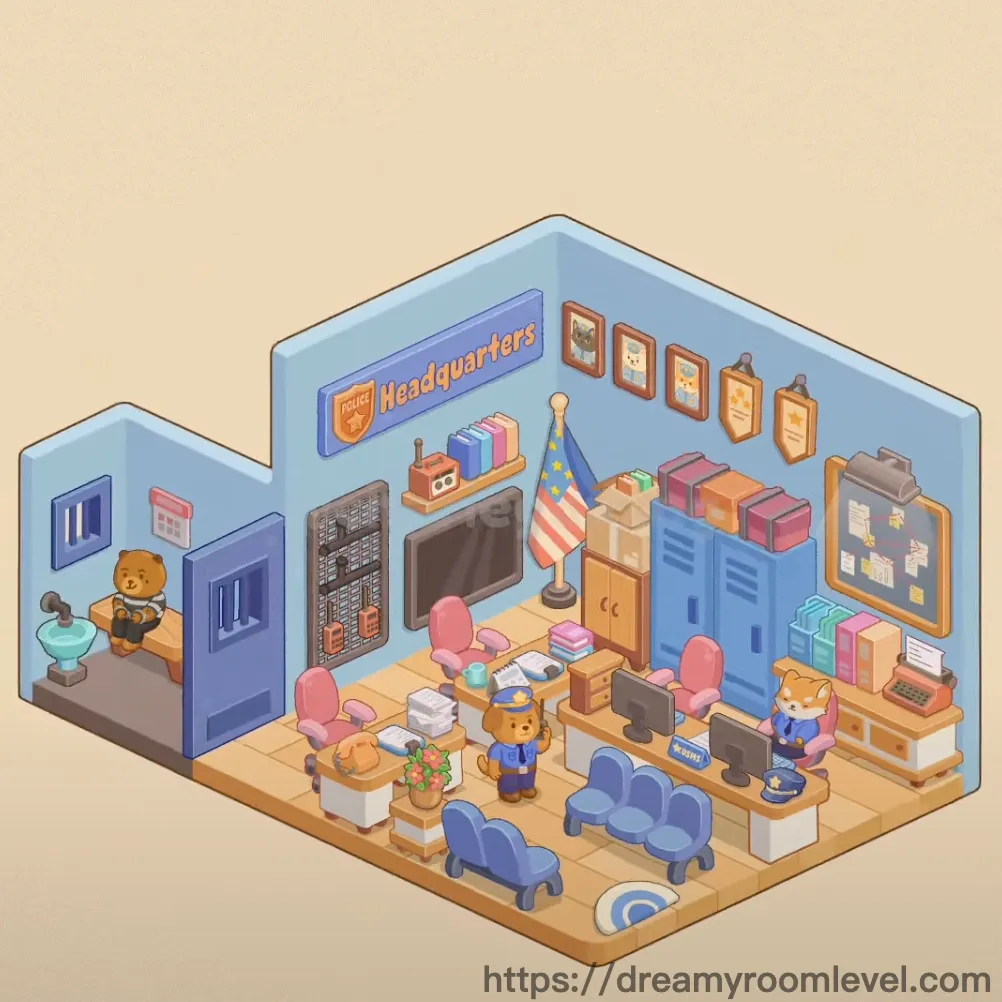
Welcome to the bustling Police Headquarters in Dreamy Room Level 111! This cozy office belongs to Chief Anderson, a dedicated teddy bear officer who's served the community for twenty years. The blue walls echo with stories of solved cases, while colorful filing systems hold decades of memories. Between morning coffee and evening paperwork, this warm space witnesses countless moments of teamwork, where fellow bear officers gather around desks sharing case files and encouragement. The American flag stands proudly, reminding everyone of their duty to serve with honor.
Dreamy Room Level 111: Step-by-Step Placement Guide
Step 1. Install Blue Wall Panels and Tile Floor Foundation
Begin your Dreamy Room Level 111 journey by establishing the room's base structure. Blue wall panels should cover all vertical surfaces, creating the signature police station atmosphere. The tile floor goes across the entire room base, providing a clean, professional foundation that's essential for Dreamy Room Level 111 completion.
Step 2. Place Blue Door on Left Side Wall
Position the blue door on the left wall near the corner. Drag it to align perfectly with the wall frame, ensuring it sits flush against the blue wall surface. This entrance is crucial for Dreamy Room Level 111's office layout.
Step 3. Mount Headquarters Sign Above Central Area
Drag the headquarters sign to the upper center of the back wall. This purple-blue banner with "Headquarters" text should be positioned prominently where it's immediately visible. Place the police shield logo on the sign itself, following Dreamy Room Level 111 branding requirements.
Step 4. Install Wooden Bookshelf Against Back Wall
Position the wooden bookshelf against the center-left section of the back wall, below the headquarters sign. This multi-shelf unit should stand firmly on the floor, aligned vertically. According to Dreamy Room Level 111 design, this becomes the primary storage focal point.
Step 5. Arrange Colorful Books on Bookshelf
Fill the wooden bookshelf with colorful books, stacking them horizontally and vertically across multiple shelves. Mix pink, blue, orange, and yellow spines to create visual interest that's characteristic of Dreamy Room Level 111's friendly atmosphere.
Step 6. Place Blue Metal Locker on Right Side
Drag the blue metal locker to the right side of the back wall. This tall storage unit should stand upright next to where the desk will be positioned, providing essential storage space in Dreamy Room Level 111.
Step 7. Position Wooden Desk in Center-Right Area
Place the large wooden desk in the center-right floor area, angled slightly toward the room's center. This L-shaped desk serves as the main workspace, essential for completing Dreamy Room Level 111 successfully.
Step 8. Add Pink Office Chairs at Desk
Position two pink office chairs at the desk - one facing the computer monitor area and another at the adjacent side. These wheeled chairs should be tucked partially under the desk surface in Dreamy Room Level 111.
Step 9. Set Up Computer Monitor on Desk
Place the computer monitor on the right side of the wooden desk, positioning it at eye level for the seated officer. Add the keyboard directly in front of the monitor on the desk surface, following standard Dreamy Room Level 111 workstation setup.
Step 10. Install American Flag Behind Desk
Mount the american flag on a pole stand positioned behind and slightly to the left of the main desk area. The flag should stand upright with the stars and stripes clearly visible in Dreamy Room Level 111.
Step 11. Place Wooden Cabinet Below Flag
Position the wooden cabinet on the floor directly beneath the American flag pole. This small storage unit with doors provides additional filing space critical for Dreamy Room Level 111 organization.
Step 12. Add Pink Filing Cabinet Against Left Wall
Drag the pink filing cabinet to the left wall area, positioning it between the door and the bookshelf. This multi-drawer unit should sit flush against the wall at floor level in Dreamy Room Level 111.
Step 13. Mount Red Wall Sign Above Door
Position the red wall sign above the blue door on the left wall. This small rectangular indicator should be centered above the door frame, adding important wayfinding to Dreamy Room Level 111.
Step 14. Position Teddy Bear Officers Throughout Office
Place the teddy bear officer seated in one pink chair at the main desk. Add the teddy bear in suit at another desk position, and position the teddy bear uniform character standing or seated elsewhere, bringing Dreamy Room Level 111 to life.
Step 15. Arrange Potted Plants for Greenery
Place potted plants on desk surfaces and shelves. Set the flower pot with colorful blooms on the left desk area or bookshelf, adding natural warmth essential to Dreamy Room Level 111's ambiance.
Step 16. Hang Picture Frames and Certificates on Walls
Mount multiple picture frames on the back wall above the blue locker and desk area. Add wall certificates and wall posters in a horizontal row, creating the accomplished atmosphere of Dreamy Room Level 111.
Step 17. Install Bulletin Board and Cork Board
Position the bulletin board on the right side wall or above the filing cabinet area. Mount the cork board nearby, providing display space for important notices in Dreamy Room Level 111.
Step 18. Add Notice Board with Pins and Papers
Install the notice board on an available wall space, attaching orange sticky notes and pink sticky notes to its surface, completing the active workspace feel of Dreamy Room Level 111.
Step 19. Place Blue Couch in Front Area
Drag the blue couch to the front-center floor area, positioning it facing toward the desk zone. This small seating area provides a waiting space characteristic of Dreamy Room Level 111's welcoming design.
Step 20. Lay Down Office Rugs on Floor
Position the large office rug beneath the couch and front seating area. Add the round rug with its distinctive circular pattern near the couch base, adding comfort to Dreamy Room Level 111's floor.
Step 21. Set Typewriter on Desk Surface
Place the vintage typewriter on the left section of the wooden desk, angled slightly for display. This classic piece adds character essential to completing Dreamy Room Level 111 authentically.
Step 22. Add Desk Lamp and Table Lamp for Lighting
Position the desk lamp on the main desk near the computer monitor for task lighting. Place the table lamp on another desk surface or side table, ensuring adequate illumination throughout Dreamy Room Level 111.
Step 23. Arrange Pink Storage Boxes on Shelves
Stack pink storage boxes on the bookshelf's upper shelves or top of the blue locker. These rectangular containers should be arranged neatly, contributing to Dreamy Room Level 111's organized appearance.
Step 24. Place Orange and Blue Boxes for Color
Position orange boxes on upper shelves or floating near the headquarters sign. Add blue boxes on the bookshelf middle sections, mixing with books to create the vibrant storage system of Dreamy Room Level 111.
Step 25. Stack Cardboard Boxes in Corner Areas
Place cardboard boxes on the floor in corner spaces or beneath desks, suggesting ongoing filing projects typical of Dreamy Room Level 111's active office environment.
Step 26. Organize File Folders on Desk and Shelves
Arrange file folders standing upright on the bookshelf and lying flat on desk surfaces. These should appear as active case files being worked on in Dreamy Room Level 111.
Step 27. Set Up Desk Organizer with Supplies
Place the desk organizer on the main desk near the keyboard, filled with pens and tools. Add the pencil holder nearby, keeping writing instruments accessible in Dreamy Room Level 111.
Step 28. Add Small Fans for Air Circulation
Position the small fan on a desk corner or shelf edge. Place the desk fan on another desk surface, providing comfort during long work hours in Dreamy Room Level 111.
Step 29. Mount Wall Clock for Time Tracking
Install the wall clock on the upper section of the back wall, positioned where it's visible from all desk areas, helping officers track time efficiently in Dreamy Room Level 111.
Step 30. Place Coffee Mug and Papers on Desk
Set the coffee mug on the desk surface near the teddy bear officer's workspace. Scatter papers and documents across desk surfaces, creating the realistic busy atmosphere of Dreamy Room Level 111.
Step 31. Arrange Decorative Items Throughout Office
Distribute decorative items on shelves and desk surfaces, adding personal touches. Include the trophy and award plaque prominently displayed, showcasing achievements earned in Dreamy Room Level 111.
Step 32. Install Water Dispenser in Corner
Position the water dispenser in a corner or against the left wall near the door, providing hydration access for all officers working in Dreamy Room Level 111.
Step 33. Set Up Filing System on Desk
Arrange the filing system on the desk or cabinet top with organized sections. Add the paper tray stacked with incoming documents, maintaining workflow efficiency in Dreamy Room Level 111.
Step 34. Add Office Phone and Mousepad
Place the office phone on the desk near the computer area for communications. Set the mousepad beside the keyboard, completing the workstation setup in Dreamy Room Level 111.
Step 35. Arrange Final Office Supplies and Accessories
Distribute remaining office supplies across desk drawers and organizers. Add desk accessories like pen holders and notepads, finalizing every detail to perfectly complete Dreamy Room Level 111.
Tips and Strategies
Common Mistakes
- Overlooking wall decorations: The picture frames, certificates, and wall posters along the back wall are easy to miss but crucial for achieving 100% completion in Dreamy Room Level 111. Check the upper wall areas carefully.
- Misplacing small desk items: The coffee mug, mousepad, and desk accessories are tiny and can be accidentally placed on wrong surfaces. Following Dreamy Room Level 111 requirements, these belong specifically on the main wooden desk.
- Forgetting storage boxes on high shelves: Orange and blue boxes floating near the headquarters sign or sitting on top of the blue locker are frequently overlooked in Dreamy Room Level 111's busy layout.
- Missing teddy bear characters: All three teddy bear officers must be positioned correctly - one seated at the computer, one at the side desk, and one elsewhere in the office space.
- Neglecting floor rugs underneath furniture: Both the office rug and round rug must be placed before positioning the blue couch, or they'll be impossible to slide underneath properly.
Placement Techniques
- Desk item density: When placing multiple small items on the wooden desk surface, start from one corner and work systematically across to avoid overlapping. Drag items at slight angles to utilize all available desk space efficiently.
- Shelf stacking strategy: For the bookshelf, place larger items like storage boxes first on upper shelves, then fill middle sections with books and folders, leaving lower shelves for accessible items following Dreamy Room Level 111 organization principles.
- Wall mounting precision: When hanging picture frames and certificates, align them horizontally by using the bookshelf top edge as a visual guide. This creates the professional aligned appearance expected in Dreamy Room Level 111.
- Corner space utilization: Tight corner areas like behind the door or beside the blue locker require precise angling. Approach from the side rather than straight-on for better placement control of items like the water dispenser.
- Character positioning for visibility: Place teddy bear officers where their faces are visible - avoid positioning them with backs to the camera view. Successful completion of Dreamy Room Level 111 requires seeing all character details clearly.
- Color coordination awareness: Group similar colored items together intentionally - pink office chairs with pink filing cabinet, blue boxes with blue locker - to create the cohesive visual harmony that makes Dreamy Room Level 111 feel professionally designed.