Dreamy Room Level 94
Level 94 guide walkthrough, helping players solve puzzles and explore the wonderful world of Dreamy Room.
Dreamy Room Level 94 Walkthrough Guide
Dreamy Room Level 94 Room Story
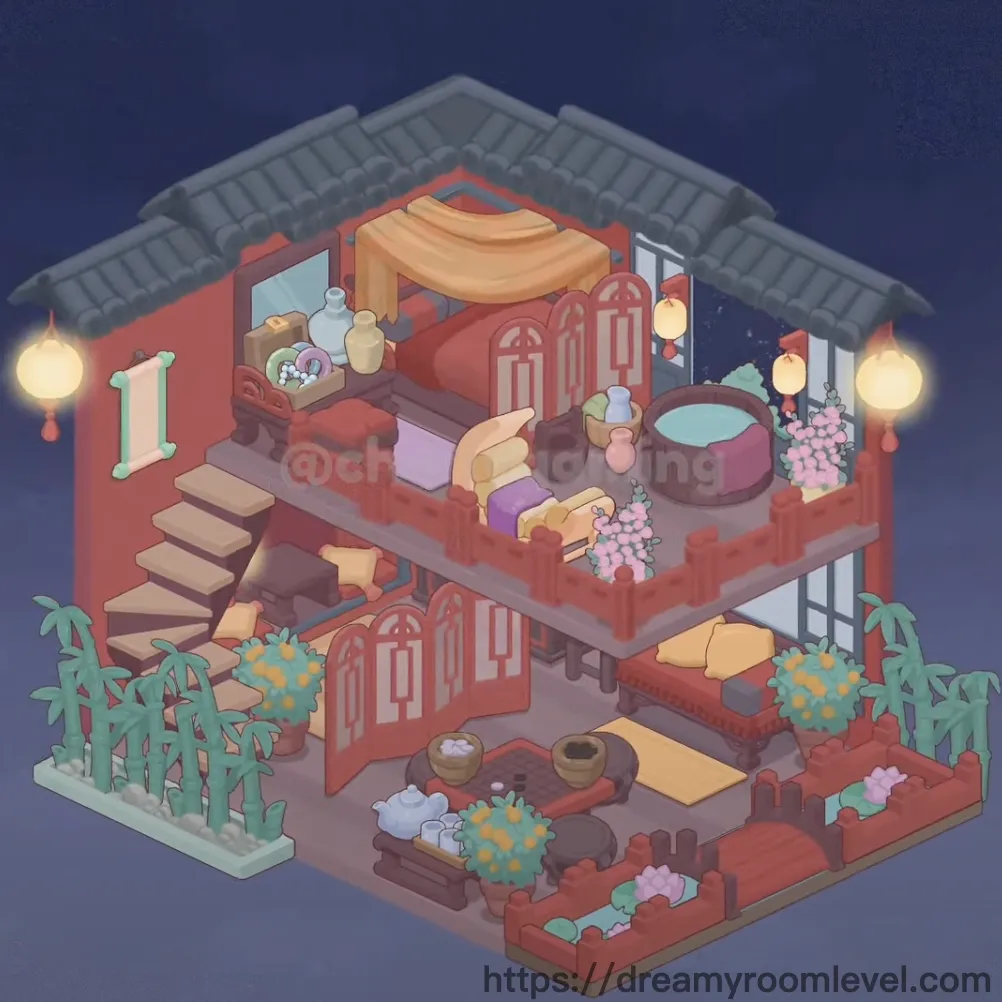
In a peaceful corner of the city, a young artist has created her sanctuary in this traditional Chinese-style courtyard room. Every morning, she awakens to the gentle rustle of bamboo leaves and the sweet fragrance of cherry blossoms drifting through the window. The red wooden bed cradles her dreams, while the balcony tea area becomes her afternoon retreat where creativity flows with every sip. This Dreamy Room Level 94 challenge invites you to recreate this harmonious blend of traditional elegance and modern comfort, where every element tells a story of tranquility and artistic living.
Dreamy Room Level 94: Step-by-Step Placement Guide
Step 1. Install Red Wall and Grey Roof Structure
Position the red wall panels to form the room's outer boundary, ensuring they align with the corner edges. Place the grey roof tiles and roof structure on top, creating the traditional Chinese architectural silhouette. The roof should overhang slightly beyond the walls for authentic styling in Dreamy Room Level 94.
Step 2. Lay Wooden Floor and Floor Tiles
Drag the wooden floor planks to cover the main interior space, starting from the center and working outward. Add floor tiles in the outdoor garden area at the bottom level. Ensure seamless alignment between indoor and outdoor flooring for smooth transitions throughout this Dreamy Room Level 94 layout.
Step 3. Build Wooden Stairs to Upper Level
Place the wooden stairs on the left side of the room, aligning the bottom step with the ground floor edge. The stairs should ascend diagonally toward the upper balcony area, creating access to the sleeping quarters as required by Dreamy Room Level 94 design.
Step 4. Install Stone Steps in Garden Area
Position the stone steps in the lower garden section, creating a small elevation change near the outdoor seating area. These steps should align with the floor tiles and provide natural transition between different garden zones in this Dreamy Room Level 94 challenge.
Step 5. Set Up Red Wooden Bed in Upper Level
Drag the red wooden bed to the upper floor's right side, positioning it parallel to the back wall. The bed's headboard should face right, leaving adequate space on the left for circulation according to Dreamy Room Level 94 placement principles.
Step 6. Place Wooden Platform Under Bed Area
Install the wooden platform beneath the bed area, extending slightly beyond the bed's footprint. This elevated platform defines the sleeping zone and adds depth to the upper level in this Dreamy Room Level 94 room design.
Step 7. Add White Pillow to Bed
Position the white pillow at the bed's head area against the right side. The pillow should rest naturally where the sleeper's head would be, completing the bed's basic setup for Dreamy Room Level 94.
Step 8. Spread Red Bedsheet Over Mattress
Drag the red bedsheet across the bed surface, ensuring it covers the mattress completely and drapes naturally over the bed frame edges. The sheet should align with the bed's rectangular shape in this Dreamy Room Level 94 arrangement.
Step 9. Layer Purple Blanket on Bed
Place the purple blanket over the lower portion of the bed, folded casually near the foot area. Let it drape naturally to create a cozy, lived-in appearance that enhances the Dreamy Room Level 94 aesthetic.
Step 10. Set Dog Plush Toy on Bed
Position the dog plush toy on the bed near the pillow area, slightly angled toward the center. This adorable companion adds warmth and personality to the sleeping space in Dreamy Room Level 94.
Step 11. Place Wooden Bedside Table Near Bed
Drag the wooden bedside table to the bed's left side, aligning it with the bed's head area. Leave a small gap between table and bed for realistic spacing following Dreamy Room Level 94 guidelines.
Step 12. Arrange Items on Bedside Table
Place the blue water bottle on the bedside table's left corner, add the beige vase in the center back, and position the green bowl on the right side. Include additional decorative items to complete this functional display in Dreamy Room Level 94.
Step 13. Install Balcony Railing at Upper Level Edge
Attach the balcony railing along the upper floor's open edge, running parallel to the front of the platform. Add red wooden railing sections to create safety barriers while maintaining the traditional aesthetic required by Dreamy Room Level 94.
Step 14. Install Window Frame in Upper Wall
Position the window frame and wall window in the upper level's back wall, centered above the bed area. The window should allow natural light to flood the sleeping quarters in this Dreamy Room Level 94 setup.
Step 15. Add Balcony Window to Side Wall
Place the balcony window on the upper level's side wall facing the outdoor area. This large window opening creates visual connection between indoor and outdoor spaces as designed for Dreamy Room Level 94.
Step 16. Hang Red Lanterns Around Space
Suspend red lantern fixtures from the roof structure at multiple points—one near the balcony stairs, others around the outdoor seating area. Add hanging lantern elements to illuminate the space beautifully in Dreamy Room Level 94.
Step 17. Install Yellow Awning Over Balcony
Attach the yellow awning above the upper balcony area, extending from the roof structure. The awning should provide shade coverage over the balcony seating zone following Dreamy Room Level 94 design specifications.
Step 18. Place Tea Table in Balcony Area
Position the tea table on the upper balcony floor, centered in the open space near the awning. This low table becomes the focal point for the relaxation area in this Dreamy Room Level 94 challenge.
Step 19. Set Tea Set on Table Surface
Arrange the tea set on the tea table, placing the teapot in the center and distributing tea cups around it. This traditional setup creates an authentic tea ceremony atmosphere for Dreamy Room Level 94.
Step 20. Add Floor Cushion and Sitting Mat
Place the floor cushion on one side of the tea table and the sitting mat on the opposite side. These seating elements should face each other across the table in typical Dreamy Room Level 94 arrangement.
Step 21. Install Round Bathtub in Lower Level
Drag the round bathtub to the lower level's right side, positioning it near the stairs. The circular tub should sit flush with the floor, creating a spa-like bathing area in this Dreamy Room Level 94 layout.
Step 22. Place Water Basin Near Bathtub
Position the water basin adjacent to the bathtub on the left side, at floor level. This practical element completes the bathing area functionality required by Dreamy Room Level 94.
Step 23. Install Decorative Door in Lower Wall
Attach the decorative door to the lower level's left wall section, near the staircase. The traditional Chinese door design should align with the wall's edge in this Dreamy Room Level 94 composition.
Step 24. Add Red Window Lattice to Outdoor Wall
Install the red window lattice on the outdoor wall section near the garden area. The geometric lattice pattern adds traditional architectural detail to complete the Dreamy Room Level 94 exterior.
Step 25. Place Decorative Fence Around Garden
Position decorative fence segments along the garden area's perimeter, creating defined boundaries. The fence should enclose the outdoor seating and planting zones as specified in Dreamy Room Level 94.
Step 26. Set Pink Cherry Blossom Tree in Garden
Drag the pink cherry blossom tree to the garden area's right side, planting it in the cherry blossom pot. The flowering tree should be positioned near the balcony window for maximum visual impact in Dreamy Room Level 94.
Step 27. Plant Bamboo in Left Garden Section
Position the bamboo plant in its bamboo pot on the garden's left side, creating symmetrical plant placement. The tall bamboo stalks should stand upright near the fence edge in this Dreamy Room Level 94 garden design.
Step 28. Add Orange Flower Pot with Blue Flowers
Place the orange flower pot containing blue flowers in the middle garden section, between the larger plants. The colorful blooms add visual interest at ground level for Dreamy Room Level 94.
Step 29. Position Pink Flower Pot with Pink Flowers
Set the pink flower pot holding pink flowers near the other garden plantings, creating a clustered flower display. Arrange these potted plants to define the garden area in Dreamy Room Level 94.
Step 30. Set Wooden Bench in Garden Seating Area
Drag the wooden bench to the lower level's outdoor seating zone, positioning it facing the garden plants. The bench should sit on the floor tiles, creating a peaceful observation spot in this Dreamy Room Level 94 garden.
Step 31. Add Wooden Chair with Striped Cushion
Position the wooden chair near the bench in the outdoor seating arrangement. Place the striped cushion on the chair seat for comfortable outdoor relaxation as designed in Dreamy Room Level 94.
Tips and Tricks
Common Mistakes to Avoid
- Don't overlook the small decorative items on the bedside table—they're easy to miss but essential for completion
- Avoid placing the tea set before positioning the tea table, as items may not align properly on the surface
- Watch for the window lattice placement on the exterior wall, as it's partially hidden behind other structures in Dreamy Room Level 94
- Don't confuse the two types of railings—red wooden railing goes on the balcony while general railing goes along platform edges
- Ensure plant pots are placed before flowers, as incorrect order may cause items to float or misalign
Pro Tips for Success
- Start with structural elements (walls, roof, floors) to establish room boundaries before adding furniture
- Place large furniture pieces like the bed and stairs first, then work downward to smaller decorative elements
- For the tea table arrangement, position the table first, then add the tea set as a group for better alignment
- When placing lanterns, hover items near the roof structure until you feel the snap-to-grid effect
- The garden area works best when you plant the large trees first, then fill in with smaller flower pots around them
- Use the balcony window as a reference point when arranging the tea ceremony area on the upper level
- For overlapping items like bedding layers, place the bedsheet first, then blanket, following natural stacking order to master Dreamy Room Level 94 efficiently