Dreamy Room Level 468
Level 468 guide walkthrough, helping players solve puzzles and explore the wonderful world of Dreamy Room.

Dreamy Room Level 468 Walkthrough Guide
Dreamy Room Level 468 Room Story
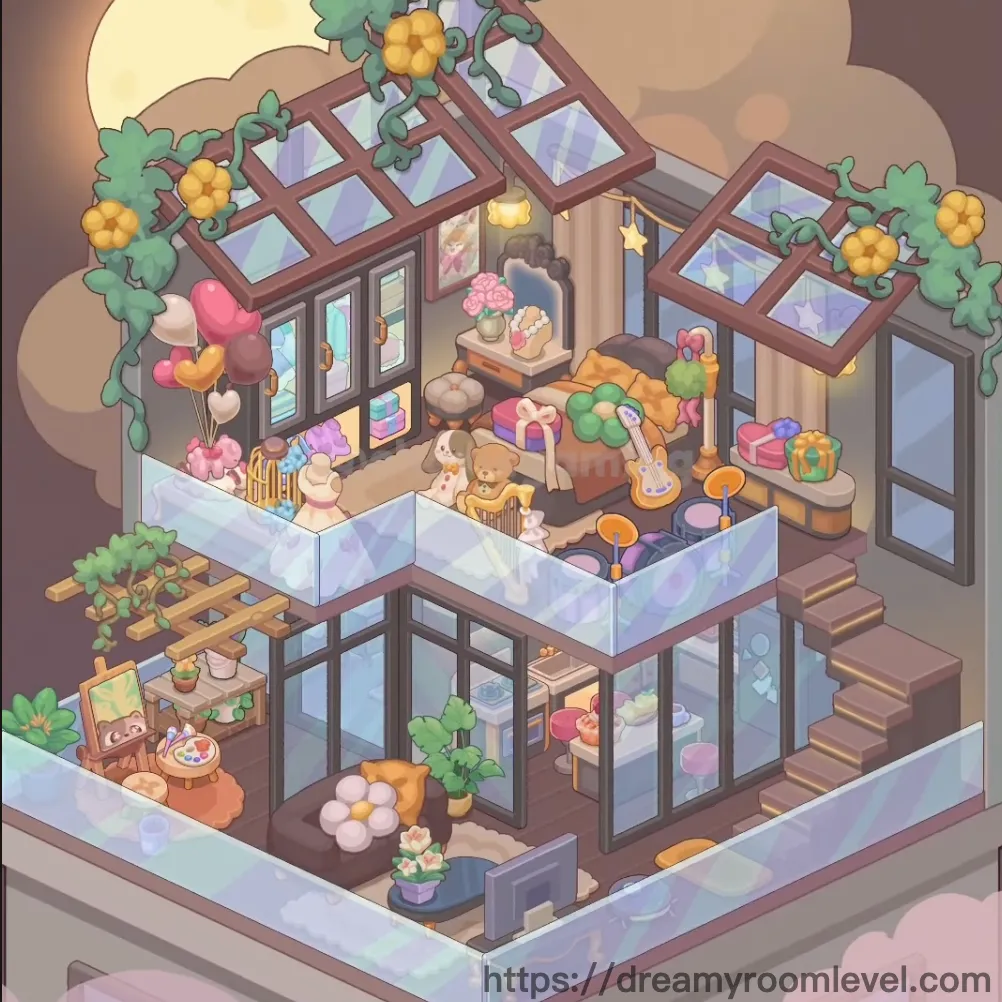
Welcome to this enchanting Snowy Mountain Cabin in Dreamy Room Level 468! Nestled among snow-capped peaks and frosted evergreens, this cozy two-story retreat offers the perfect winter escape. The ground floor features a warm living area with cream sofas and a charming kitchen corner, while upstairs a dreamy bedroom with teal bedding awaits. A glass-railed balcony provides stunning mountain views. This Dreamy Room Level 468 cabin is where hot cocoa meets snowy adventures.
Dreamy Room Level 468: Step-by-Step Placement Guide
Step 1. Set Cabin Walls in Dreamy Room Level 468
Place pink wooden walls as the main backdrop on all interior surfaces. Following Dreamy Room Level 468 design principles, these warm-toned walls create the cozy cabin atmosphere.
Step 2. Install Floor and Foundation
Place brown checkered floor throughout the ground level. Add stone foundation base around the exterior perimeter. The foundation sits at the base of the cabin structure.
Step 3. Add Balcony Railing and Staircase in Dreamy Room Level 468
Install glass balcony railing along the front edge of both floors. Add pink brick staircase on the right side connecting both levels. According to Dreamy Room Level 468 layout requirements, these create the multi-level structure.
Step 4. Place Rooftop Elements
Position snowy rooftop chimney on top of the cabin with snow accumulation. Completing Dreamy Room Level 468 requires this charming winter detail.
Step 5. Set Up Kitchen Cabinet in Dreamy Room Level 468
Place brown wooden cabinet shelf against the back wall of the kitchen area. Add cabinet doors lower beneath the shelving. Position cups mugs shelf display on the upper shelves.
Step 6. Install Kitchen Window and Curtains
Add wooden framed window on the back wall. Hang pink curtain window left and pink curtain window right on either side. Following Dreamy Room Level 468 design principles, curtains add warmth.
Step 7. Place Kitchen Counter and Sink in Dreamy Room Level 468
Position kitchen sink counter below the window area. Add potted plant kitchen green near the sink. According to Dreamy Room Level 468 layout requirements, greenery brightens the kitchen.
Step 8. Set Up Dining Area
Place wooden dining table in the center of the kitchen space. Add wooden stool 1 and wooden stool 2 around the table.
Step 9. Add Dining Table Items in Dreamy Room Level 468
Position cream pie dessert plate on the dining table. Add coffee cup saucer table nearby. Place teapot blue ceramic for tea service. Completing Dreamy Room Level 468 requires these cozy details.
Step 10. Add Kitchen Dishware
Position plates bowls stack near the sink area on the counter. Following Dreamy Room Level 468 design principles, organized dishware completes the kitchen.
Step 11. Place Slippers and Bags in Dreamy Room Level 468
Add grey slippers pair on the floor near the sofas. Position purple bunny slippers nearby. Place purple backpack floor and teal suitcase luggage indicating recent arrival.
Step 12. Set Up Living Room Sofas
Place cream sofa couch 1 facing the balcony view. Add cream sofa couch 2 adjacent to it. Position pink pillow sofa 1 and pink pillow sofa 2 on each sofa.
Step 13. Place Living Room Coffee Table in Dreamy Room Level 468
Set round coffee table living between the two sofas. According to Dreamy Room Level 468 layout requirements, this creates the central gathering spot.
Step 14. Add Coffee Table Items
Place wine bottle purple on the coffee table. Add wine glasses pair beside it. Position purple flower vase table for decoration.
Step 15. Add Living Room Decorations in Dreamy Room Level 468
Position white lily flowers pot near the balcony railing. Add teal blanket folded on one sofa. Place books magazines floor on the floor. Completing Dreamy Room Level 468 requires these cozy touches.
Step 16. Add Star Rating and Outdoor Elements
Position star rating display near the entrance. Add wall lantern outdoor beside the door. Place house number sign 91 on the exterior wall.
Step 17. Place Outdoor Plants in Dreamy Room Level 468
Add potted plant outdoor door near the entrance. Position green plant tall outdoor beside it. Place stepping stones path leading to the door. Following Dreamy Room Level 468 design principles, outdoor plants welcome guests.
Step 18. Set Up Upper Floor Bed
Place teal bed frame upper against the back wall upstairs. Add teal polka dot blanket on the bed. Layer yellow striped blanket on top.
Step 19. Add Bed Pillows in Dreamy Room Level 468
Position pink pillow bed at the head of the bed. Add purple pillow bed beside it. According to Dreamy Room Level 468 layout requirements, colorful pillows add comfort.
Step 20. Install Bed Canopy and Curtains
Hang pink bed canopy curtain above the bed. Add pink headboard curtain behind the pillows. Place gift box bed shelf on the shelf above.
Step 21. Add Bedroom Lamp and Nightstand in Dreamy Room Level 468
Position table lamp yellow bedroom near the bed for reading light. Add wooden nightstand bedroom beside the bed. Completing Dreamy Room Level 468 requires proper bedroom lighting.
Step 22. Place Nightstand Decorations
Add rose bouquet vase pink on the nightstand. Position photo frame nightstand beside the flowers. Following Dreamy Room Level 468 design principles, personal touches matter.
Step 23. Set Up Balcony Seating in Dreamy Room Level 468
Place teal armchair balcony on the upper floor balcony area. Add teal footrest ottoman in front of it. According to Dreamy Room Level 468 layout requirements, this creates a cozy reading nook.
Step 24. Add Balcony Accessories
Position pink sunglasses balcony on the ottoman. Add towels stacked balcony nearby. Place snack bowl balcony for relaxation time.
Step 25. Install Wall Clock and Art in Dreamy Room Level 468
Mount wall clock round on the upper floor wall. Add flower painting frame nearby. Completing Dreamy Room Level 468 requires these wall decorations.
Step 26. Add Final Decorative Elements
Hang sheer curtain window large on the large window. Position palm plant indoor tall in the corner. Place candle purple jar for ambiance. Your charming Dreamy Room Level 468 Snowy Mountain Cabin is complete!
Tips and Precautions
Precautions
- Pink sunglasses on the balcony ottoman are tiny and easy to overlook
- Coffee cup and saucer on the dining table blend with other tableware
- House number sign 91 is a small detail on the exterior wall
- Photo frame on nightstand is a small item near larger decorations
- Stepping stones outside may blend with the snowy ground texture
- Purple candle jar is a small cylindrical item easy to miss
- Star rating display near entrance is a small golden detail
Practical Tips
- Start with walls and floor in Dreamy Room Level 468 to establish the cabin structure
- Install the staircase before placing items on both levels
- Position large furniture like sofas and bed before adding accessories
- Place kitchen cabinet before adding cups and dishware on shelves
- Set up the dining table before adding food items and teapot
- Add outdoor elements like plants and lantern before finishing interior
- Complete balcony seating area before placing small accessories like sunglasses
- Add pillows and blankets last after bed frame is positioned in Dreamy Room Level 468