Dreamy Room Level 68
Level 68 guide walkthrough, helping players solve puzzles and explore the wonderful world of Dreamy Room.
Dreamy Room Level 68 Walkthrough Guide
Dreamy Room Level 68 Room Story
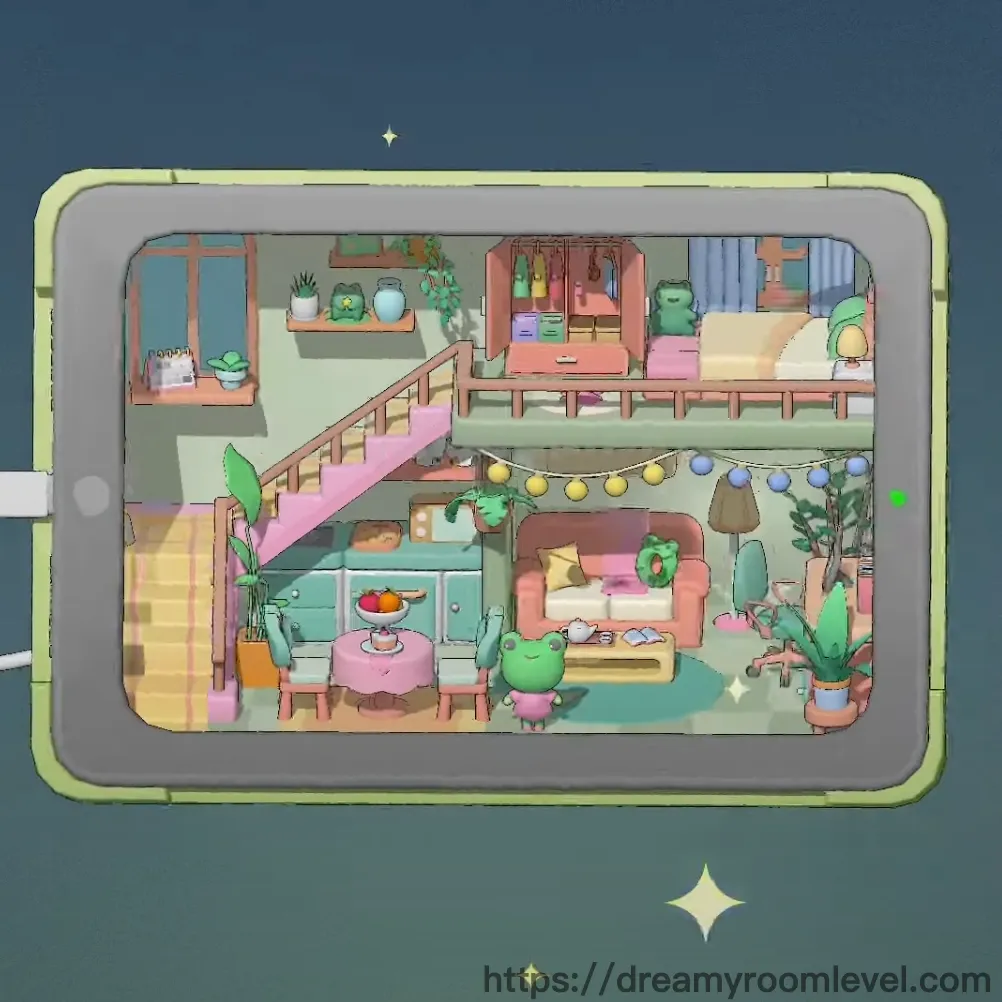
In this charming loft apartment designed for Dreamy Room Level 68, a family of adorable frog characters has found their perfect cozy sanctuary. The warm pastel palette of pink, mint green, and soft yellow creates a whimsical atmosphere where creativity and comfort blend seamlessly. Upstairs, the peaceful sleeping quarters await beneath twinkling string lights, while downstairs buzzes with life—a kitchen filled with fresh fruits, a dining nook for family gatherings, and a living area adorned with thriving plants. Every corner tells a story of happiness and togetherness.
Dreamy Room Level 68: Step-by-Step Placement Guide
Step 1. Place Pink Stairs in Center-Left Area
Drag the pink stairs to the center-left position of the room, connecting the first and second floors. The stairs should align vertically with a slight angle, creating the main pathway between living spaces. Position them so the bottom step faces the living area while the top opens to the bedroom loft in Dreamy Room Level 68.
Step 2. Install Wooden Railing Along Staircase
Attach the wooden railing along both sides of the pink stairs. The railing should run parallel to the staircase edges, providing safety and visual continuity. Make sure it aligns perfectly with the stair steps for a polished look following Dreamy Room Level 68 design standards.
Step 3. Add Yellow Stairs Carpet and Pink Stairs Runner
Layer the yellow stairs carpet first on the steps, then place the pink stairs runner on top for a vibrant two-tone effect. Both should cover each step completely, creating a soft, colorful pathway in this Dreamy Room Level 68 challenge.
Step 4. Position Kitchen Counter Against Back Wall
Place the kitchen counter against the back wall on the first floor, below the bedroom loft area. This creates the main cooking workspace and should be positioned centrally to allow access from both sides in Dreamy Room Level 68.
Step 5. Set Green Drawer Cabinet Below Counter
Install the green drawer cabinet directly beneath the kitchen counter on the left side. The mint green color coordinates beautifully with the room's palette while providing essential storage space for completing Dreamy Room Level 68 successfully.
Step 6. Place Round Dining Table Near Kitchen in Dreamy Room Level 68
Position the round dining table in the dining area, slightly left of center on the first floor. The pink table should be easily accessible from the kitchen counter, creating a cozy dining nook according to Dreamy Room Level 68 layout requirements.
Step 7. Add Green Chair at Dining Table
Pull out the green chair and place it beside the round dining table, angled as if ready for someone to sit. This mint-colored chair completes the dining setup in this Dreamy Room Level 68 design.
Step 8. Set Fruit Bowl and Orange on Table in Dreamy Room Level 68
Place the fruit bowl on the round dining table's surface, then add the orange either in or near the bowl. This adds a pop of color and life to the dining area, essential for Dreamy Room Level 68 completion.
Step 9. Position Pink Sofa in Living Area
Drag the pink sofa to the right side of the first floor, creating the main seating area. Angle it slightly to face the center of the room for optimal conversation flow in Dreamy Room Level 68.
Step 10. Add White Sofa Next to Pink Sofa in Dreamy Room Level 68
Place the white sofa perpendicular or adjacent to the pink sofa, forming an L-shaped seating arrangement. This creates a cozy conversation corner following Dreamy Room Level 68 principles.
Step 11. Set Yellow Coffee Table in Front of Sofas
Position the yellow coffee table in front of the sofa arrangement, centered between the pink and white sofas. This provides a functional surface for the living area in this Dreamy Room Level 68 setup.
Step 12. Place Pink Rug and Small Round Rug on Floor in Dreamy Room Level 68
Layer the pink rug under the living area furniture first, then add the small round rug near the dining table. These define separate zones in Dreamy Room Level 68.
Step 13. Install Checkered Floor Pattern
The checkered floor should cover the entire first floor area in a subtle green-tinted checkerboard pattern. This provides visual texture throughout the Dreamy Room Level 68 space.
Step 14. Add Floor Lamp Near Sofa Area in Dreamy Room Level 68
Place the floor lamp beside the pink sofa or in a corner near the seating area. The tall lamp provides ambient lighting for evening relaxation in this Dreamy Room Level 68 challenge.
Step 15. Position Pink Bed on Second Floor Loft
Drag the pink bed to the upper loft area, positioning it against the back wall of the bedroom space. The bed should be easily accessible from the staircase landing for Dreamy Room Level 68.
Step 16. Add Yellow Pillow on Bed in Dreamy Room Level 68
Place the yellow pillow on the pink bed, either at the headboard or arranged decoratively. This adds a cheerful accent to the sleeping area in Dreamy Room Level 68.
Step 17. Install Pink Wardrobe and Orange Wardrobe in Bedroom
Position the pink wardrobe on one side of the bedroom loft, then place the orange wardrobe nearby. These provide essential storage while adding color variety to Dreamy Room Level 68.
Step 18. Set Bookshelf with Books on Second Floor in Dreamy Room Level 68
Place the bookshelf against a wall in the bedroom area, then fill it with books. This creates a reading corner perfect for quiet moments in this Dreamy Room Level 68 setup.
Step 19. Add Clothing Rack with Hanging Clothes
Install the clothing rack in the bedroom area near the wardrobes, then hang the hanging clothes on it. This provides additional storage visible in Dreamy Room Level 68.
Step 20. Hang Yellow String Lights and Blue String Lights in Dreamy Room Level 68
String the yellow string lights across the ceiling of the first floor, then hang the blue string lights on the second floor bedroom area. These create magical ambient lighting throughout Dreamy Room Level 68.
Step 21. Install Window with Curtains on Back Wall
Place the window on the back wall of the bedroom area, then hang curtains on either side. This brings natural light into the Dreamy Room Level 68 loft space.
Step 22. Add Wall Painting and Landscape Picture in Dreamy Room Level 68
Hang the wall painting and landscape picture on available wall spaces throughout the apartment. These artworks add personality to this Dreamy Room Level 68 challenge.
Step 23. Mount Calendar and Notepad on Walls
Attach the calendar on a wall near the kitchen or bedroom area, and place the notepad on a nearby surface or wall. These organizational tools are essential for Dreamy Room Level 68.
Step 24. Install Wall Shelf and Wall Mounted Shelf in Dreamy Room Level 68
Mount the wall shelf on the kitchen wall area and the wall mounted shelf in the bedroom or living space. These provide display areas following Dreamy Room Level 68 design.
Step 25. Add Wall Decoration Pieces
Place the wall decoration items on available wall spaces throughout both floors. These finishing touches complete the decorated look of Dreamy Room Level 68.
Step 26. Position Cactus Plant and Tall Cactus in Living Area in Dreamy Room Level 68
Set the cactus plant near the living area furniture, then place the tall cactus in a corner or beside the stairs. These desert plants add green accents to Dreamy Room Level 68.
Step 27. Add Potted Plant and Hanging Plant Throughout Space
Position the potted plant on the floor or furniture surfaces, and suspend the hanging plant from the ceiling or upper shelf. Greenery brings life to this Dreamy Room Level 68 setup.
Step 28. Place Succulent in Plant Pot on Surfaces in Dreamy Room Level 68
Set the succulent inside the plant pot and position it on the kitchen counter, shelf, or dining table. This small plant detail completes the botanical theme of Dreamy Room Level 68.
Step 29. Add Vase as Decorative Element
Place the vase on the dining table, kitchen counter, or shelf as a decorative accent. This adds elegance to the Dreamy Room Level 68 interior design.
Step 30. Set Table Lamp on Bedroom Furniture in Dreamy Room Level 68
Position the table lamp on a bedside surface or shelf in the bedroom loft area. This provides task lighting for reading in bed for Dreamy Room Level 68 completion.
Step 31. Add Storage Boxes in Bedroom Area
Stack the storage boxes near the wardrobes or under the bed in the loft. These provide practical organization matching the Dreamy Room Level 68 aesthetic.
Step 32. Place Desk Organizer on Work Surface in Dreamy Room Level 68
Set the desk organizer on the bedroom shelf or a desk area if visible. This keeps small items tidy in this Dreamy Room Level 68 challenge.
Step 33. Add Desk Items to Work Surfaces
Scatter the desk items across the bedroom shelf, desk, or storage areas. These small details bring realism to the Dreamy Room Level 68 workspace.
Step 34. Position Office Chair in Bedroom Area in Dreamy Room Level 68
Place the office chair near the bookshelf or desk area in the bedroom loft. This creates a study or work corner following Dreamy Room Level 68 requirements.
Step 35. Add Decorative Cushion, Pink Cushion, and Green Cushion on Sofas in Dreamy Room Level 68
Arrange the decorative cushion, pink cushion, and green cushion across the pink and white sofas. These add comfort and color coordination to Dreamy Room Level 68.
Step 36. Place Magazines on Coffee Table or Shelves
Stack the magazines on the yellow coffee table or nearby shelves. This adds a lived-in feel to the Dreamy Room Level 68 living area.
Step 37. Position Green Frog Character in Main Living Area in Dreamy Room Level 68
Place the green frog character on the first floor, perhaps near the dining table or living area. This adorable resident brings life to Dreamy Room Level 68.
Step 38. Add White Character and Pink Character Throughout Space
Position the white character and pink character on different floors or areas of the loft. These friendly inhabitants complete the family living in Dreamy Room Level 68.
Step 39. Install Green Indicator Light as Final Detail in Dreamy Room Level 68
Add the green indicator light as a small glowing accent on a shelf or wall corner. This subtle detail marks the completion of Dreamy Room Level 68.
Tips and Tricks
Important Notes
- Watch for hidden placement spots behind the staircase railing, as small decorative items can easily be missed in these shadowed areas during Dreamy Room Level 68.
- The loft bedroom area may cause item overlap issues; place larger furniture like wardrobes first before adding smaller decorative elements to avoid blocking access.
- String lights can be tricky to position correctly—drag them slowly across the ceiling to ensure they snap into place along the proper hanging points.
- Plants in corners or near stairs may appear hidden behind other objects; rotate your view angle to ensure all botanical elements are properly placed.
- The checkered floor pattern must be laid before rugs to prevent layering conflicts that could cause items to bounce back.
Practical Techniques
- For precise placement of small items on shelves, zoom in and drag from the side rather than top-down to avoid accidentally selecting wrong surfaces in Dreamy Room Level 68.
- When positioning the three character dolls, place them at different heights (floor, furniture, loft) to ad