Dreamy Room Level 67
Level 67 guide walkthrough, helping players solve puzzles and explore the wonderful world of Dreamy Room.
Dreamy Room Level 67 Walkthrough Guide
Dreamy Room Level 67 Room Story
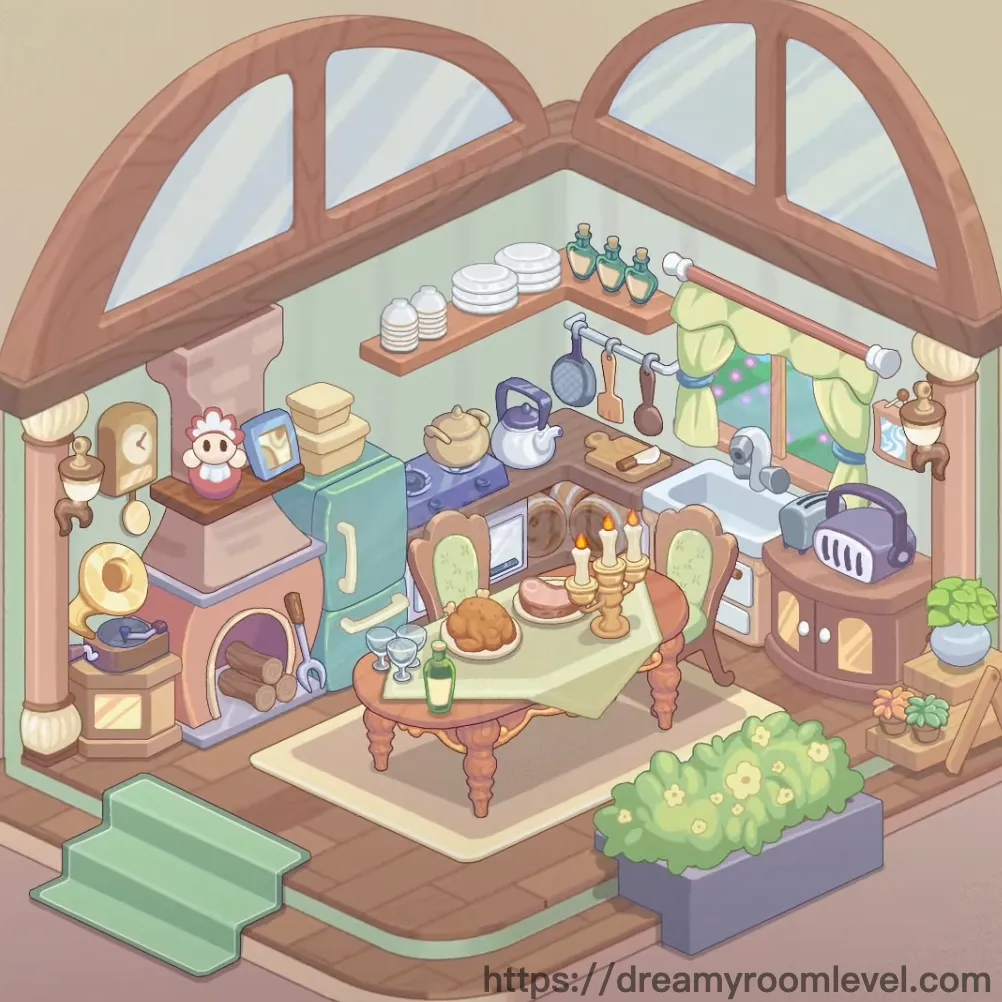
Welcome to Emma's countryside cottage kitchen, where morning sunlight streams through elegant arched windows. This cozy space tells the story of a passionate baker who loves hosting Sunday brunches. The warm wooden beams and soft green walls create a peaceful atmosphere, while the aroma of freshly baked bread fills the air. Every corner of Dreamy Room Level 67 reflects Emma's dedication to creating a welcoming space where family and friends gather to share homemade meals and sweet memories.
Dreamy Room Level 67 Complete Walkthrough Guide
Step 1. Install Arched Window Left and Arched Window Right
Place both arched window left and arched window right at the top corners of the room. The left window sits in the upper left corner, while the right window mirrors its position on the right side. These elegant windows feature distinctive curved wooden frames that create the foundation of this Dreamy Room Level 67 cottage aesthetic.
Step 2. Add Wooden Beam
Position the wooden beam horizontally across the top center, connecting both arched windows. This structural element creates a unified ceiling design and adds rustic charm to the kitchen layout in Dreamy Room Level 67.
Step 3. Apply Green Wall and Wooden Frame
Install the green wall covering the main wall surface, then add the wooden frame border along the bottom edge. The soft sage color creates a calming backdrop for all kitchen elements in Dreamy Room Level 67.
Step 4. Place Floor Mat
Drag the floor mat to cover the central floor area. This cream-colored mat defines the main activity space and provides a clean surface for placing furniture. Position it carefully to align with the room's center.
Step 5. Set Up Refrigerator with Fridge Handle
Place the refrigerator on the left wall, then attach the fridge handle to its door. This blue-tinted appliance stands tall against the left side and serves as a major anchor point for Dreamy Room Level 67 kitchen layout.
Step 6. Install Blue Stove in Dreamy Room Level 67
Position the blue stove in the center of the kitchen counter area. This essential cooking appliance features a distinctive blue color and provides the focal point for meal preparation activities.
Step 7. Add Dark Oven and Oven Grill
Place the dark oven on the right side of the kitchen, then install the oven grill inside. This combination creates a professional baking station perfect for Dreamy Room Level 67 cottage cooking.
Step 8. Set Wooden Counter and Sink
Position the wooden counter along the back wall, spanning from left to right. Install the sink into the counter's right section, then attach the faucet above it for a functional washing area.
Step 9. Mount Hanging Rack and Utensil Hooks in Dreamy Room Level 67
Attach the hanging rack and utensil hooks above the stove area. These metal fixtures hang from the ceiling beam and provide convenient storage for cooking tools in Dreamy Room Level 67.
Step 10. Hang Cooking Utensils
Suspend the ladle, spatula, and frying pan on the hanging rack. These essential tools dangle within easy reach above the cooking area, displaying a well-organized kitchen.
Step 11. Install Plate Shelf with White Plates
Mount the plate shelf on the upper back wall, then stack the white plates neatly on it. This open shelving displays dinnerware beautifully in Dreamy Room Level 67 cottage style.
Step 12. Arrange Green Bottles and Condiment Bottles
Place the green bottles on the upper shelf next to the plates, then position the condiment bottles nearby. These decorative containers add color and personality to the kitchen display.
Step 13. Set Up Wooden Shelf
Install the wooden shelf on the left wall near the refrigerator. This rustic shelf provides additional storage and display space for various kitchen items following Dreamy Room Level 67 design principles.
Step 14. Place Cutting Board and Knife in Dreamy Room Level 67
Position the cutting board on the wooden counter near the sink, then place the knife on it. This prep station sits ready for chopping vegetables and preparing meals.
Step 15. Add Coffee Maker and Teapot
Set the coffee maker on the left counter section, then place the teapot on the stove. These beverage essentials create a cozy morning routine space in Dreamy Room Level 67.
Step 16. Position Cooking Pot
Place the cooking pot on one of the stove burners. This large pot sits ready for soups and stews, adding to the functional kitchen setup.
Step 17. Install Yellow Curtain with Curtain Rod and Floral Pattern
Hang the curtain rod above the right window area, then drape the yellow curtain with its floral curtain pattern on it. This cheerful window treatment adds warmth and privacy to Dreamy Room Level 67 kitchen.
Step 18. Mount Towel Rack with Hanging Towel in Dreamy Room Level 67
Attach the towel rack near the sink area, then hang the hanging towel on it. This convenient placement keeps dish towels within easy reach while washing.
Step 19. Set Dining Table with Green Tablecloth
Position the dining table in the center-right floor area, then cover it with the green tablecloth. This creates the main dining space for family meals in Dreamy Room Level 67.
Step 20. Arrange Wooden Chairs
Place the wooden chair left and wooden chair right on opposite sides of the dining table. Add the chair cushion green to each chair for comfortable seating.
Step 21. Decorate Table with Food Items
Arrange the bread on table, fruits, and orange on the dining table. Add the vase as a centerpiece, then place the drinking glass and wine glass for a complete table setting in Dreamy Room Level 67.
Step 22. Add Candles and Candle Holder in Dreamy Room Level 67
Position the candles on the dining table for ambient lighting, then place the candle holder nearby. These create a romantic dining atmosphere perfect for evening meals.
Step 23. Place Table Decoration
Add the table decoration to enhance the dining table's visual appeal. This finishing touch completes the table setting according to Dreamy Room Level 67 cottage aesthetics.
Step 24. Install Wall Clock
Mount the wall clock on the upper left wall near the arched window. This functional timepiece helps track cooking times while adding vintage charm to the kitchen.
Step 25. Hang Picture Frame in Dreamy Room Level 67
Place the picture frame on the left wall shelf or nearby wall space. This personal touch adds character and memories to the cottage kitchen.
Step 26. Position Character Doll
Set the character doll on the left counter or shelf. This cute decorative figure brings playful energy to the Dreamy Room Level 67 kitchen space.
Step 27. Add Wooden Barrel and Wooden Stool
Place the wooden barrel in the left corner for storage, then position the wooden stool nearby. These rustic elements enhance the cottage farmhouse aesthetic.
Step 28. Place Steps and Potted Plant
Position the steps at the room's entrance in the lower left area. Set the potted plant right with its green plant near the right side entrance. Add the flower pot with yellow flowers for natural beauty in Dreamy Room Level 67.
Step 29. Arrange Tea Set and Kitchen Tools in Dreamy Room Level 67
Place the tea set on the upper shelf for elegant display. Position the mortar and pestle and rolling pin on the counter for baking preparation.
Step 30. Add Wooden Spoon and Cutting Tools
Set the wooden spoon in a utensil holder, then arrange the cutting tools near the cutting board. These essential implements complete the food prep area.
Step 31. Install Dish Rack and Kitchen Towel
Place the dish rack beside the sink for drying dishes, then drape the kitchen towel over it. This practical setup maintains an organized washing station in Dreamy Room Level 67.
Step 32. Arrange Spice Jars and Food Items
Position the spice jars on the counter or shelves within easy cooking reach. Distribute the food items across various storage areas for a lived-in kitchen feel.
Step 33. Place Bread Loaf and Egg in Dreamy Room Level 67
Set the bread loaf on the left counter or shelf, then position the egg in a small bowl or egg holder. These fresh ingredients complete the cozy cottage kitchen atmosphere.
Tips and Tricks
Common Mistakes to Avoid
- Don't place the fridge too close to the stove, as the appliances need proper spacing for functionality in Dreamy Room Level 67
- Avoid hanging curtains before installing the curtain rod, as the rod must be positioned first for proper draping
- Don't overcrowd the dining table with all decorative items at once; place larger items like the vase first, then add smaller elements
- The hanging rack must be installed before suspending any utensils, otherwise the items won't attach properly
- Watch for the knife placement on the cutting board, as it needs precise alignment to avoid falling off
Pro Placement Strategies
- Start with wall-mounted elements like shelves and racks before placing countertop items to avoid blocking access points
- When arranging the dining table, position the tablecloth first, then chairs, and finally tabletop decorations for smooth layering
- Use the corner spaces efficiently by placing the wooden barrel and steps early, creating more central workspace
- The plants near the entrance should be placed last to avoid accidentally moving them while arranging larger furniture
- Align utensil hooks horizontally at the same height for a balanced aesthetic appearance following Dreamy Room Level 67 design standards
- Take advantage of the item snap feature by dragging objects close to their intended position and letting them auto-align for pixel-perfect placement