Dreamy Room Level 96
Level 96 guide walkthrough, helping players solve puzzles and explore the wonderful world of Dreamy Room.
Dreamy Room Level 96 Walkthrough Guide
Dreamy Room Level 96: Room Story
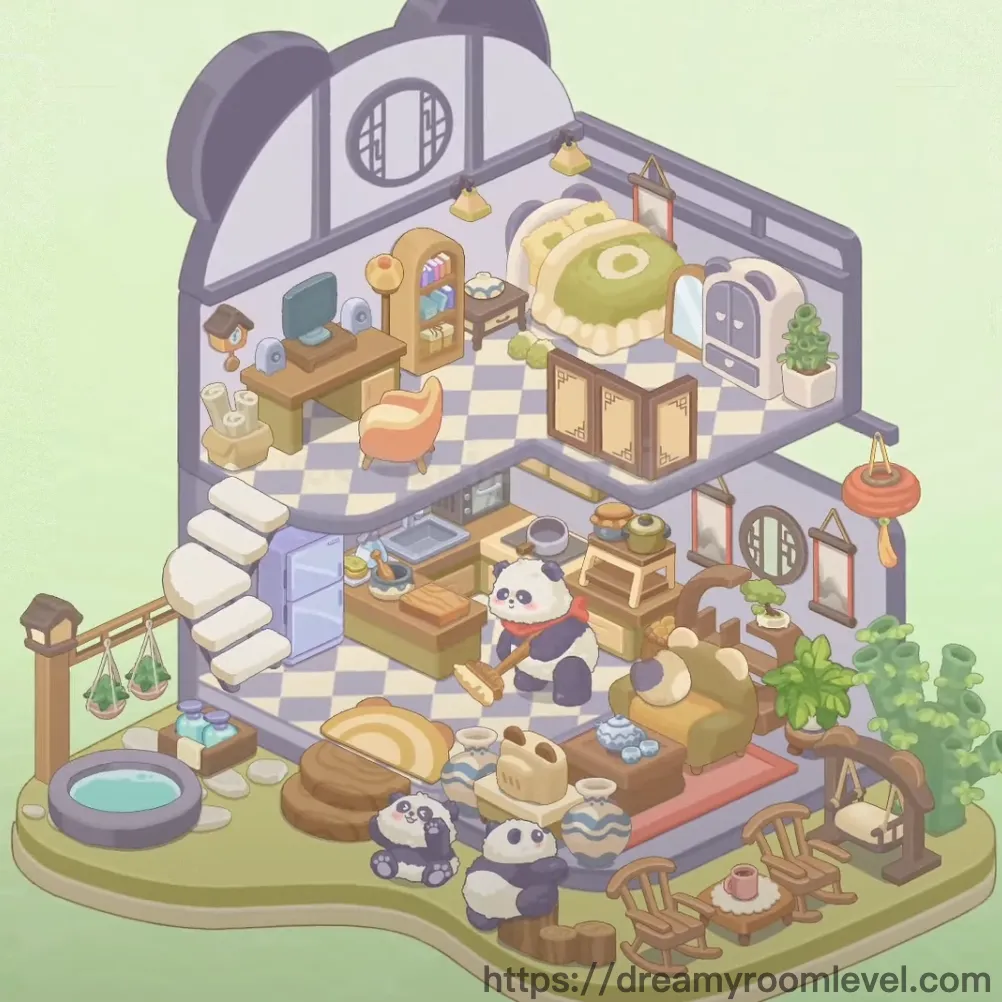
In this charming Dreamy Room Level 96, a family of pandas has created their cozy teahouse sanctuary. The main panda sits peacefully at the center, surrounded by warmth and tradition. Baby pandas play around while parents enjoy their tea ceremony. Soft checkered floors blend with natural wood, creating a space where bamboo grows and ceramic teapots steam with fresh brew. Every corner whispers stories of lazy afternoons and family gatherings.
Dreamy Room Level 96: Step-by-Step Placement Guide
Step 1. Position the Checkered Rug in Dreamy Room Level 96
Place the checkered rug covering the main floor area in the center-left section. This purple and cream checkered pattern serves as the foundation for Dreamy Room Level 96, creating the primary activity zone where pandas will gather.
Step 2. Add the Pink Rug for Accent
Drag the pink rug to the lower right corner area, creating a cozy secondary zone. This coral-colored accent piece defines the outdoor seating area in Dreamy Room Level 96.
Step 3. Install the Entrance Door
Mount the entrance door on the right wall at ground level, featuring traditional paneled design. Position it to align perfectly with the wall edge for proper Dreamy Room Level 96 access.
Step 4. Place Circular Window and Window
Install the circular window high on the left wall featuring geometric lattice design. Add the window on the upper right wall. These openings bring natural light into Dreamy Room Level 96.
Step 5. Set Up the Decorative Arch in Dreamy Room Level 96
Position the decorative arch forming the distinctive panda ear-shaped roof structure at the top. This signature element defines the exterior silhouette for Dreamy Room Level 96.
Step 6. Build the Stairs Structure
Construct the stairs along the left wall leading to the upper level. These white cushioned steps provide vertical access and storage beneath in Dreamy Room Level 96.
Step 7. Position Main Dining Table Setup
Place the dining table in the center area with the dining chair nearby. This wooden set serves as the primary eating area for Dreamy Room Level 96's panda family.
Step 8. Add Wooden Tables Throughout
Position the wooden table near the dining area, the tea table beside it, and the low table in front. These surfaces hold various items in Dreamy Room Level 96.
Step 9. Install the Desk and Computer Setup in Dreamy Room Level 96
Mount the desk against the upper wall with computer monitor and keyboard on top. Position the desk lamp at the corner for proper workspace lighting in Dreamy Room Level 96.
Step 10. Position All Chair Types
Arrange the rocking chair and wooden chair around tables. Add the small stool and wooden stool near low surfaces for versatile seating in Dreamy Room Level 96.
Step 11. Install Storage Cabinet and Wooden Cabinet
Place the storage cabinet with paneled doors against the right wall. Position the wooden cabinet nearby for additional storage in Dreamy Room Level 96.
Step 12. Add the Refrigerator in Dreamy Room Level 96
Mount the refrigerator along the left wall near the stairs, this light purple appliance keeps food fresh. Essential for any functional kitchen area in Dreamy Room Level 96.
Step 13. Position the Bookshelf
Place the bookshelf on the upper level shelving area against the back wall. This storage unit organizes books and decorative items in Dreamy Room Level 96.
Step 14. Install Wardrobe and Dresser
Position the wardrobe with its characteristic purple-white design on the upper right. Add the dresser beside it for clothing storage in Dreamy Room Level 96.
Step 15. Hang Round Mirror and Square Mirror in Dreamy Room Level 96
Mount the round mirror on the upper right wall near the ceiling. Place the square mirror on the middle right wall reflecting the room's interior in Dreamy Room Level 96.
Step 16. Add Picture Frames for Decoration
Hang multiple picture frames on various walls at eye level. These red-bordered frames display artwork throughout Dreamy Room Level 96.
Step 17. Position All Lighting Fixtures
Install the ceiling light at the room's center top. Add the hanging lamp and wall lamp for ambient lighting in Dreamy Room Level 96.
Step 18. Place Sitting Panda as Central Character in Dreamy Room Level 96
Position the sitting panda wearing a red scarf at the room's center on the checkered rug. This main character anchors the entire Dreamy Room Level 96 scene.
Step 19. Add Baby Panda and Lying Panda
Place the baby panda playing on the floor near the center. Position the lying panda relaxing on the pink rug area in Dreamy Room Level 96.
Step 20. Arrange Tea Set and Teapot
Place the tea set on the tea table surface. Position the teapot nearby with its distinctive green ceramic finish for serving in Dreamy Room Level 96.
Step 21. Add Tea Cups and Dishware in Dreamy Room Level 96
Arrange multiple tea cups on tables and surfaces. Place bowls and plates for dining setup throughout Dreamy Room Level 96.
Step 22. Position Food Display Stand and Food Tray
Place the food display stand on a table surface showcasing treats. Add the food tray nearby for serving items in Dreamy Room Level 96.
Step 23. Arrange All Food Items
Position the bread loaf on the lower table area. Place dumplings, steamed buns, and rice balls on various plates throughout Dreamy Room Level 96.
Step 24. Add Serving Tray for Organization in Dreamy Room Level 96
Place the serving tray on the wooden table holding organized tea items. This bamboo tray keeps everything neat in Dreamy Room Level 96.
Step 25. Position Large Potted Plant
Place the large potted plant in the lower right outdoor area. This substantial greenery adds natural beauty to Dreamy Room Level 96.
Step 26. Add Small Potted Plants and Bamboo Plant
Position multiple small potted plants on shelves and corners. Place the bamboo plant near the dining area bringing nature indoors in Dreamy Room Level 96.
Step 27. Hang the Hanging Plant in Dreamy Room Level 96
Suspend the hanging plant from the ceiling or upper structure with trailing vines. This adds vertical greenery to Dreamy Room Level 96.
Step 28. Arrange Cushions and Pillows
Place the cushion on chairs for comfort. Add the floor cushion on the ground for casual seating. Position the pillow stack near the stairs in Dreamy Room Level 96.
Step 29. Add Throw Pillow and Bean Bag
Place the throw pillow on seating areas. Position the large bean bag in a cozy corner for relaxation in Dreamy Room Level 96.
Step 30. Position Water Features in Dreamy Room Level 96
Place the water basin in the lower left outdoor area. Add the small pool nearby creating a tranquil water element for Dreamy Room Level 96.
Step 31. Add Floor Mat and Bamboo Mat
Lay the floor mat near the entrance area. Position the bamboo mat on the floor for natural texture in Dreamy Room Level 96.
Step 32. Position Storage Box
Place the storage box under surfaces or in corners. This golden box provides organized storage throughout Dreamy Room Level 96.
Step 33. Arrange Vase and Ceramic Jar in Dreamy Room Level 96
Position the vase on the upper shelf. Place the ceramic jar on tables displaying traditional pottery in Dreamy Room Level 96.
Step 34. Add Decorative Pot Elements
Position the decorative pot with traditional patterns on shelves. This green ceramic piece adds cultural authenticity to Dreamy Room Level 96.
Step 35. Position Cat Tree Stand
Place the cat tree stand near the dining area despite being a panda house. This wooden climbing structure adds playful dimension to Dreamy Room Level 96.
Step 36. Add Stone Decoration and Pebbles in Dreamy Room Level 96
Position the stone decoration in the outdoor garden area. Scatter pebbles around the water basin creating natural landscaping in Dreamy Room Level 96.
Step 37. Hang Wall Decoration and Hanging Scroll
Mount the wall decoration on upper walls. Hang the hanging scroll featuring traditional calligraphy artwork in Dreamy Room Level 96.
Step 38. Add Table Cloth for Elegance
Drape the table cloth over the dining table surface. This fabric adds refinement to the eating area in Dreamy Room Level 96.
Step 39. Position Special Decorative Elements in Dreamy Room Level 96
Place the lantern and paper lantern hanging from the ceiling structure. Add the incense burner on a table surface for atmosphere in Dreamy Room Level 96.
Step 40. Complete with Exterior Elements
Position the exterior walls forming the room boundaries. Add the panda ears decoration and roof decoration at the top. Place the fence and outdoor decorations completing the exterior design of Dreamy Room Level 96.
Notes and Practical Tips
Important Notes
- The upper level shelving area can be easily overlooked; ensure all items like the bookshelf, wardrobe, and dresser are properly placed before moving to floor items in Dreamy Room Level 96
- Multiple similar items like tea cups, bowls, and plates need careful distribution across different table surfaces to avoid clustering mistakes
- The stairway area conceals storage space underneath; don't forget to utilize this hidden zone for smaller decorative items
- Plant placement requires attention to vertical spacing; hanging plants must be positioned before placing tall furniture that might block placement in Dreamy Room Level 96
- The circular window and decorative arch create the distinctive panda face exterior; misalignment of these elements affects the overall aesthetic
Practical Tips
- Start with structural elements (walls, doors, windows) before adding any furniture to establish proper boundaries for Dreamy Room Level 96 layout
- Place large furniture first (refrigerator, wardrobe, dining table) to define activity zones, then fill in smaller items around these anchor points
- When positioning the three pandas, place the sitting panda first as the central character, then arrange baby and lying pandas relative to this focal point
- For densely packed areas like the tea service setup, place larger items (teapot, food display stand) first, then nestle smaller items (cups, plates) around them in Dreamy Room Level 96
- Use the checkered rug pattern as a grid reference for aligning furniture; the squares provide visual guides for achieving balanced spacing
- Items on the upper level have limited space; position them from back to front to avoid placement conflicts and ensure proper layering in Dreamy Room Level 96