Dreamy Room Level 582
Level 582 guide walkthrough, helping players solve puzzles and explore the wonderful world of Dreamy Room.
Dreamy Room Level 582 Walkthrough Guide
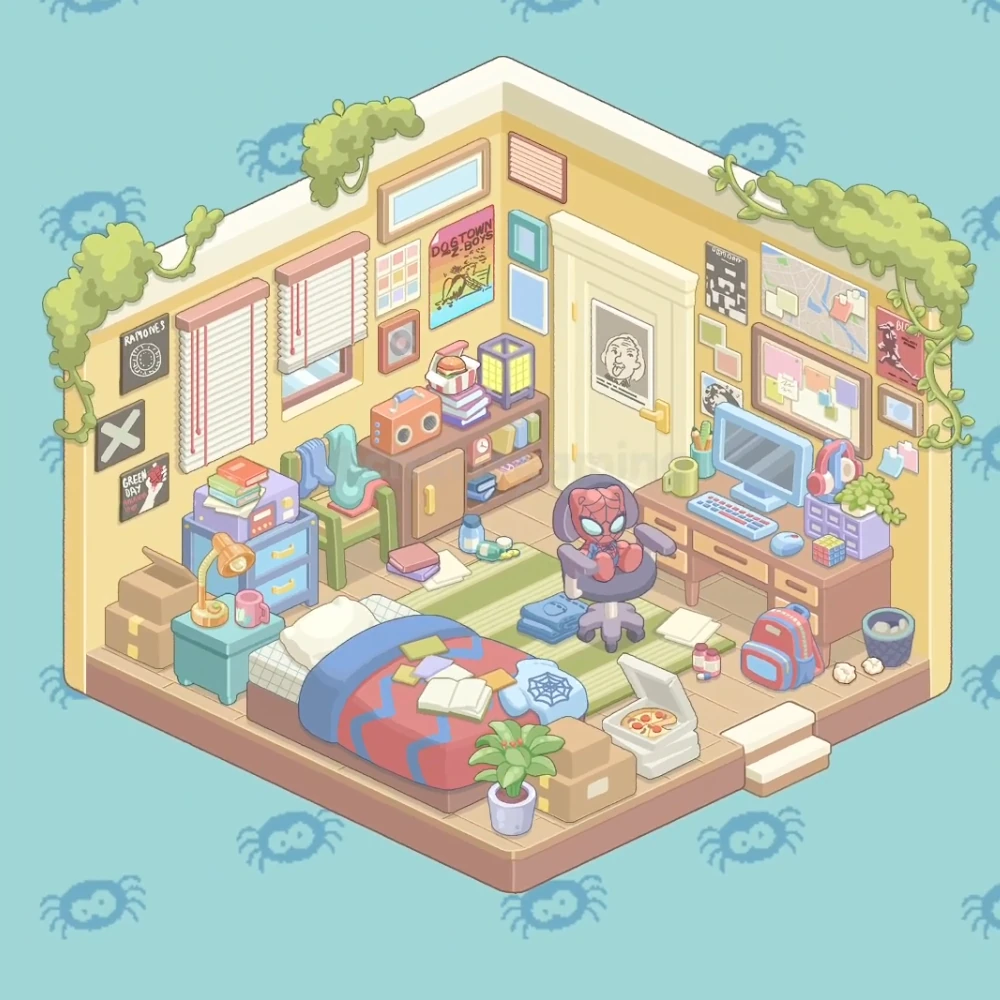
Dreamy Room Level 582 is a compact yellow bedroom filled with red-and-blue superhero details. The bed stretches across the front-left floor, storage lines the left wall, and the computer desk occupies the right wall. A purple swivel chair with a masked plush figure marks the center of the study area.
Step 1. Set the bed across the front-left area
Place the red-and-blue bed with its pillow at the left end beneath the windows. The white sheet shows beside the pillow, and the red cover with blue zigzag bands extends toward the room's front center.
Arrange the bed books and spiderweb shirt on the cover. The open book lies near the middle among the colored papers, while the pale blue shirt with the web design rests near the foot on the right.
Step 2. Add the bedside cabinet and lamp
Put the turquoise bedside cabinet beside the bed's head, near the front-left wall. It stands between the pillow and the cardboard boxes at the outer corner.
Set the yellow lamp and pink mug on top. The curved lamp rises from the cabinet's left side, and the mug sits to its right, close to the pillow.
Step 3. Fill the wall beneath the windows
Fit the two windows and white blinds into the left wall, with pink valances above them and red pull cords hanging down. The longer blind is on the left; the shorter window sits nearer the back corner.
Place the blue drawer unit under the left window area, behind the bedside cabinet. The lavender electronic unit and stacked books sit on its top. Put the green clothes chair to its right, between the drawers and the brown cabinet, with the blue garments and mint footwear arranged over the chair.
Step 4. Complete the storage cabinet
Set the brown storage cabinet against the back-left wall, immediately left of the door. Its left section has a closed door; the open right shelves hold books, a small clock, and other containers.
Arrange the orange radio and cabinet-top objects above it. The radio occupies the left side, the stack of books and striped food container sit in the middle, and the square yellow-and-purple lantern stands nearest the doorway.
Step 5. Decorate the door and surrounding walls
Position the cream door and portrait in the back wall, with the black-and-white portrait centered on the door panel and the gold handle on the right.
Distribute the wall posters and small frames around the windows and doorway. The black posters cluster along the far-left wall; the colorful poster and smaller frames fill the area above the storage cabinet. On the right wall, the map sits above the large noticeboard, with the red poster and small blue frame toward the outer edge. The small vent belongs high beside the door.
Step 6. Build the computer desk along the right wall
Place the long computer desk beneath the noticeboard. Its drawers face into the room, and the right end stops near the wastebasket.
Set the monitor keyboard and mouse across the desktop: the blue monitor stands in the center, the keyboard lies directly in front, and the mouse sits to its right. Keep the green mug and pencil cup at the left end near the door.
Step 7. Finish the desk accessories and swivel chair
Put the headphones and desk organizer on the desk's right side. The pink headphones hang beside the monitor above the small purple drawer organizer; a green plant sits on top, and the colored puzzle cube rests in front.
Position the purple chair and superhero plush in front of the keyboard. The red-and-blue masked figure sits facing the viewer, with its feet over the chair seat and the wheeled base on the rug.
Step 8. Place the rug and loose belongings
Spread the green rug and scattered belongings between the bed and the desk. The pale stripes run along the rug's length. Folded blue clothing lies to the chair's left; books, loose papers, and small drink containers sit around the rug's edges.
Stand the red-and-blue backpack on the floor in front of the desk's right drawers. The two small pink-topped containers sit to its left, nearer the rug and the bed's foot.
Step 9. Arrange the clutter near the entrance
Put the wastebasket and crumpled paper against the far-right wall beside the desk. Two loose paper balls sit on the floor in front of the basket.
Set the open pizza box near the front opening, to the right of the bed's foot. Its raised lid leans toward the desk, with the pizza visible in the lower half. The pale entrance steps project outward just to its right.
Step 10. Add the boxes, plants, and vines
Place the cardboard boxes in two groups: stacked boxes at the far-left corner behind the bedside cabinet, and a closed box at the front beside the bed's foot and pizza box.
Finish the potted plants and trailing vines. The broad-leaf plant in the lavender pot stands at the front, directly left of the closed box. The smaller desk plant stays above the organizer, while the vines drape over the wall tops and curl down the outer corners.
Final placement check
The blue drawer unit belongs under the windows, the brown cabinet belongs beside the door, and the computer setup stays beneath the right-hand noticeboard. Keep the pizza box near the steps, the backpack below the desk, and the spiderweb shirt on the bed.