Dreamy Room Level 602
Level 602 guide walkthrough, helping players solve puzzles and explore the wonderful world of Dreamy Room.
Dreamy Room Level 602 Walkthrough Guide
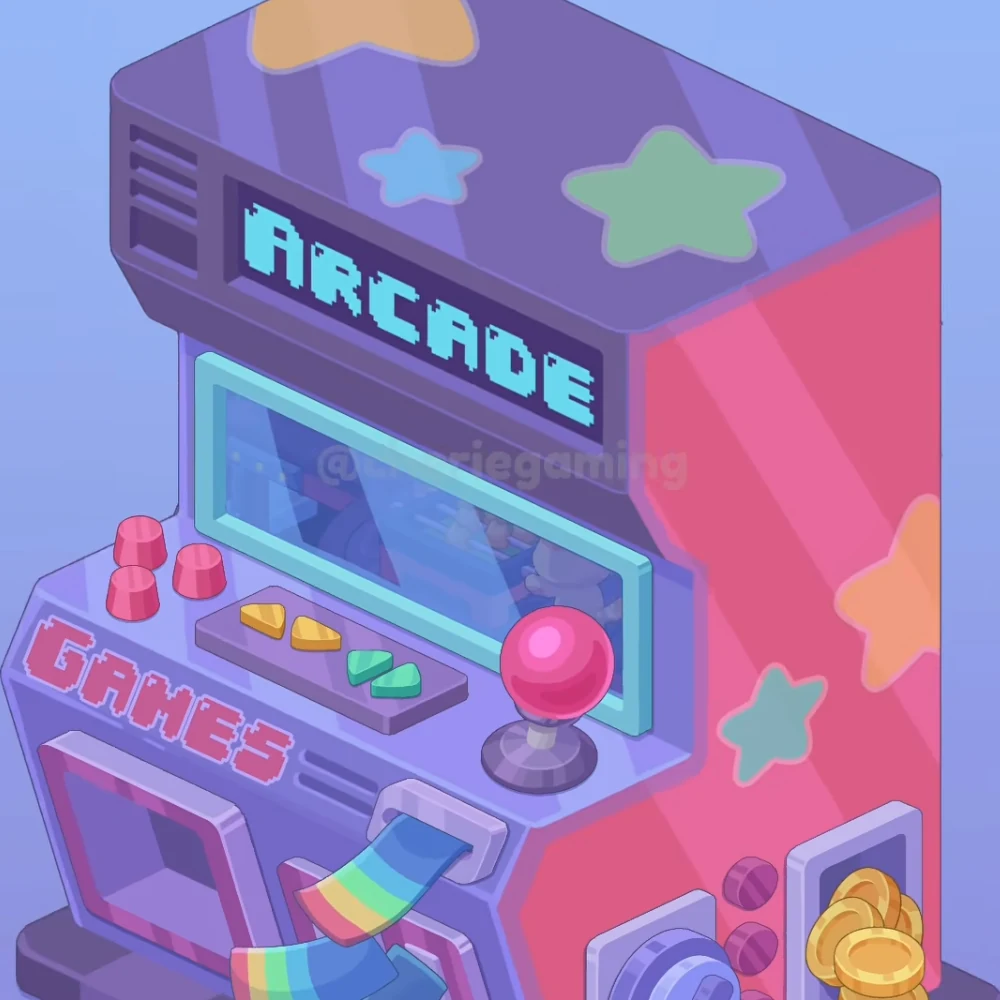
Dreamy Room Level 602 builds a large purple-and-pink arcade cabinet. The upper housing carries pastel stars and an ARCADE sign, the middle holds the screen and controls, and the lower front contains ticket and coin details. Directions refer to the cabinet as seen in the image.
Step 1. Match the cabinet panels
Position the purple cabinet and pink side panel with the control deck projecting toward the lower left. The broad pink side rises on the right, while the purple front supports the screen and lower openings.
The top housing overhangs the screen. Its sloping purple surface is distinct from the flatter control deck below.
Step 2. Decorate the top with stars
Fit the pastel stars on the top panel across the sloping upper surface. The small blue star sits toward the front-left portion, the larger mint star sits to its right, and the orange star is higher toward the back.
Match these shapes to the top panel rather than the pink side wall, which has its own separate stars.
Step 3. Fit the arcade header
Place the cyan arcade sign across the dark inset below the top panel. The pixel-style letters run along the cabinet's upper front, immediately above the screen.
Fit the upper left vent into the purple panel at the sign's left end. Its horizontal slots sit outside the black lettering area.
Step 4. Frame the display
Position the cyan screen frame and blue display directly beneath the sign. The thick light-blue border surrounds the wide reflective screen, with its lower edge just above the controls.
The screen occupies the recessed middle of the cabinet. Keep its right edge behind the joystick, where the pink ball overlaps it from the viewer's angle.
Step 5. Group the pink buttons on the left
Arrange the on the control deck's far-left side. Two sit farther back, and the third sits nearer the front edge, forming a small triangular group.
These short pink buttons belong beside the screen's lower-left corner. They are separate from the tall ball-topped control at the opposite end of the deck.
Step 6. Place the central arrow buttons
Set the in the middle of the control deck, below the screen. Its long rectangular base angles in the same direction as the cabinet's front edge.
Put the on this plate. The two yellow controls form the left pair, and the two green controls form the right pair.
Step 7. Add the pink joystick
Position the pink ball joystick and round base at the control deck's right end. The large glossy ball rises on a short pale shaft above the circular purple base.
Its base sits beyond the colored arrow plate, close to the cabinet's pink side panel. The ball partly overlaps the screen's lower-right area in the completed view.
Step 8. Finish the front lettering and lower opening
Attach the games lettering and front vent to the sloping purple face beneath the controls. GAMES runs across the left portion, with the short dark vent slots immediately to its right.
Fit the pink trimmed lower opening below the lettering. Its large recessed purple center sits toward the cabinet's lower-left corner, bordered by the thick pink-and-lavender frame.
Step 9. Position the rainbow tickets
Place the ticket slot and rainbow strips on the lower front, right of the large opening. One multicolored strip curves outward from the narrow blue slot beneath the control deck.
The other visible rainbow section bends across the lower front. Keep both colored bands in the ticket area rather than on the screen or button plate.
Step 10. Complete the side stars and coin fittings
Add the orange and mint side stars to the broad pink right panel. The large orange star sits higher near the outer edge, and the smaller mint star sits below and to its left.
Fit the into the lower-right part of the cabinet. The large blue-purple circular fitting sits left of the small round pink fittings.
Place the gold coins and purple coin recess at the far-right lower corner. The gold discs overlap inside the pale-edged purple recess, beside the small pink fittings.
Final placement check
The three short pink buttons stay at the left of the deck, the yellow and green arrows share the center plate, and the tall joystick occupies the right end. Keep the rainbow strips below the controls and the gold coins at the cabinet's lower-right side.