Dreamy Room Level 624
Level 624 guide walkthrough, helping players solve puzzles and explore the wonderful world of Dreamy Room.
Dreamy Room Level 624 Walkthrough Guide
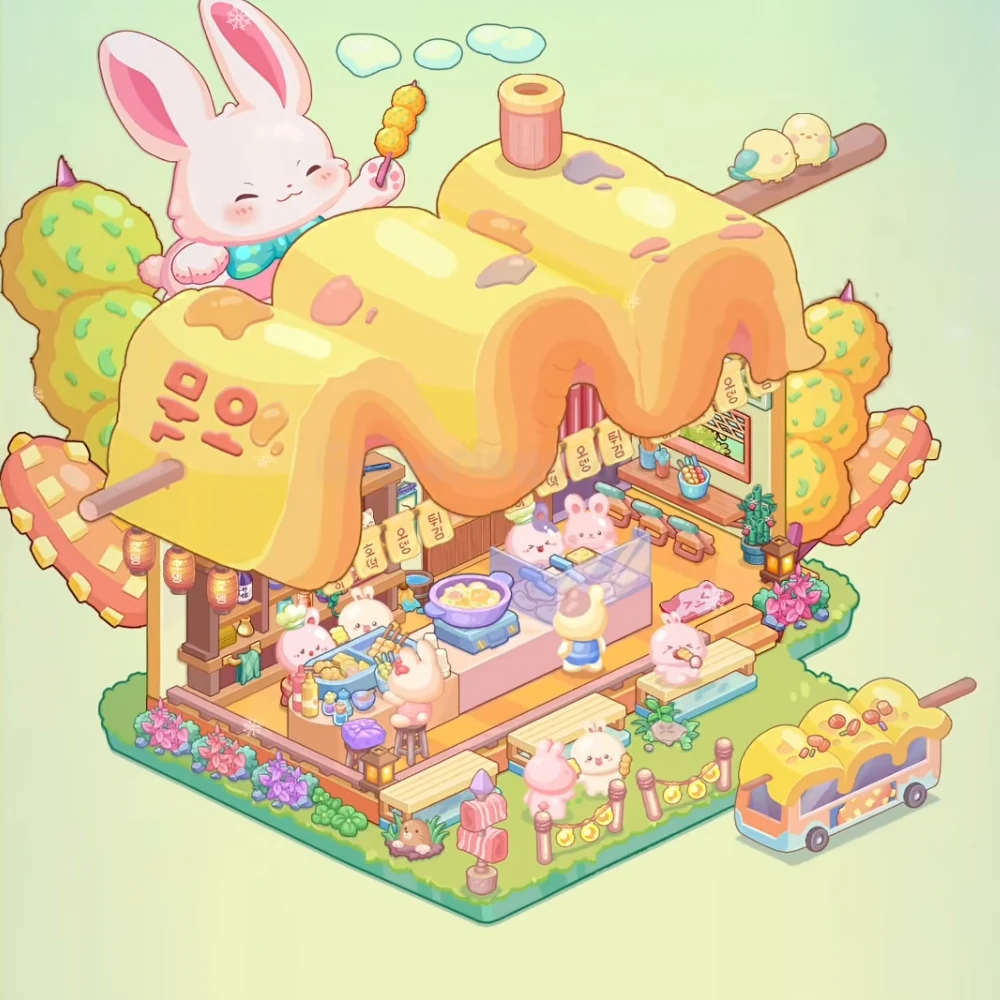
Dreamy Room Level 624 is a cheerful open-front snack shop beneath an oversized yellow skewer-shaped roof. The cooking counter spans the middle, with stools inside and benches outside. Directions follow the image as viewed.
Step 1. Shape the snack shop roof
Fit the yellow wavy roof and wooden skewer above the wooden shop. Its three rounded dips extend across the front, and the brown stick projects from both sides.
Add the pink chimney and colorful roof toppings across the yellow surface. The short cylindrical chimney sits near the rear center, with small pink, tan, and purple accents scattered over the roof.
Step 2. Decorate behind the roof
Position the giant rabbit with snack skewer behind the upper-left roof edge. Its long ears rise above the shop, and its raised paw holds three round golden snacks.
Arrange the round snack trees and two small birds behind the side walls. The yellow-green trees frame both ends, while the two birds perch together on the stick projecting from the upper right.
Step 3. Finish the shop frontage
Place the below the roof. The red lanterns hang beneath the left eave, and the pale menu strips follow the open counter frontage and upper-right wall.
Fit the rear shelves jars and small containers against the left interior wall. Keep these narrow storage shelves behind the cooks and countertop.
Step 4. Arrange the left food station
Set the blue food trays and condiment bottles on the counter's left section. The trays hold pale golden food and upright skewers, with the small multicolored squeeze bottles lining the front-left corner.
Position the rabbit cooks behind the trays behind this food station. Their pale heads peek above the counter, beneath the hanging menus.
Step 5. Complete the central cooking counter
Place the purple pot and blue burner in the middle of the long pink counter. The round pot holds pale yellow pieces, with its handles extending to either side over the blue base.
Set the glass food display and two cooks immediately to the right. The transparent case occupies the right countertop, with the pale animal workers visible behind it.
Step 6. Fill the dining places
Arrange the front stools and seated customers along the counter's outer edge. The large pale customer sits on the pink stool near the left trays; the blue-clad figure stands in front of the glass section.
Position the beneath the framed food picture. The narrow shelf holds cups and upright utensils, with several short stools below.
Step 7. Add the outdoor benches
Set the front and right wooden benches outside the shop. The long front bench runs across the lower-left edge, while the right-side benches sit beside the pink animal customer.
Place the pink customers and cream rabbit around the outdoor seating. One pink figure sits near the right bench, while another faces the cream rabbit near the front-center path.
Add the corner lanterns cactus and flower beds around the wooden deck. Pink and purple flowers border the left edge, and a tall cactus and glowing lantern stand near the right corner.
Step 8. Complete the front garden and bus
Arrange the pink posts yellow garland and striped sign across the front garden. The garland hangs between the short posts, with the pink striped sign farther left near the bench.
Park the small yellow roof snack bus outside the lower-right garden edge. Its wavy yellow roof echoes the shop canopy, with orange food shapes visible on top.
Final placement check
Keep the rabbit sign behind the left roof, the food trays on the left counter, the purple cooking pot in the center, and the glass display on the right. Benches and customers surround the open frontage, with the small bus outside the garden at the lower right.