Dreamy Room Level 604
Level 604 guide walkthrough, helping players solve puzzles and explore the wonderful world of Dreamy Room.
Dreamy Room Level 604 Walkthrough Guide
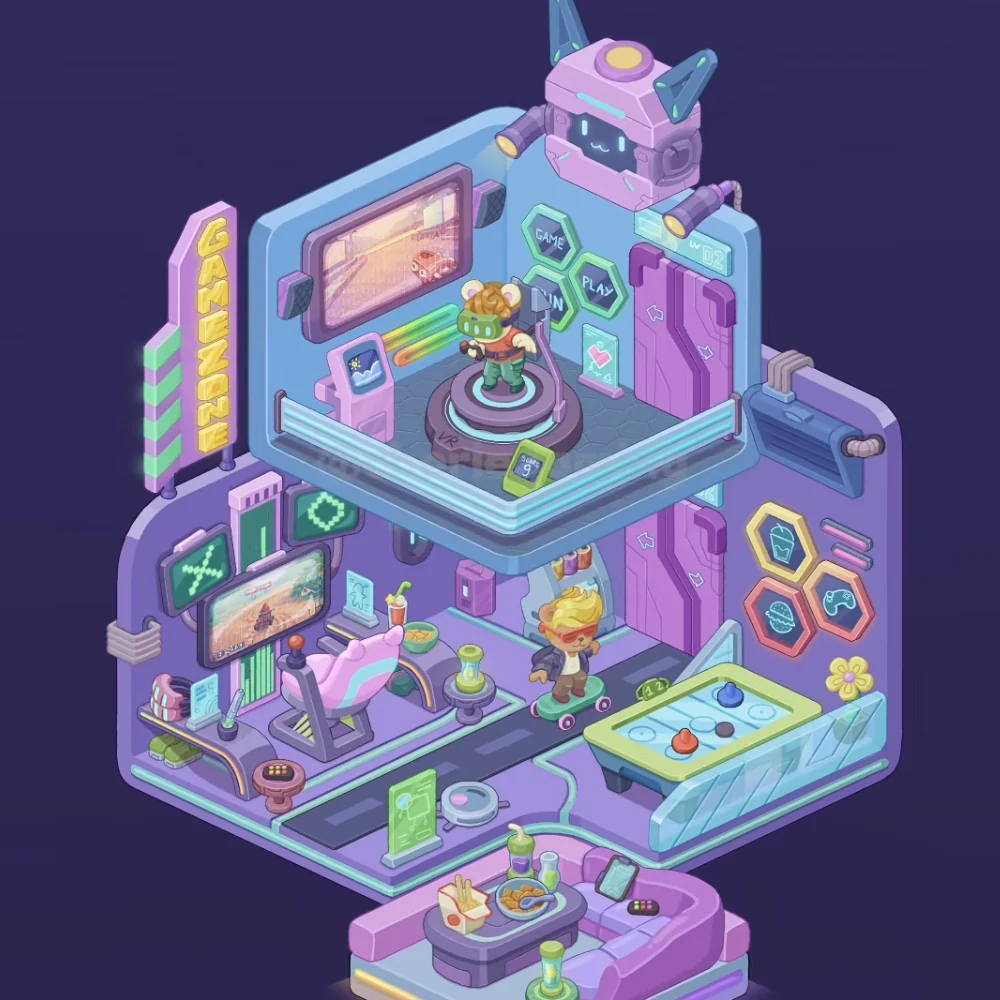
Dreamy Room Level 604 is a two-floor neon gaming lounge. The upper balcony holds a virtual-reality station, the lower-left corner contains a racing setup, and an air hockey table fills the lower right. A curved snack booth projects from the front. Left and right refer to the image as viewed.
Step 1. Frame the two floors
Fit the blue upper balcony and cyan railings above the purple ground floor. The bright double rails follow the balcony's exposed front and right edges, leaving the back walls for the screen and door.
Place the vertical gamezone sign along the building's outer-left side. Its yellow letters sit on a tall purple backing beside the mint-striped upright panel.
Step 2. Add the robot above the upper door
Position the pink cat robot topper over the upper-right wall. Its dark face has glowing cyan features, with two tall pointed ears and a yellow round button on top.
Attach the robot spotlights and side vent beside it. The short purple lights point outward from either side of the robot, while the blue rectangular vent sits outside the building farther down on the right, connected by pale pipes.
Step 3. Fit the upstairs screen
Mount the upper wide screen and speakers on the upper-left wall. Small purple speakers sit at its sides, and the screen shows a bright game scene.
Place the colored light bars and pink terminal below it. The horizontal yellow-green bars run along the wall, while the freestanding pink terminal stands near the balcony's left-front corner.
Step 4. Arrange the upper doorway and wall signs
Fit the upper purple door and number panel into the upstairs right wall. The little illuminated 02 panel sits above the tall segmented door.
Group the hexagonal game signs and heart panel on the wall to the door's left. The green hexagons carry short game words, and the narrow cyan heart panel stands lower beside the doorway.
Step 5. Center the virtual reality station
Set the round vr platform and headset player in the upper floor's center. The green-clad player stands on the raised circular pad, facing toward the left-front side, with a green visor over its eyes.
Position the vr support pole and score sign at the station's edges. The tall gray support rises to the player's right with its line curving overhead. The small green score board rests against the platform's near edge, inside the railing.
Step 6. Build the lower racing corner
Mount the racing screen and green pixel panels along the lower-left wall. The wide racing display hangs below the smaller green graphics, with vertical green light strips underneath.
Place the pink racing seat and controls directly in front. The high-backed pink chair sits on a gray frame facing the screen. Its orange-topped control stands beside the seat, and the dark green control unit sits toward the wall.
Step 7. Fill the gaming desk and nearby stands
Arrange the headphones drink and desk accessories across the low shelf around the racing area. Pink headphones and a pale blue panel occupy the left end. A red drink with a green straw and a snack bowl sit on the higher section farther right.
Put the glowing cylinders and round controller near the racing station. One green-yellow cylinder stands on the small purple pedestal beside the road; the round brown controller with colored buttons sits near the front-left edge.
Step 8. Complete the central walkway
Fit the lower door and snack display under the balcony on the right back wall. The second purple door aligns below the upstairs one. The narrow snack display, with colorful containers above a yellow food tray, sits immediately to its left.
Place the skateboard rider on the central dark walkway in front of this display. The blond figure with the orange visor stands on a green board with purple wheels, between the racing area and air hockey table.
Step 9. Add the air hockey table
Set the air hockey table and scoreboard on the lower-right side. Its pale-blue playing surface sits inside a green rim, with the small green score panel along the far side.
Place the red and blue strikers and dark puck on the table. The red striker sits near the front-left end, the blue striker farther back, and the dark puck rests between them.
Step 10. Decorate the right wall and front path
Attach the three hexagonal game icons and flower to the right wall above the air hockey area. The drink, burger, and controller symbols form a compact group, with the yellow flower decoration below.
Fit the glass side barrier and neon floor lines along the hockey area's exposed edge and around the ground-floor walkway. The mint lines bend around the room's zones, and the pale glass panels run outside the table.
Set the green standing panel and round cleaner near the front center, below the racing area. The little round blue cleaner sits to the panel's right, beside the dark path.
Step 11. Furnish the projecting snack booth
Place the curved purple sofa and snack table on the platform projecting from the front of the lounge. The sofa wraps around the table, with its curved back facing outward.
Arrange the fries drinks tablet and small controller on and around the booth's table. The fries carton and food plate sit on the left, drinks stand farther back, and the tablet leans beside the right seat near the small black controller.
Final placement check
Keep the VR player and circular platform upstairs. The racing chair faces the lower-left screen, the skateboard rider occupies the center path, and the air hockey table stays behind the right glass barrier. The curved sofa belongs on the separate front projection.