Dreamy Room Level 617
Level 617 guide walkthrough, helping players solve puzzles and explore the wonderful world of Dreamy Room.
Dreamy Room Level 617 Walkthrough Guide
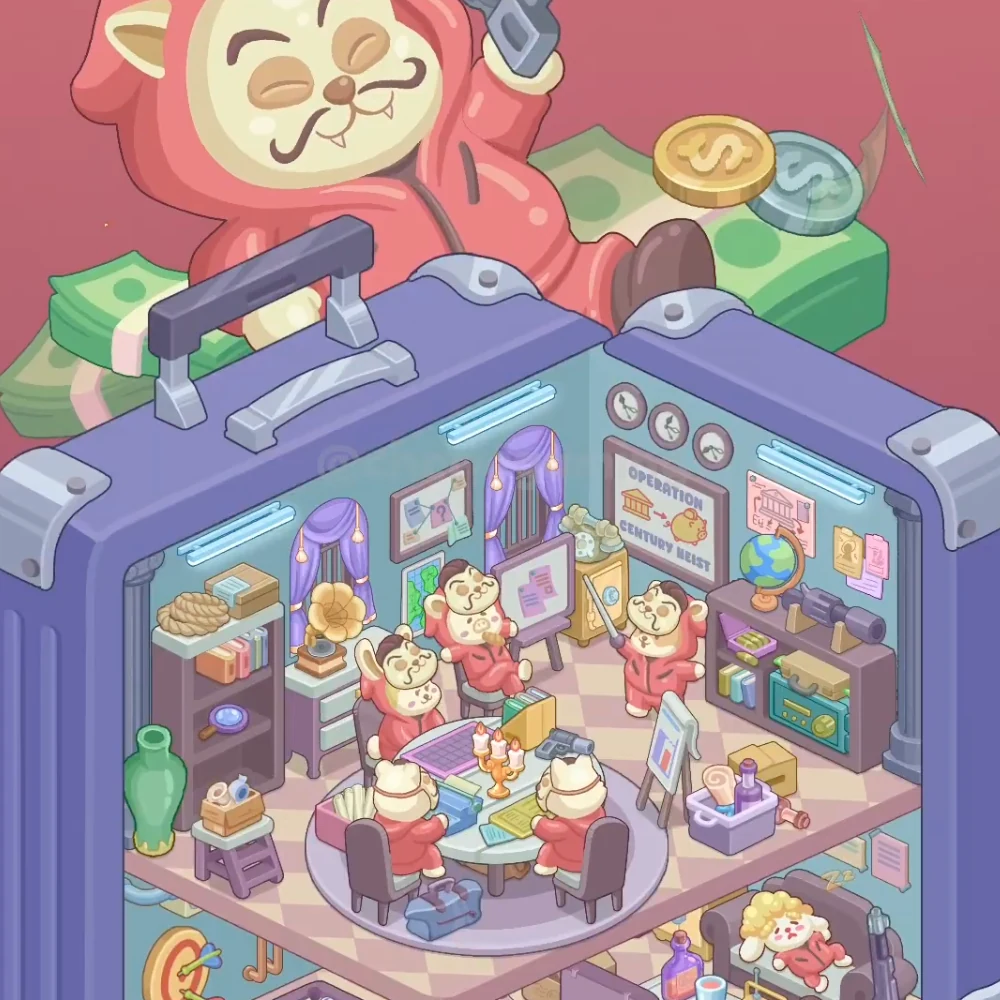
Dreamy Room Level 617 places a red-suited cat team inside a purple suitcase headquarters. The main planning table fills the upper compartment, with display boards behind and beside it, shelves along both walls, and part of a lounge below. Directions follow the image as viewed.
Step 1. Frame the suitcase headquarters
Fit the purple suitcase frame handle and metal corners around the room. The long dark handle sits above the left wall, supported by two pale metal brackets, while the rounded silver plates cap the case's upper corners.
Position the large red cat mascot and money backdrop behind the case. The smiling hooded figure rises above the walls, surrounded by green note bundles and oversized gold and silver coins.
Step 2. Add the windows and wall lights
Fit the two barred windows and purple curtains into the upper room's left wall. The lavender drapes gather at the sides of each narrow barred opening, with gold tassels near their ends.
Mount the three cyan wall lights high along the walls. Two run above the left windows, and another sits on the right wall above the bank poster and bookshelf.
Step 3. Arrange the left storage corner
Set the tall left bookcase rope and boxes against the far-left wall. The rope coil and pale cardboard boxes occupy its top, books fill the middle section, and the blue round ornament rests on the lower shelf.
Place the large green vase and tape box stool in front of this corner. The vase stands beside the bookcase, while the little box of round tape rolls sits on the pale-topped purple stool nearer the front edge.
Step 4. Set the gramophone and small wall pictures
Position the gold gramophone and drawer cabinet below the left window. The broad gold horn faces into the room, above the short pale drawer unit.
Hang the framed paper display and small color picture between and below the two windows. The larger paper-filled frame sits higher, while the smaller blue-and-green picture appears behind the seated team member nearer the corner.
Step 5. Arrange the rear planning display
Place the purple planning board and rear seated cat near the room's back center. The board stands on angled legs behind the table, with the smiling red-suited cat seated immediately to its left.
Set the gold safe and money bags in the back-right corner, behind the standing cat. The pale green bags rest on the safe's top, above its round front fitting and gold-edged door.
Step 6. Decorate the right wall
Hang the three clocks and operation poster high on the right wall. The three small clocks form a row above the framed OPERATION CENTURY HEIST poster.
Arrange the bank picture and colored wall notes to the poster's right. The larger pink bank illustration sits below the cyan light, with the smaller yellow and pink notes farther toward the outside edge.
Step 7. Fill the right display shelf
Set the right bookcase books and green radio along the right wall. Books occupy the left compartments, while the broad green radio and tan storage box fill the lower-right section.
Place the globe and dark telescope on top. The blue-green globe stands at the shelf's left end, and the long telescope rests horizontally on its two pale supports farther right.
Step 8. Arrange the meeting table and cats
Position the oval meeting table purple rug and chairs in the room's center. The chairs surround the pale tabletop, with the broad lavender rug following its curved outer edge.
Place the red suited cat team and pointer around it. Two cats sit with their backs toward the front edge, another sits at the left side, and the rear cat stays by the board. The standing cat holds the long pointer beside the safe on the right.
Step 9. Fill the tabletop and foreground boards
Arrange the purple laptop folders and gold candelabra on the meeting table. The open laptop occupies the left side, the yellow folders stand nearer the rear center, and the candleholder sits between the papers and screens.
Keep the table papers and dark binoculars across the near and right sides of the tabletop. The pale blue and yellow sheets lie flat, while the dark binoculars sit near the upright folders.
Set the small chart easel and lavender supply bin near the room's front-right edge. The chart board faces the table, and the bin of rolled items and the purple bottle sits beside the tan box farther right.
Step 10. Finish the floor and lower lounge edge
Place the blue duffel bag on the floor beside the table's front-left chair, near the rug's outer curve.
Keep the lower lounge sleeping cat and dartboard in the compartment beneath the meeting platform. The blond sleeping cat lies in the purple chair at the right, while the round dartboard sits on the lower-left wall. These belong below the planning room rather than beside the upper meeting table.
Final placement check
The gramophone and tall bookcase stay on the left, while the safe, globe, telescope, and green radio belong toward the right. Keep the standing pointer-holding cat beside the safe, the chart easel near the front-right edge, and the blue duffel beside the front-left chair.