Dreamy Room Level 608
Level 608 guide walkthrough, helping players solve puzzles and explore the wonderful world of Dreamy Room.
Dreamy Room Level 608 Walkthrough Guide
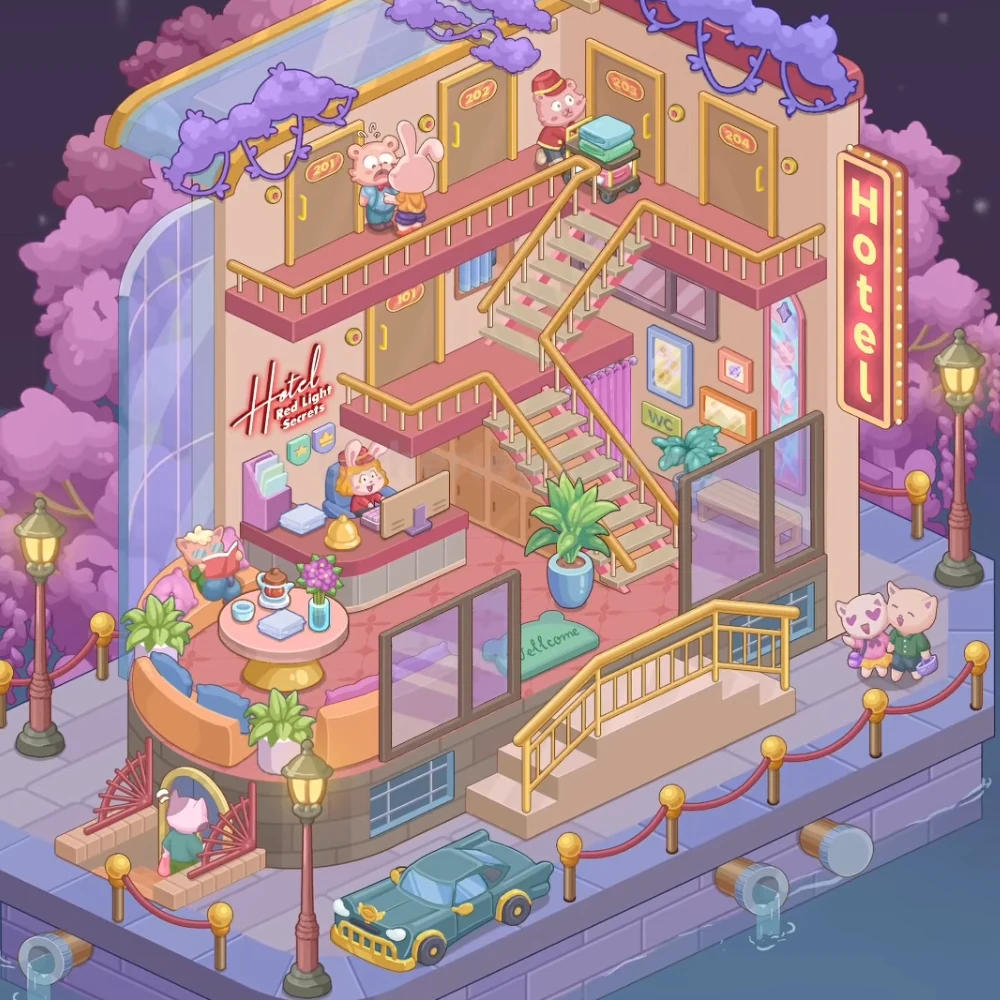
Dreamy Room Level 608 creates a tall canalside hotel with a cutaway lobby and upper guest corridor. Numbered doors line the top floor, two flights of stairs descend through the middle, and a rounded lounge faces the waterfront. Left and right follow the image as viewed.
Step 1. Frame the hotel exterior
Position the tall curved glass wall and purple trees along the hotel's left side. The high blue-lavender glass rises behind the rounded lounge, with purple foliage surrounding the building outside.
Arrange the purple roof vines and vertical hotel sign across the upper edges and right exterior wall. The gold-edged red sign hangs vertically beside the top corridor, with yellow letters stacked down its face.
Step 2. Match the upper room doors
Fit the upper doors 201 through 204 along the top corridor. Room 201 sits at the far left, 202 occupies the wall beside it, 203 sits near the inner corner, and 204 closes the right side.
The doors share gold trim and small round wall fittings. Follow their visible number plates to keep the two walls' door positions distinct.
Step 3. Add the upper guests and porter
Place the two guests at room 201 together near the left end of the corridor. The pale animal in blue faces the pink rabbit, whose back is toward the viewer.
Set the red uniformed porter and luggage trolley beside room 203. The porter stands left of the cart, which carries folded blue-and-green items above the stacked luggage.
Step 4. Fit the corridor rails and staircase
Run the gold corridor railings along the exposed top-floor edges. Their upper bars follow the left and right corridors, with the opening for the stairs between them.
Fit the two flight staircase and middle landing through the building's center. The upper flight connects the guest corridor to the small left landing; the lower flight continues down to the lobby on the right. Gold handrails trace both flights.
Step 5. Decorate the middle level
Place the room 101 door and blue curtain above the lobby's left side. The numbered door sits behind the middle landing's railing, with the narrow blue curtain visible near the stairs.
Arrange the framed wall pictures and wc sign on the tall wall to the staircase's right. The framed prints sit beneath the broad upper window, and the small WC sign hangs lower near the greenery.
Step 6. Build the reception counter
Set the red topped reception desk and monitor across the back-left part of the lobby. The wide beige monitor faces the blue chair, with the desk's pale front panels facing the open lounge.
Position the rabbit receptionist and gold service bell behind and on the counter. The yellow-haired rabbit sits at the monitor in a red uniform and cap. The large gold bell rests near the desk's left-front corner.
Step 7. Complete the reception wall and storage
Place the file holder paper stack and red wall logo beside and above the counter's left side. The tall pink file holder contains pale folders, the blue paper stack rests below, and the red script logo glows on the wall above.
Fit the wooden cabinets and pink curtain beneath and behind the central stairs. The low tan cupboards fill the back wall behind the receptionist; the pink curtain hangs farther right under the landing.
Step 8. Arrange the curved lobby lounge
Position the orange curved sofas and reading guest around the hotel's rounded front-left corner. Blue and purple cushions sit inside the curved seats, with the guest holding a pink book at the back-left end.
Set the round pink table tea set and flower vase in the middle of this seating area. The brown teapot and pale cups sit beside the paper stack, and the tall blue vase of purple flowers occupies the table's right side.
Place the lounge plants and large blue floor pot beside the sofa ends and stair base. The largest broad-leaf plant stands in the blue pot immediately left of the lower staircase's bottom rail.
Step 9. Finish the lobby openings and entrance steps
Fit the brown glass panels and welcome mat along the lobby's open front and right edge. The paired rectangular panes border the lounge at the front, while the taller right panel stands beside the staircase. The green Welcome mat lies inside the front opening.
Set the cream front stairs and gold handrails against the building's front-right side. The broad steps descend toward the waterfront pavement, with the curved gold rail running along their outside.
Step 10. Place the street characters and vintage car
Position the green vintage car on the pavement in front of the hotel. Its gold grille and front bumper point toward the lower left, and the yellow-rimmed wheels sit parallel to the canal edge.
Place the two pavement guests and small side entrance at opposite sides of the building. The pair of dressed-up animals stand to the right of the main steps. The smaller guest in green stands at the oval gold-trimmed entrance below the lounge, between the short red railings.
Step 11. Complete the waterfront edge
Arrange the street lamps and red rope barriers along the outer walkway. The tall old-fashioned lamps rise beside the hotel and near the car; the red ropes link the short gold-topped posts along the water.
Fit the canal wall and drain pipes beneath the pavement's outer edge. The round gray outlets project from the wall toward the blue water, with visible water streams falling from some of them.
Final placement check
Rooms 201–204 stay on the upper corridor, and room 101 sits by the middle landing. The porter belongs beside the luggage cart upstairs, while the receptionist remains behind the lobby counter. Keep the vintage car on the waterfront pavement below the main entrance steps.